P3D Help Index
How To ...
Commands
File menu
Edit menu
Window menu
Help menu
Rendering Options
Architecture
Design
Known Problems
Future Enhancements
P3D scene files contain global scene definitions.
Scene file names are of the form filename.p3d,
and contain the following sections:
| Camera | Specify camera position and orientation |
| Frustum | Specify the view frustum. |
| Light | Specify light location, intensity, and color. |
| Ambient light | Specify the ambient light value of the scene. |
| Objects | Specify the objects contained in a scene and indicate transformations for each. |
| Sample | A sample file containing a cube and a cylinder. |
White space can appear anywhere, but there is no
comment character.
P3D object files define 3D objects that can be included
in scene files. This level of indirection makes it easier to compose
complex scenes by aggregating and transforming a small number
of objects. Object file names are of the form filename.obj,
and contain the following sections:
| Vertex list | Specify a list of vertices for the object. |
| Surface count | Specify the number of surfaces on the object (and in the surface list). |
| Surface list | Specify the list of surfaces, in terms of polygons, that make up the object. Polygons are specified in terms of vertices in the vertex list. |
| Sample | A sample file containing a cube. |
White space can appear anywhere, but there is no
comment character.
The View menu offers the following commands:
| Phong | Renders the 3D model as solid objects using Phong shading. |
| Gouraud | Renders the 3D model as solid objects using Gouraud shading. |
| Wireframe | Renders the 3D model at wireframe objects. |
| Do Culling | Toggles culling of backfacing polygons in wireframe objects. By default, no culling is performed when Wireframe rendering is selected. |
The Options menu offers the following commands:
| Camera | Displays a dialog box in which you can position the camera. |
| Frustum | Displays a dialog box that allows you to control shape and location of the view frustum. |
| Ambience | Displays a dialog box in which you set the ambient light of the scene. Only affects non-wireframe rendering |
| Light | Displays a dialog box in which you position the direction of the light and set the intensity. |
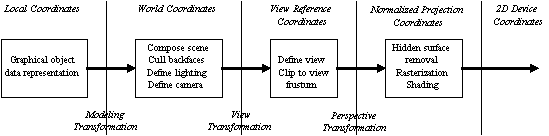
P3D implements the standard graphics pipeline where
a data representation is transformed in various ways until it
is in a form suitable for rendering. This pipeline is shown below:
P3D uses the Windows Multiple Document Interface (MDI) architecture. This allows the user to have multiple documents, possibly of different types, open at the same time. P3D only supports one document type, a scene, but several scene documents can be open at once.
In the Microsoft Foundation Class library, CDocument
derived classes handle I/O and data management; CView
derived classes are responsible for displaying data controlled
by the CDocument classes. P3D provides
four views on the data: a tree view of the data, a wireframe rendered
view, a solid rendered view using Gouraud shading, and a solid
rendered view using Phong shading. The class relationships for
windowing are shown below:
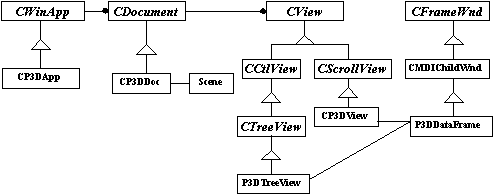
The P3D classes are described below:
| CP3DApp | Top-level application class; required by MFC. Contains CDocument. |
| CP3DDoc | Manages P3D documents: opening, closing, saving, etc. |
| Scene | Contains P3D in-memory graphics data representation. |
| P3DTreeView | Displays a tree control for traversing and editing the P3D graphics data representation. |
| CP3DView | Displays graphical rendering of the P3D graphics representation. Either wireframe or a solid rendering is displayed depending on user selected parameters. |
| P3DDataFrame | Frame containing a split window of P3DTreeView and CP3DView windows.
|
P3D is designed for flexibility: alternative implementations can be easily plugged into the graphics pipeline. The data representation is static, but the reader and the renderer can be changed to support different file formats and different renders or rendering algorithms. The high level design is depicted in the following diagram:
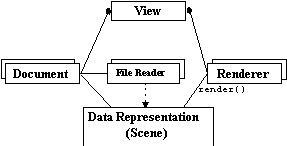
| Document | Controls P3D documents. |
| View | Displays P3D data. Different views show the data in different ways (e.g., tree data or wireframe rendering). A view may do the drawing as in the case of the Tree representation, or it may delegate the task to a renderer as in the case of the wireframe and the solid representations. |
| File Reader | Reads a particular format of graphics data file (e.g., *.p3d format). Instantiates the in-memory data representation from a file. |
| Data Representation | In-memory graphics data representation; contained in a Scene object. |
| Renderer | Draws the data representation into a view on the screen. |
| Linear Algebra classes | Utility classes that support linear transforms and linear algebra. |
The following P3D bugs have been discovered:
The following is a list of possible enhancements
to P3D:
Scene File: the Camera
In the scene file you specify the location, orientation, and direction of the camera. The location is specified as a point in world coordinates. The orientation is specified as a vector in camera coordinates. Think of it as a normal vector to the top of the camera. The direction of the camera is specified as a world coordinate point to aim the camera at.
In the scene file the user specifies:
. . .
from_point
to_point
V
. . .
An example entry would be as follows:
. . .
0 7 50
0 3 3
0 1 0
. . .
Here the camera is located 7 units above the z axis at z = 50. The camera is pointing at a point 3 units above the z axis at z = 3. The camera is oriented upright. The value of V does not need to be normalized into a unit vector.
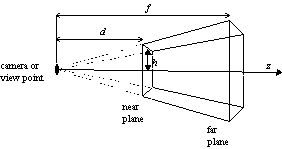
You specify the configuration of the view frustum in the scene file as follows:
. . .
near_plane
far_plane
height
. . .
The near_plane is the distance from the view point to the front plane of the view frustum. The far_plane is the distance to the back plane of the view frustum. The height is the length from the center of the front plane to the edge; the front plane is centered about the z-axis in view coordinates. A sample set of view values are:
. . .
5
100
3
. . .
This specifies that the near plane of the frustum
is 5 units from the camera in view coordinates, the far plane
is 100 units away, and the near plane height (on every side of
the z-axis) is 3 units.
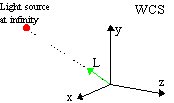
You specify the light configuration in the scene file as follows:
. . .
light_intensity
light_color
direction_from_origin
. . .
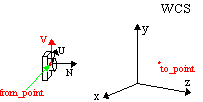
The light_intensity indicates how bright the light is; it ranges from 0.0 to 1.0. The light_color is the light color in RGB. The light of a scene is a point source at inifinity. The direction_from_origin indicates the orientation of the light with respect to the origin, in world coordinates. The following figure show the direction vector L, at the origin.
A sample entry in the scene file is:
. . .
1.0
255 255 255
1 1 1
. . .
This specifies a bright white light.
You specify the level of ambient light in a scene as a real number between 0 and 1.0. Ambient light is intended to account for the sum of all reflected light in a scene. Higher ambient values will increase the global brightness of the scene.
. . .
0.2
. . .
Reflected light is too complex to model directly,
so this parameter is provided to add realism.
You include objects in the scene by listing them in the scene file. First, the number of objects is entered. Then, for each object, you supply an object file name, three transformation vectors, color, and surface specifications:
. . .
object_count
file_name
rotation_vector
scaling_vector
translation_vector
color
diffuse
specular
shininess
. . .
The object_count specifies
how many object entries are to follow. If there are not enough
entries, P3D will likely crash. If there are too many entries,
some will not be read. The file_name
is the name of an object file.
The rotation_vector indicates object
rotations about each of the three axes in world coordinates. Likewise,
the scaling_vector scales the object
in three dimensions and the translation_vector
translates the object.
The color specifies
the object color as an RGB triple where each value is an integer
in the range 0 to 255. The diffuse
value specifies the degree to which the object's surface will
diffuse light due to subsurface scattering. It is a measure of
surface roughness and ranges between 0 and 1.0. The specular
value specifies the surface's mirror-like quality or ability to
generate a specular highlight. This value ranges between 0 and
1.0. The shininess value indicates
how smooth the surface is; it is also affects the ability to generate
a specular highlight. This value is an integer greater than 0.
Low values indicate a rough surface and cause a narrow specular
highlight, high values indicate a smooth surface with a broad
specular highlight.
Gouraud shading
only uses the diffuse component and ignores specular and shininess
values. Phong shading uses all
three to generate a more realistic rendering.
A sample of two obects in a scene file is:
. . .
2
cylinder.obj
0 45 0
5 5 5
-7 0 5
128 128 128
0.2
0.8
20
cube.obj
0 45 0
5 5 5
7 0 5
200 50 50
0.5
0.5
5
The last object is at the end of the scene file.
Here is a complete scene file for a tank:
0 27 60
0 0 0
0 0.993263 -0.115881
5
100
3
1
255 255 255
0.638971 0.42829 0.638971
0.4
8
cylinder.obj
0 0 0
10 10 1
10 0 8
0 0 255
0.4
0.8
5
cylinder.obj
0 0 0
10 10 1
-10 0 8
128 0 0
0.4
0.8
5
cylinder.obj
0 0 0
10 10 1
10 0 -8
130 140 150
0.4
0.8
5
cylinder.obj
0 0 0
10 10 1
-10 0 -8
130 140 150
0.4
0.8
5
cube.obj
0 0 0
40 10 15
0 2 0
128 128 192
0.4
0.8
10
wedge.obj
0 0 90
10 10 15
-25 2 0
160 170 180
0.4
0.8
10
cylinder.obj
90 30 0
14 14 8
0 11 0
255 128 0
0.4
0.8
20
cylinder.obj
0 90 0
2 2 18
-15 13 0
255 255 128
0.4
0.8
20
You specify the vertices of an object in the object file as a list of points in world coordinates. This is done as follows:
. . .
vertex_count
vertex_1
. . .
vertex_N
. . .
If vertex_count does not match the number of vertices specified, then unpredictable behavior will occur. Each vertex is specified as a vertex identifier and an x y z triple. A sample for a unit cube is:
8
1 .5 .5 .5
2 -.5 .5 .5
3 -.5 -.5 .5
4 .5 -.5 .5
5 .5 .5 -.5
6 -.5 .5 -.5
7 -.5 -.5 -.5
8 .5 -.5 -.5
It is recommended that identifiers start at 1 and increase in counting order. The vertex identifiers are used later in the object file to define polygons.
Object Files: the Surface
List
Surfaces allow you to aggregate polygons into a group. You specify the surfaces of an object in the object file as follows:
. . .
surface_count
polygon_count_1
vertex_count_1_1
vertex_id_list_1_1
. . .
vertex_count_1_N
vertex_id_list_1_N
. . .
polygon_count_N
vertex_count_N_1
vertex_id_list_N_1
. . .
vertex_count_N_N
vertex_id_list_N_N
All counts must match the number the number of items they specify. Each vertex_id_list contains vertex identifiers that refer to vertices specified in the vertex list appearing earlier in the file. A sample surface list for a unit cube with eight vertices is:
6
1
4
1 2 3 4
1
4
5 1 4 8
1
4
5 8 7 6
1
4
6 7 3 2
1
4
1 5 6 2
1
4
4 3 7 8
Note that vertex identifiers must be specified in
counterclockwise order with respect to the outward facing normal
of the polygon. The renderer uses this information to determine
the polygon normal which is used when illiminating back facing
polygons. If specified incorrectly, the polygon may be incorrectly
illiminated from a scene.
Here is a complete object file for a unit cube:
8
1 .5 .5 .5
2 -.5 .5 .5
3 -.5 -.5 .5
4 .5 -.5 .5
5 .5 .5 -.5
6 -.5 .5 -.5
7 -.5 -.5 -.5
8 .5 -.5 -.5
6
1
4
1 2 3 4
1
4
5 1 4 8
1
4
5 8 7 6
1
4
6 7 3 2
1
4
1 5 6 2
1
4
4 3 7 8
Graphics Pipeline: Composing
a Scene
A P3D scene is composed by including object files
in a scene file. By keeping
objects in separate files, P3D allows you to reuse objects to
save time in scene composition. Objects in the object file are
specified by a set of vertices. In the scene file, you specify
how to transform the object, rotating, scaling, and translating
it as desired.
The easiest way to compose a scene is to define your
objects centered at the origin. That way, scaling and rotation
will have predictable effects. Use unit lengths whenever possible;
it will be easier to predict the effect of scaling and translation
on the object.
Once you have written the scene file and object files, you can load them into P3D and modify scene properties via the user interface.
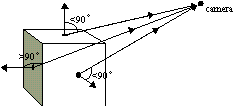
Graphics Pipeline: Culling Backfacing
Polygons
Culling backfacing polygons is the process of removing polygons facing away from the camera. This is determined by calculating the angle between the polygon normal and the line of sight vector to the camera point. It that angle is greater than 90 degrees, then the polygon is backfacing and should be set to not visible.
The following computations are required to perform culling:
This clipping is performed by the Culler
class. For wireframe rendering, this feature is normally off so
that all polygons are visible.
Graphics Pipeline:
Defining Lighting, Camera, and View
The light and the camera can be positioned in the
scene file. You can also aim
and orient the camera. The shape of the view frustum is
also specified in the scene file.
The light, camera, and view frustum can be adjusted
via dialogs from the view menu or from
the tree view. Any changes to these scene parameters can be saved
via the File menu.
The light is a point source located at infinity and
is specified by giving a direction vector pointing from the world
coordinate origin to the point at infinity. The intensity and
color of the light can be modified. This light is implemented
by the LightAtInfinity class which
is derived from the abstract Light
class. Alternative lights could be implemented in a similar fashion.
By positioning a camera, you specify a new coordinate system in which to view objects. Objects, which are specified in world coordinates, must be transformed into camera or view coordinates. By specifying a view frustum, you restrict the area to be rendered.
Graphics Pipeline: Clipping
to View Frustum
The view frustum specifies
boundaries within which vertices will be rendered. Any vertices
lying outside the frustum are clipped or removed from the
rendering process. For solid model rendering, this can drastically
reduce rendering time.
The default P3D clipper (class Clipper)
implements the Sutherland-Hodgeman clipping algorithm. Each polygon
in the scene is first examined to see if it is visible (e.g.,
it hasn't been culled); if so, then it is examined for trivial
acceptance or rejection. A polygon is accepted if all vertices
are within the frustum, and rejected if all vertices are outside
the frustum.
For each of 6 clip boundaries of the frustum, the
clipper is call ed. In 3D screen coordinates, these boundaries
are defined by the parallelpiped:  ,
,  .
The polygon vertices are in normalized projection coordinates
and the perspective divide has not yet been performed. So, given
a homogeneous vertex (x,y,z,w), the clip parallelpiped
is defined as:
.
The polygon vertices are in normalized projection coordinates
and the perspective divide has not yet been performed. So, given
a homogeneous vertex (x,y,z,w), the clip parallelpiped
is defined as:
 ,
,  .
.
The algorithm is implemented with the following pseudocode:
// case 1: first and second are inside,
// case 2: first inside and second outside,
// case 3: first and second are outside
// case 4: first outside and second inside.
first = Last vertex in polygon
for each vertex in polygon {
second = current vertex
if (inside(second)) { // Cases 1 and 4.
if (inside(first)) {
output(second); // Case 1.
} else { // Case 4.
intersection = intersect(first, second, coord, axis);
output(intersection);
output(second);
}
} else { // Cases 2 and 3.
if (inside(first)) { // Case 2.
intersection = intersect(first, second, coord, axis);
output(intersection);
}
}
first = second;
}
Graphics Pipeline:
Hidden Surface Removal
The goal of hidden surface removal is to avoid computing
pixel intensity values for polygons that are hidden by polygons
closer to the view point; this technique only applies to solid
rendering and now wireframe rendering.
P3D uses a z-buffer to remove hidden surfaces during rasterization at the end of the graphics pipeline. During the second phase of the bilinear interpolation, the interpolated z 3D screen coordinate of each pixel is compared to the value stored at the same x,y position in the z-buffer. If the current z value is closer, then its surface intensity value is computed and the z buffer is updated.
Graphics Pipeline:
Coordinate Systems
P3D utilizes several coordinate systems when transforming a scene file into an on-screen image.
The Vertex class stores
most of the different coordinate values.
3D Modeling Coordinates Individual objects are defined in this coordinate system. This is the coordinate system you use in object files.
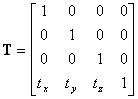
World Coordinates Objects are transformed into this coordinate system based on affine transforms specified in scene files.
View Reference Coordinates Also known as the camera coordinate system. This system has the camera at the origin, pointing down the z-axis. The view frustum is centered on the z-axis. All object vertices have been transformed into this system via the view transform matrix.
Normalized Projection Coordinates
Also known as 3D screen coordinates, vertices are transformed
into this system via the perspective transform matrix.
These coordinates are homogeneous: (x,y,z,w) where w
is the so-called perspective divide. This space is the shape of
a parallelpiped where  ,
,  Clipping is performed in this coordinate system. After the perspective
divide, the bounds of the parallelpiped are
Clipping is performed in this coordinate system. After the perspective
divide, the bounds of the parallelpiped are  ,
,
 . In this space, hidden surface removal
is performed.
. In this space, hidden surface removal
is performed.
2D Logical Coordinates
A transformation from 3D to 2D space results in vertices specified
as (x,y) values where  .
.
2D Device Coordinates
This coordinate system is specified in 2D coordinates native to
the display device. For example, the Window Device Context has
the origin in the upper left corner, x axis from right to left,
and y axis from top to bottom (bounds for x and y depend on the
size of the client area of the window used for display). The transformation
must map  into
into and
and  in the flipped coordinate system.
P3D sets
in the flipped coordinate system.
P3D sets  to avoid distortion caused a
non-unity aspect ratio.
to avoid distortion caused a
non-unity aspect ratio.
Graphics Pipeline: Modeling
Transform
The modeling transform converts objects specified
in modeling coordinates in
object files into world coordinates.
This is done by computing the net transform based on rotations,
scaling, and translations given in the scene files.
In P3D the net modeling transform is computed when
the scene file is read and each Obj
object is created. The Obj class
retains all the affine transforms as well as the net modeling
transform which is computed as  where
where
 ,
, 

Every vertex in the scene is transformed into world
coordinates with:  . This step is performed
in the rendering pipeline by LC2WCTransformer::transform().
. This step is performed
in the rendering pipeline by LC2WCTransformer::transform().
Graphics Pipeline: View Transform
The view transform converts object vertices from
world coordinates to view reference coordinates.
This system has the camera at the origin, pointing down the z-axis.
The view frustum is centered
on the z-axis. All object vertices are transformed into this system
via the view transform matrix.
In P3D, the Camera object
computes and contains the view transform matrix. This matrix is
applied in the rendering pipeline by WC2NPCTransformer::transform().
The view transform is computed as  , where:
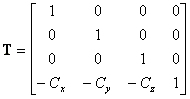 ,
, 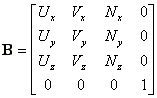
The values used are:
These values are computed based on values in the
scene file:


Note that view reference coordinates are not stored
in the vertices like other coordinates because these values are
never required by P3D. In WC2NPCTransformer::transform(),
the product of the view transform matrix and the perspective transform matrix
are applied to each vertex resulting in a transformation into
the normalized projection coordinates.
Graphics Pipeline:
Perspective Transform
The perspective transform converts object vertices
from view reference coordinates
to normalized projection coordinates.
This system has the camera at the origin, pointing down the z-axis.
The view frustum is centered
on the z-axis. The view frustum is either a normalized, truncated
pyramid with  and
and  ,
or it is a parallelpiped with
,
or it is a parallelpiped with  and
and  .
In the former case, the perspective divide hasn't yet been performed.
All object vertices are transformed into this system via the perspective
transform matrix.
.
In the former case, the perspective divide hasn't yet been performed.
All object vertices are transformed into this system via the perspective
transform matrix.
In P3D, the View object
computes and contains the perspective transform matrix. This matrix
is applied in the rendering pipeline by WC2NPCTransformer::transform().
The perspective transform is computed as:
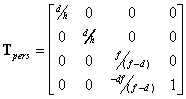
The values used are:
These values are specified in the scene file.
Normalized projection coordinates are assigned in
the vertices by WC2NPCTransformer::transform().
In the Microsoft Foundation Classes (MFC) realm,
a CDocument object is responsible
for managing all aspects of a single document type. Documents
usually have an in-memory representation and an on-disk representation.
The Document class is responsible
for managing the in-memory representation and for converting to
and from the on-disk representation.
The CP3DDoc class is
a subclass of Document and manages
P3D scene data. The on-disk representation is stored in scene files.
CP3DDoc can read and write to scene
files and keeps track of when a scene needs to be saved. These
capabilities are provided by overriding virtual functions of Document.
P3D has another type of file, an object file,
but there is not a Document object
for this file type. This is because these files are embedded in
scene files and are not directly manipulated by the P3D user.
The CP3DDoc class delegates the scene
file I/O to a reader/builder class
pair.
The CP3DDoc class maintains
a reference to a Scene object that contains
the in-memory representation. Typical MFC applications ask the
document to manipulate the data. In P3D, a client asks for the
Scene, and makes manipulation requests
on that. The reason for this is that the manipulation functions
are tightly coupled with the representation. But, on the other
hand, since the manipulation functions eventually will render
in a view, they are also tightly coupled to the view.
The choice for P3D was to keep the data and I/O in the document and the rendering in the view. The data is passed as an argument to the view for rendering. Note that all but the last phase of the rendering pipeline require intimate knowledge of the view.
Scene Class and Graphics Data
Representation
The Scene class is the
top level container of the P3D in-memory data representation.
All rendering begins with the Scene
object. The current Scene object
is contained in the CP3DDoc object.
The Graphics data representation is described with
the following Object Model Diagram:
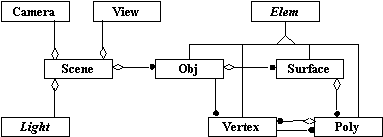
The classes in the graphics data representation are briefly described:
The Elem class is an
abstract class which allows its subclasses to be members of lists
and arrays. This technique provides for less code, but it also
defeats the strong typing of C++. This could be improved.
The P3DTreeView class
is one of two view classes responsible for presenting P3D data.
In MFC, classes derived from CView
provide the user with a view on the document. When a P3D document
is opened, a split window frame is presented with a rendered image
on the right and a tree view of the data on the left.
The P3DTreeView class
is derived from the MCF CTreeView
class and presents a literal view of the P3D graphics data in
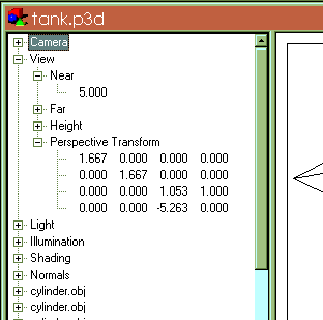
the form of a tree. By clicking on the  you can exapand or collapse the tree. The following figure shows
what a few expanded items reveal.
you can exapand or collapse the tree. The following figure shows
what a few expanded items reveal.
To learn how to edit the scene in this view, see
Modifying the Scene Using the Tree View.
The CP3DView class is
one of two view classes responsible for presenting P3D data. In
MFC, classes derived from CView provide
the user with a view on the document. When a P3D document is opened,
a split window frame is presented with a rendered image on the
right and a tree view of the data on the left.
The CP3DView class is
directly derived from CScrollView
and displays P3D data in graphical form; either solid or wireframe.
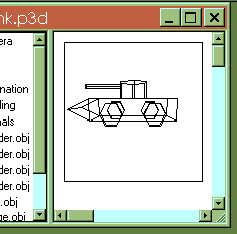
The following figure shows this view in action:
This class refers to two other types classes: Renderer,
and its parent frame of class P3DDataFrame.
CP3DView contains a reference to
each type of renderer implemented; currently GouraudRenderer,
PhongRenderer and
WireframeRenderer.
CP3DView has a reference to its parent frame
so that it can determine which renderer to use for display based
on user selection. The parent frame contains this and other user
information set via menus. Each time rendering is performed, CP3DView
checks which renderer the user selected and uses that to draw
the scene.
The P3DDataFrame class serves several purposes:
The parent of this class is CMainFrame which is the top level window in a MFC application.
A design goal was to create a framework that would allow create the same in-memory data representation from different data file formats. This required an extensible structure.
A Scene object is a container for the in-memory 3D graphics data. This representation is constructed a piece at a time by a group of collaborating objects which form a builder pattern. This pattern makes it easy to support multiple file formats and multiple internal data representations. The class diagram of the pattern is:
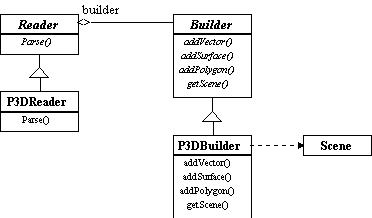
Here is a description of each class in this pattern:
A CP3DDoc class contains
references to a Builder and a Reader,
as well as the Scene. By assigning
different values to these references, other readers and builders
can be used.
The P3D data representation is rendered on the screen by a subclass of Render. This base class defines the rendering pipeline via a set of worker classes called substrategy classes.The following class diagram shows how these classes relate.
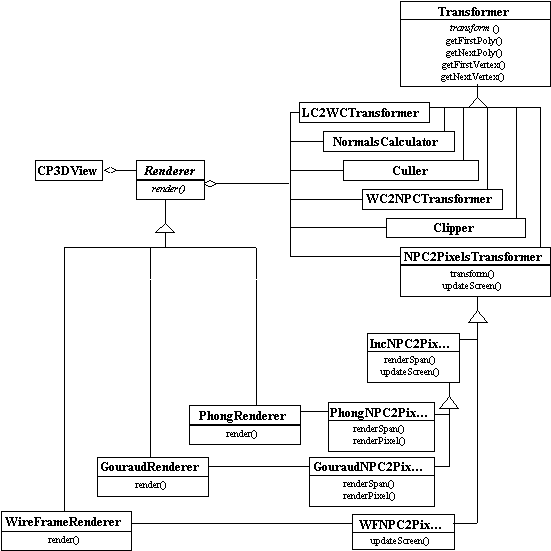
These classes are described below.
To implement wireframe and solid renderers, subclasses of Renderer are defined that override various parts of the rendering pipeline. These subclasses may subclass some of the substrategy classes; especially NPC2PixelsTransformer.
Design: Linear Algebra
Classes
A basis for 3D graphics is a set of utility classes implementing linear algebra. These classes and their relationships are demonstrated in the following figure:
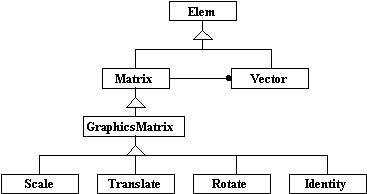
The Matrix class uses
to the Vector class for its implementation;
both derive the ability to be in lists via Elem.
All elements of the classes are of type double.
The GraphicsMatrix class enforces
a 4x4 affine transform matrix. The Rotate
class is used to compose a rotations in X, Y, and Z.
Incremental shading techniques are a class of algorithms that compute intensity values at the vertices of polygons and incrementally shade the interior points by applying a simple reflection model. Both Gouraud and Phong are incremental shading techniques.
Incremental shading techniques are characterized by the following:
Incremental techniques are characterized by the fact
that the geometric information is available only at the vertices.
They apply a simple reflection model to a polygon, calculating
values at the vertices, then interpolating values for the interior
points. Interior points are computed from left to right (in scan
line order).
Interpolative techniques provide two functions: 1) compute interior
points using an interpolative method; 2) attempt to minimize the visibility of the polygon mesh.
P3D traverses the objects in a scene in by-polygon order and applies bi-linear interpolation to each. Rasterization uses an edge list structure that stores the points where every visible polygon edge intersects a scan line. The following figure shows the edge list representation for a polygon.
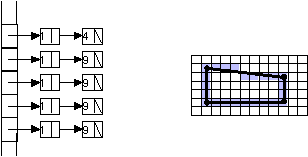
Other information stored in the edge list elements includes vertex normal, light intensity, and the z value. Note that P3D currently supports convex polygons only.
P3D uses a z-buffer to implement hidden surface removal.
Each entry in the z-buffer contains the z position of the closest
pixel at the corresponding screen location, and the pixel color.
Use this command to render the 3D data as solid objects
with Phong shading. A check mark appears next to the menu item
when Phong is selected.
Phong shading is an interpolated or incremental technique for polygon meshes. Phong shading is characterized by the following:
The surface reflectance value is computed as follows:

Where Crgb is the surface color
adjusted by the color of the light source, Ka
is the ambient value, Kd is the diffuse surface
reflectance value, Lrgb is the light source
color factor, Ks is the specular
surface reflectance value, N is the surface normal at the
pixel (interpolated from vertices), L is the surface direction
vector to the light source, n is the surface shininess
value, Imax is the maximum RGB value (255),
and Li is the light intensity. In practice,
under- and overflow must be detected to keep values in range.
This equation uses an optimization to avoid computing
 (R is the surface unit reflectance
vector and V is the surface unit vector to the view point).
By assuming the light source is at infinity and the view point
is at infinity, L and V are constant across the
polygon. Therefore a geometric simplification can replace
(R is the surface unit reflectance
vector and V is the surface unit vector to the view point).
By assuming the light source is at infinity and the view point
is at infinity, L and V are constant across the
polygon. Therefore a geometric simplification can replace  with
with  where H is the unit vector
normal to a hypothetical surface that is oriented in a direction
between the light direction L and the view vector V.
H is
where H is the unit vector
normal to a hypothetical surface that is oriented in a direction
between the light direction L and the view vector V.
H is 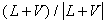 . This saves having to compute
R, V, and L for every pixel.
. This saves having to compute
R, V, and L for every pixel.
Use this command to render the 3D data as solid objects
using Gouraud shading. A check mark appears next to the menu item
when Gouraud is selected.
Gouraud shading is an interpolated or incremental technique that is characterized by the following:
The surface reflectance value is computed as follows:

Where Crgb is the surface color
adjusted by the color of the light source, Ka
is the ambient value, Kd is the diffuse surface
reflectance value, I is the interpolated intensity at the
pixel. All values range from 0.0 to 1.0 except the color vector
Crgb. In practice, under- and overflow must
be detected to keep values in range.
Use this command to render the 3D data as wireframe
objects. The data is rendered as lines representing the edges
of every polygon. A check mark appears next to the menu item when
Wireframe is selected.
Wireframe rendering skips the back face elimination
and hidden surface detection steps in the graphics pipeline. The
Do Culling selection on the view menu allows you to specify that
back face elimination should be performed
Do Culling command (View
menu)
Use this command to toggle culling of backfacing
polygons for wireframe objects. Wireframe rendering usually skips
the back face elimination in the graphics pipeline. The data is
rendered as lines representing the edges of every polygon. A check
mark appears next to the menu item when culling is turned on.
The camera is an ease-of -use analogy for specifying
the view point and the orientation of the viewer. A camera has
a location in space, it is pointed in a direction, and it can
be rotated along the view axis, (e.g., changing the camera's up
direction).
This option displays a dialog which allows you to specify the following camera properties:
For more information, see Scene File: the Camera.
Frustum command (Options menu)
A frustum is a truncated pyramid. A view frustum
is the area that defines the clipping boundaries used by the renderer.
Edges with end points outside the frustum are clipped,
making a new edge. Frustum parameters are set in view coordinates;
the space has been transformed such that the camera is at the
origin pointed along the positive z-axis. The frustum is centered
on the z-axis, both planes are square and perpendicular to the
axis.
This command displays a dialog which allows you to specify the shape of the frustum by setting these properties:
Ambience command (Options menu)
When in solid rendering mode, this command displays a dialog which allows you to specify the ambient light value of the scene. You specify the level of ambient light in a scene as a real number between 0 and 1.0. Ambient light is intended to account for the sum of all reflected light in a scene. Higher ambient values will increase the global brightness of the scene.
For simplicity, the light is defined as a point source located at infinity. P3D supports a single light in the scene. The displayed dialog allows you to specify the following light properties:
For more information about the P3D light, see Scene Files: the Light.
There are several ways to modify a P3D scene: by
creating or modifying P3D files, by using edit features of the
document windows, and by using menu commands.
Creating and Modifying P3D Files
P3D uses two file types to define a scene. The scene file
defines global parameters of a scene, includes object definitions,
and specifies transforms for the objects. Objects are defined
as a set of surfaces and vertices in object files.
Currently, objects can only be edited by modifying the object
files.
P3D View Windows
When you open a P3D scene, it is presented in two
views separated by a splitter bar. The right hand view is the
rendering view; it presents a rendering based on the algorithm
chosen by the user (e.g., wireframe, Gouraud, or Phong). The left
hand view is the tree view which presents hierarchical view of
the data representation. You can modify the scene values using
the tree view.
Modifying the Scene using Menus
Scene and rendering parameters can be modified by using either the View menu
or the Options menu.
Modifying the Scene Using
the Tree View
The Tree View presents a hierarchical view of the P3D scene data. The following figure shows the top level items in the view.
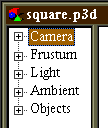
Items with a '+' can be expanded to show more information. Scene file data can be directly edited in this view by double clicking on the item. A dialog will allow you to modify the properties for the item:
The Objects item does not support editing,
but you can modify object values by opening the Objects
item as shown below:
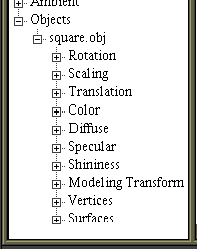
Double clicking on an object name or any of its editable items will bring up a tabbed dialog. This dialog allows you to modify the object properties.
The camera dialog allows you to modify the following camera properties:
For more information, see Scene Files: the Camera.
The frustum dialog allows you to modify the following properties:
For more information, see Scene Files: the Frustum or Frustum command.
For more information, see Scene Files: Ambient Light.
The Light dialog allows you to modify the following properties:
For more information, see Scene Files: the Light.