Here we will explain our hardware approach to the 5 main and 2 supporting operations to incorporate all Cricket features:
Main Operations
· Walking
· Avoiding obstacle
· Chirping
· Mimicking two green eyes and Cricket heart
· IR Remote control Supporting features
· Cricket power pack
· Program download
Walking
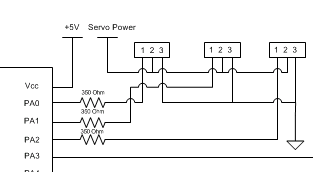
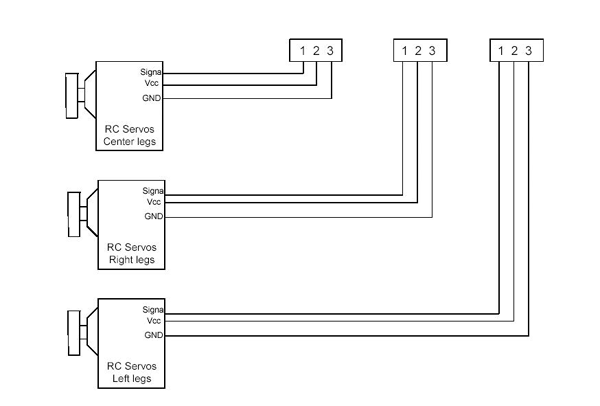
The Cricket Robot can walk with 3 servos, Center, Left and Right. Center servo moves left-right legs positioned in the middle of the Cricket. Left servo moves front-rear legs on the left, and Right servo moves front and rear legs on right.

Fig.0 Cricket Leg Notation
Servos are controlled by PWM generated by the microcontroller onboard and output to PORTA.0 -2. The angular movement of motors is determined by the time when logic hi is sent to servo. Approximately, 0-180 degree servo would correspond to 0.5ms to 2.3ms of the high time.
|
High-Time
|
Position
|
|
0.5ms
|
0
|
|
1.4ms
|
90
|
|
2.3ms
|
180
|
Fig. 1 Servos Part
Fig 2. Servos Connection
Avoiding Obstacles
The Cricket has two antennas projecting from its body. They serve as sensory devices to detect incoming obstruction. Each antenna attaches to a normally open microswitch, which will be closed when the Cricket runs into something. PORTA.5 and PORTA.6 are dedicated as input pins for the Cricket antennas.
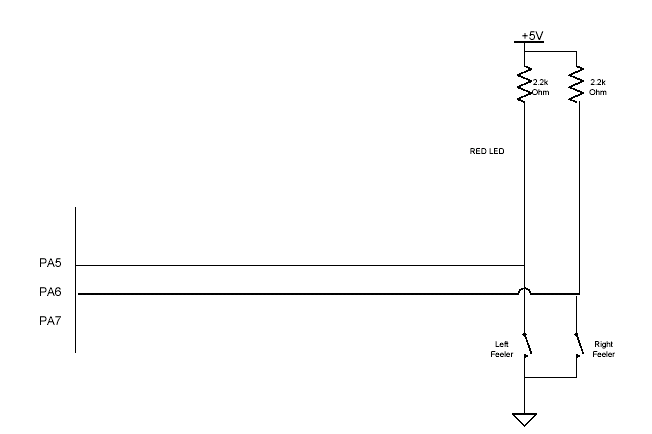
Fig.3 Cricket Antenna Circuit Part
Chirping
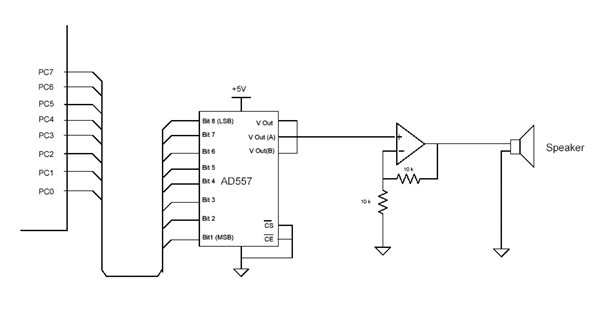
The Cricket can chirp 4 different songs. We installed a DAC (Digital to Analog Converter), an amplifier, and a speaker on the Cricket body. The DAC is connected to PORTC.0-PORTC.7. Analog output from the DAC is amplified to the speaker. Unfortunately, we didn't have time to make use of the DAC as originally planned, so our cricket songs are all digitally driven square waves.
Fig.4 Cricket song generator part
Mimicking Cricket Eyes and Heart
Two green LEDs and one red LED are used to mimic a real cricket eyes and its heart. The green eye LED turns off if the Cricket's antenna hits something. In fact, you could play around with the eye and heart features if there were two crickets approaching each other. One might blink its eyes and the other might have a high heart beat rate. PORTA.3 is for driving the two green LEDs. PORTA.4 is for driving the red LED.
Fig.5 Cricket LED Part
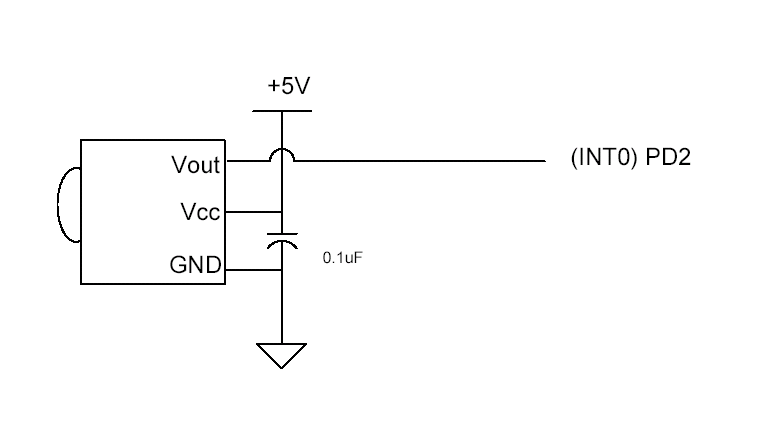
IR-Remote Control
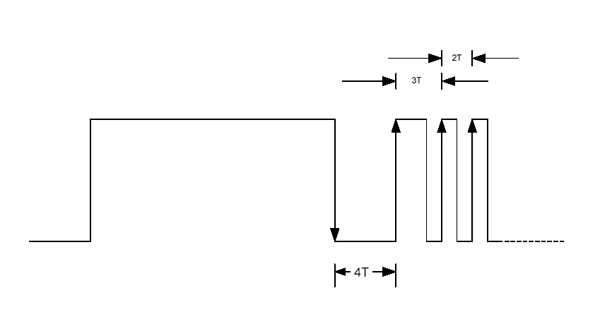
The Cricket can be remotely controlled by a Sony IR TV/VCR remote. We equipped an IR-detector onboard to pick up the IR transmission. A IR detector was connected to PORTD.2 (INT0) since we intended to use IR as an interrupt-driven signal. Output generated form the IR-detector is a pulse train of 12 bits. The pulse train begins with "Start header" with duration of 4T (T~650us for our remote, but vary a little for a different remote) and is followed by pulses with duration of 3T (Logic "1" ) or duration of 2T(Logic "0" ). We use the onboard microcontroller to decode these 12 bits (please refer to Software Design for details).
Fig.6 Typical Pulse Generated By an IR-TV Remote
Fig. 7 IR Detector Circuit Part
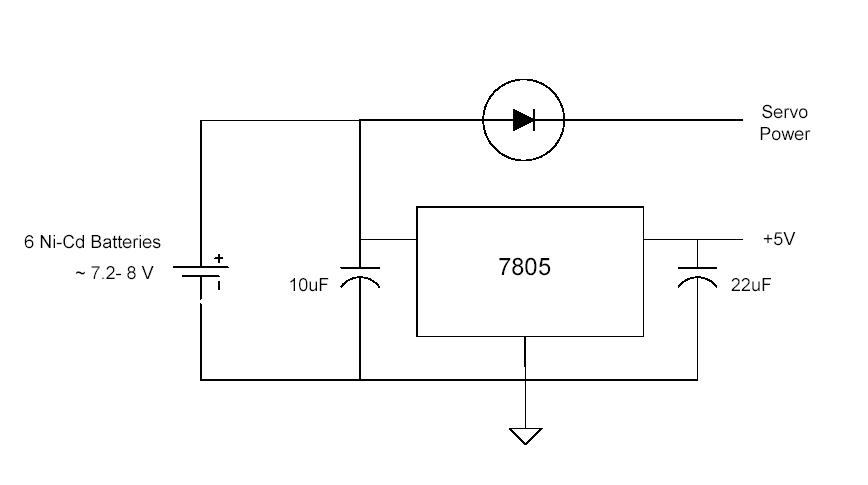
Power Pack
The Cricket stays on its own power. A Power pack at the back of the Cricket contains 6 Ni-Cad 1.5 rechargable batteries. Utility voltage supplied to the Cricket circuit is regulated to 5Vdc by LM7805, a 5Vdc regulator. Since Cricket servos are 6V DC servos, they are not very sensitive. The servo voltage is pulled down by 0.7 V using a diode.
Fig.8 Power Distribution Part
Program Download
As the Cricket Robot needs to stay on its own board, for convenience, our design allows software programs to be downloaded via a STK200 dongle. The hardware configuration is as follows:
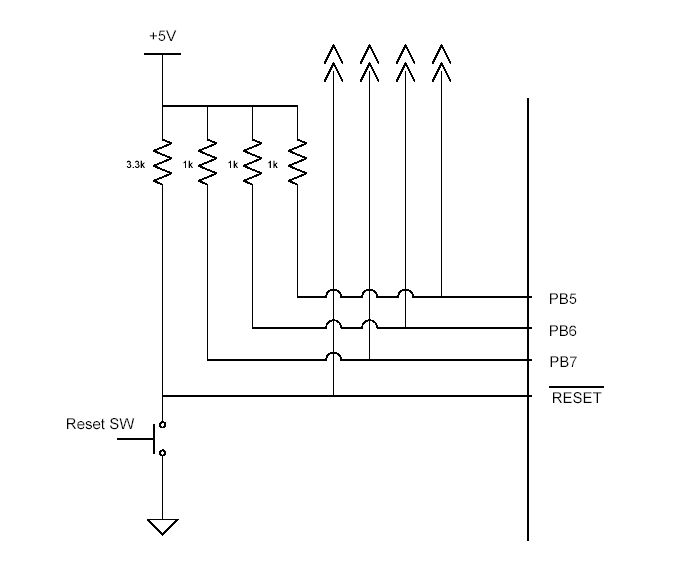
Fig.9 Program Download Circuit Part