April 30, 2003
ECE476 Final Project
 

BattleShip Game

 
BY
 
Tomasz Micula, tm86@cornell.edu
Gilbert Cheng, ghc2@cornell.edu


Introduction Instructions High Level Design Program/Hardware Design Results Conclusion Appendices References


For our final project, we decided to create the classic game of Battleship that was displayed on a TV and controlled by keypad inputs. We both enjoyed playing the board game when we were young and we occasionally would do battle against each other online while at university. So we thought, why not take what we both love doing and apply it to a final project? So we set forth in creating the game of battleship, and although there were many roadblocks along the way, including running out of SRAM (grrrr), we thoroughly enjoyed creating the game of Battleship and we hope you enjoy it as well. BOMBS AWAY!!!!


1. Press the # sign to advance to the Select Level Screen

2. At this point you can choose what difficulty level you want your computer opponent to play at. After deciding on a level, press the corresponding number to move on.

3. You will see a flashing “C” on the grid position (0,0). This is the starting position of the carrier battleship. By pressing a 2 to move up, a 4 to move left, a 6 to move right, and an 8 to move right, you can move the starting position of the battleship around the grid as you please. After you are satisfied with the starting position of the battleship, press 1 to place the ship vertically downward or press 0 to place the ship horizontally to the right.

4. You will now see a flashing D on top of the digital representation of the carrier battleship. This is the starting position for the destroyer battleship. Of course you can’t place the destroyer on top of the carrier so you can once again move the flashing D around to the grid position you desire. Continue allocating the rest of the battleships in the same way.

5. Once you have allocated the patrol boat, press the # sign to begin the game.

6. You will now be taken to the computer opponent’s grid. Of course right now it is blank because you cannot see where he allocated his ships but that will soon change.

7. The grid rows and columns are numbered 0 to 9. Pick a coordinate you would like to shoot at and input it onto the keypad. For example, you may want to shoot at grid position (3,8). Once you input a coordinate, an “H” will appear if you have hit one of his ships or an “X” will appear if you have missed his ship.

8. The game will then switch back to your grid and the computer will take a shot at your ships. Again, an H or X will display on your grid depending on the outcome of the shot and the game will switch back to the computer’s grid.

9. Once again pick a grid position to shoot at and enter it into the keypad. If you happen to sink one of the computer’s ships or the computer sinks one of your ships, a set of K’s will appear on the grid that indicate that the entire ship has been hit and is now sunk. When you see this, you know that you have sunk the particular ship you had been firing at and you no longer need to shoot at it.

10. Once all the ships have been sunk on one of the grids, you will be taken to a Game Over screen which informs you who won the game of battleship. You also have the option of playing again if you want another chance to beat the computer.

11. Have Fun!!!

Here are the types of ships and the number of hits required to sink each one:
 
Ship Ship Name Number of Hits
 
Carrier 5
 
Destroyer 4
 
Aegis Cruiser 4
 
Submarine 3
 
Patrol Boat 2

Ships' images were taken from yahoo website.


  • Logical Structure :

    The details of our project are as follows. The game starts by displaying the introduction page, has some background music, the name of the game, and the designers of the game. By pressing the # key on the keypad, the player can advance to the next screen. We have some music playing in the background that is continued throughout the whole game.

    On this next screen, the player is able to select the difficulty level of the game. The two levels of our game are Easy and Difficult. In easy mode, the computer opponent just fires at a random pattern throughout the game until the game is over. In difficult mode, the computer once again fires randomly but once it hits one of the players ship, we have an algorithm that will continue to fire around the hit area until the ship is sunk. This makes it much harder for the player to win the game.

    After choosing the level, you are brought to a 10x10 grid. This is the player’s grid where he can allocate the position of his ships. In the top left hand corner there is flashing C to indicate that he is about to allocate his carrier. The player is able to move the letter C in all 4 directions until he is satisfied with the beginning position of his carrier. Once he decides on an initial starting position, he can press “0” if he wants to place the carrier horizontally along the grid or he can press “1” if he wants to place the carrier vertically on the grid. After deciding on a direction, a digital image of the carrier will be placed onto the grid and a flashing D will appear on the carrier that represents the destroyer. Once again the player can move the D around the grid to a position where he wants to place it. This continues until all the battleships have been placed on the grid. Of course we have made our game so that all ships have to fit on the grid and no ships can overlap each other during allocation. Once all the ships have been allocated on the players grid, the user hits the # sign once again to start playing the game.

    The next screen is a blank 10x10 grid that belongs to the computer opponent. The word Computer is written along the right side of the grid to let the player know which grid is on the TV screen at the present time. At this point, the player is able to input the coordinates, row and then column, that he wants to shoot at with the rows and columns numbered 0-9. The player’s inputs into the keypad are confirmed through the LED representation of the number in binary. After entering in the coordinate, an “H” will appear at that grid position if the player has HIT one of the computers ships and an “X” will appear if you have missed the computers ships. After about 2 seconds, the screen will switch back to the players grid showing where he allocated all his ships. The computer will then take a shot at the player’s ships and an “H” or “X” will once again indicate hit or miss. After another 2 seconds, the screen switches back to the computer grid where the player gets another chance at hitting the computer’s ships. This pattern continues until either the player or the computer has sunk all of their opponent’s ships.

    Once someone has sunken all of their opponent’s ships, we go to a Game Over screen which displays who won the game of Battleship and has the distinction of being the best naval commander on the seven seas……well at least until the next game of Battleship is played. By hitting the # sign, the player will be able to go back to the introduction page to play the game again if he desires.

  • Digital Design of Battleships :

    In order to display a picture representation of the battleships, we had to alter the binary bitmap representation of images given to us by Professor Land. We changed some of his functions that called the bitmap and we created our own bitmap, which drew out the specific pieces for the battleships. For example, the carrier contained five pieces of the bitmap, which was made of 1’s and 0’s. We had to fill in the gaps between the pieces of the ship with a separate bitmap that served as filler.


  • Hardware :

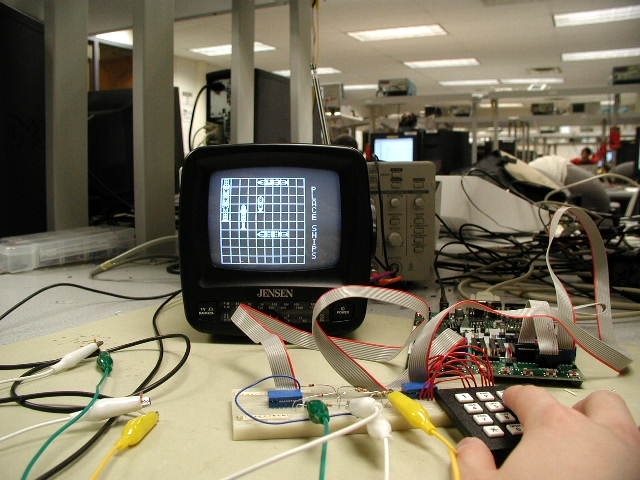
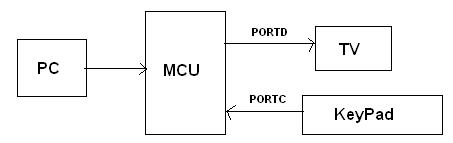
    The hardware for our project consisted of an Atmel-32 microcontroller, an STK500 development board, a TV, and a keypad. We connected the TV’s video signal to PortD of the STK500 board as shown below:

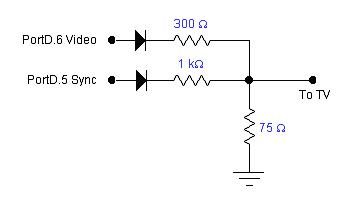
    Figure #1: Schematic of the connection from STK500 to TV

    To interface the keypad to the PORTC of the STK500 development board, we set it up as shown below:

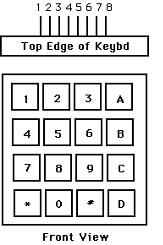
    Figure #2: Schematic of the connection from STK500 to keypad

    where pin 1 = PORTC.0, 2 = PORTC.1, etc.

    To see the schematic of the full circuit, please refer to Appendix A.

  • Software :

    Most of our final project consisted of writing a C program to program to the microcontroller. We basically had one state machine that we will call the “Game Machine” that controlled the flow of our game. The six states in our state machine are Start, SelectLevel, GridSetup, PlayGame, EndGame, and CleanState. The flow of the program with these six states is shown below:

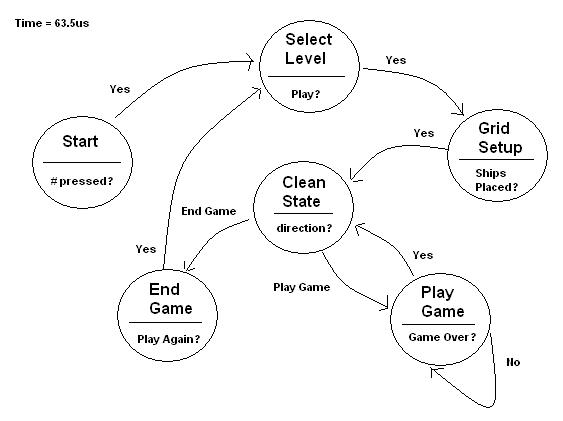
    Figure #3: State Diagram for Battleship

    At the beginning of Line 231, we always check to see if there is an input from the keypad and we debounce the keypad inputs once again using a state machine with four states. The four states are Pushed, Debounce, Detect and DebouncedEnd and the flow of these states is shown below:

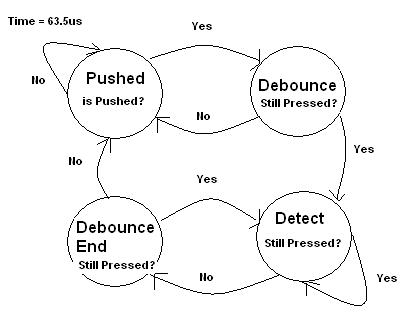
    Figure #4: State Diagram for Debouncing Buttons

    • Analysis of State Machine for Debouncing Buttons :

      In the Pushed state, we simply check to see which key was pressed and store it in a variable called lastbutnum. We also set the seed for our random number in this state using the value of TCNT0 when the key is pressed and adding it to the rand function.

      In the Debounce state several things happen depending on the state of the “Game Machine”. First off though, we check to see if the button being pressed at that instant is the same as the value stored in lastbutnum. If it is, we execute commands in the Debounce state, if not, we go back to Pushed state. In the Debounce state, if the “Game Machine” is in the Start state and the # key is pressed, we will move onto the SelectLevel state. If we are in the SelectLevel state and the key pressed is a 0 or 1, then the level of the game will be set to easy or difficult and we move on to the GridSetup state. If we are in the GridSetup state, then pressing a 2, 4, 6 or 8 will move the starting position of the ship in a desired direction. If a 0 or 1 is pressed in this state, then we call a function that takes in several pieces of information and places the ship horizontally or vertically on the grid. Once all the ships have been allocated, if we are still in the GridSetup state, then pressing the # key will move the “Game Machine” to the PlayGame state. If we are in the PlayGame state, then any buttons pressed between 0 and 10 will indicate the coordinates that the player wants to shoot at. This is where we also call the function that determines whether the player hit the computers ship or not. If we are in the EndGame state, and the # key is pressed, then we will go back to the SelectLevel state. At the end of the Debounce state, we go to the Detect state.

      In the Detect state, if the key getting pressed is the same as lastbutnum, we stay in the Detect State. If the key being pressed is different, then we go to the DebouncedEnd state.

      In the DebouncedEnd state, if the key being pressed is the same as lastbutnum, we back to the Detect state. Otherwise we go back to the Pushed state and wait for another keypad input.

    • Analysis of the “Game Machine” states :

      If we are in the Start state, we simply display the front page of our game, which includes a digital image of a side view of a battleship. The name of the game and our names are also displayed on this front page.

      If we are in the SelectLevel state, we display the 2 levels of our game, easy or medium. After the player has chosen the level he wants, we go to the GridSetup state.

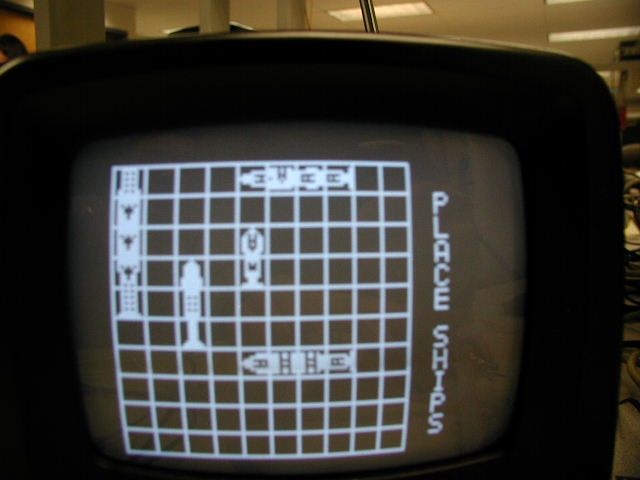
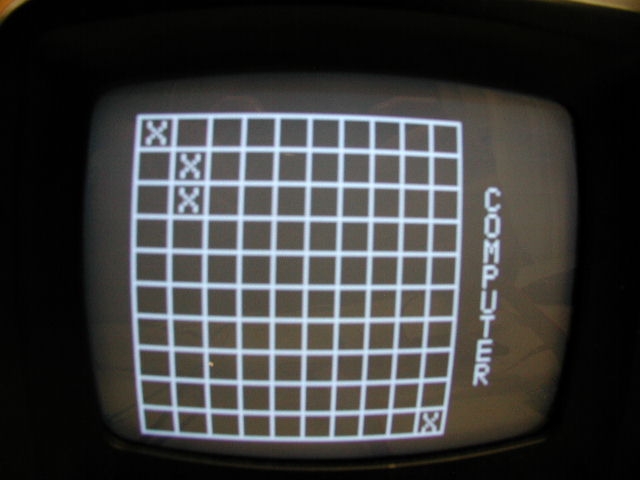
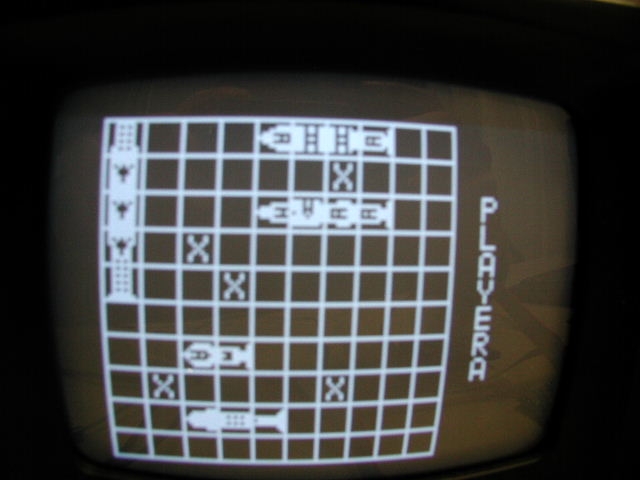
      In the GridSetup State, we print the 10x10 grid for the player and we also print out the ships that the player has allocated on the grid. This is where the player can move the starting position of the ship around and allocate it vertically or horizontally. Once all the ships have been allocated, we move on to the PlayGame state.

      In the PlayGame state, we first draw the grid for the computer and allocate his ships on the grid using a random function. It will stay on the computer grid until the player inputs a coordinate that he wants to shoot at. Once the player has inputted his coordinate, the game will pause for about 2 seconds so the player can see if he hit a ship and then we switch back to the player’s grid to allow the computer to shoot at the player’s ships. In this state the algorithms for easy and difficult are also called depending on the level that the player selected. We also display whose grid we are displaying on the screen in this state. This cycle continues in PlayGame until all the battleships on one grid have been sunk. Once this happens, we go to the EndGame state.

      In the EndGame state, we display our end game page which tells who won the battleship match and allows the player to press the # sign in order to return to the SelectLevel state.

      The CleanState state is pretty much a state where we go when we need to clear our TV screen. Depending on the value of a variable called direction, we go to EndGame state, we initialize our game board, or we go to PlayGame state.

    • Key Variable :

      The key variable in our final design project was the playerAGrid and computerGrid arrays. These arrays stored each box in our grid and each of these boxes contained information that was imperative to the success of our final project. Each box in the grid was coded as follows :

      Each square in the game grid holds two values. It tells if there is any ship present at all and the type of ship.

      For example: if square 1,1 contains a carrier ship then it is represented in the following way:

       
      B7 B6 B5 B4 B3 B2 B1 B0
      0 1 0 1 0 0 0 1

      Where the upper order bits are used to distinguish the type of ship in the grid position.

      Low order bits are used to detect presence of ship and its status 4 bits are divided into two groups: Lower 2 bits tell if a ship is present and whether it was hit or missed. The next upper two bits tell the status of the grid box (if sunk)

       
      B3 B2 B1 B0 Description
      0 0 0 0   no ship present
      0 0 0 1   ship present and not yet hit not sunk with horizontal orientation
      1 0 0 1   ship present and not yet hit not sunk with vertical orientation
      0 0 1 0   ship not present, hit attempted and missed
      0 0 1 1   ship present, hit but not yet sunk (horizontal orientation)
      1 0 1 1   ship present, hit but not yet sunk (vertical orientation)
      0 1 1 1   ship present/hit and sunk (horizontal orientation)
      1 1 1 1   ship present/hit and sunk (vertical orientation)

    • Most Challenging Aspect of the Software Implementation :

      One of the main problems we had when designing this project was that the Mega32 microprocessor only has 2K of memory and the video generation code has a screen array that is necessary and takes up 1.6K, which means we only had 400 bytes to work with. Because of this limitation, several times during the design of our project, we ran out of SRAM memory. The main problem was that we had to be able to display two different grids, one for the player and one for the computer that were 10x10 in size so both grids together took up 200 bytes. This forced us to constantly try to optimize our code so that our variables would not exceed 200 bytes of memory. To make sure our we did not run out of SRAM memory, we made sure that everyone of the bits in the char variables were used in order to save memory.

    • Reference Code :

      The code we started out with for video generation was taken from the ECE476 website at Cornell University and was written by Professor Bruce Land.

    • Things we attempted :

      The main limitations of using the TV as a visual output is that we are limited by the amount of time we are given to perform computations and draw a picture onto the screen. We must fit everything we want to draw out onto the TV screen in Line 231, which only gives us about 60 lines of code. We really wanted to do animation of bullets firing across the screen towards the target but our design of the basic game play had taken so much computational time that we were not able to animate our game without significant flicker on the TV screen. With more time to be able to perform computations and output images onto the screen, we would of liked to add animation to make our game more realistic. The last thing we would of liked to do is put our game on a larger TV screen, which would make the game more enjoyable.


  • Game Play :

    Our game works very well on an overall basis. The transitions between different phases of the game is very fast and we have been able to optimize our code so that all the computations fit into Line 231 and there is no flicker at all on the TV when our game is being played. The game play is very smooth and it you can easily tell when you have hit, missed, and sunk one of your opponent’s ships. Our difficult algorithm is good enough that it will give the human player a very good game. We particularly like our allocation scheme for the battleships. By letting the player move the starting position of the ship to a position where he wants and then pressing a 0 or 1 for alignment, we let the player see their grid at all times and we believe this makes the game a lot better to play because he can space his ships out as much as he wants without worrying about overlapping the ships or placing them too close to each other.

    The video signal timing of our project is very good. The ships are displayed almost instantaneously during allocation and the hits and misses are displayed very fast. We would of liked to spend more time between transitions of the two grids but we were limited to the time we were able to delay because of the restrictions from Line 231.

  • Safety Concerns :

    As our project is a video game, there are very few major safety concerns but there are a few we would like to mention. Of course when TV or video game playing is done, it can have a negative effect on ones eyes. Too much playing of our video game could cause someone to develop poor eyesight and lead to glasses. Another concern is that if a person were to play our game too much, they may develop some problems with their fingers because it requires a lot of button pressing on the keypad. This could lead to arthritis or some other sort of muscular disease. The final safety concern that we see is that if someone cannot beat the computer on the difficult algorithm. We may have programmed our computer so well that some people may not be able to defeat the computer opponent. This may lead to intense rage and stress, which could lead to countless hours of video game playing, breaking of expensive items around the area, and very possibly a heart attack. We did not intend to make the difficult algorithm that difficult but some people may just not know how to play the game of battleship properly.


Overall our final project definitely met our expectations. We were able to build a functional game of battleship displayed on a TV and running on a microcontroller. We wanted to be able to have smooth functionality and a lot of interactivity with the player and we were able to achieve that. We really like how we were able to display the battleships digitally on the grids because we feel it gives the user a better idea of how we want our ships to look. We are also very pleased with our ship allocation scheme as was mentioned earlier in the report. We are very pleased to be able to design a final project that has interactivity and is very playable.

Next time in our final project we would try to interface our game with a wireless mouse and Java enabled input grid instead of the keypad. We would display the grid on a computer screen and we would allow the player to input the coordinates and allocate ships simply by clicking on the grid. The input from the mouse would be interfaced to the microcontroller through the RS-232 serial communication. The actual game would still be displayed on the TV screen. The only difference is that the input is done through a wireless mouse and grid instead of the keypad. We would of also liked to add animation in the form of bullets to our game but we ran out of computation time in Line 231. Perhaps if we would of had more time, we would have been able to optimize our code even more and found a way to animate our game and make it much more realistic.

All the code that we have written was done on our own. We based our code off the video generation code provided to us by Professor Land.

  • Ethical Considerations from IEEE Code of Ethics:

    1. To accept responsibility in making engineering decisions consistent with the safety, health and welfare of the public, and to disclose promptly factors that might endanger the public or the environment;

    When designing our final project, we made sure that our work environment was always neat and tidy so that someone walking by would not trip on any hanging wires. We also clearly stated any safety concerns that might come along with playing our game in our webpage.

    7. To seek, accept, and offer honest criticism of technical work, to acknowledge and correct errors, and to credit properly the contributions of others;

    We always listened to people’s opinions about our final project and changed our project if we thought their ideas had merit. We have given credit to Professor Land of Cornell University for supplying us with his video generation page.

    8. To treat fairly all persons regardless of such factors as race, religion, gender, disability, age, or national origin;

    While we were designing our final project in the lab there was a lot of competition for lab space but we always treated everyone with respect and made sure that if they had been waiting for a lab station before we had, that they would get the next open lab space.

    9. To avoid injuring others, their property, reputation, or employment by false or malicious action;

    We made sure that our final project didn’t interfere with anyone else’s final project at the same time. We did not hoard all the equipment all at once so that people would not have any to work on. People’s prototype boards with their circuitry were sitting in the lab cabinet but we did not go and ruin them so that their final project would be tampered with.

    10. To assist colleagues and co-workers in their professional development and to support them in following this code of ethics.

    Whenever a fellow colleague asked for advice or some help on their final project, we did not hesitate to give it. We believe great engineering ideas are fostered through cooperation between great minds.


Main Program in C : BattleShip.c


All the parts used in the project were supplied to us in the lab. These included : STK-500 Board, Mega32 Microcontroller, TV, and keypad. Therefore, the incurred cost was $0 toward the budget.


Since Gilbert and Tomasz have the privilege of being roommates, the design ideas, the algorithms, the coding, and the web page were done together at the same time. Yes, we spent a lot of time together working on this final design project in order to get it working

After we came up with the overall design of our final project, Tomasz wrote most of the code while Gilbert sat by his side giving thoughtful input(most of the time) and cracking the occasional joke. This is because Tomasz is a CS major and loves coding so much he can’t imagine doing anything else :). In return, Gilbert wrote up most of the web page so he could add some humor to the site.


1. Mega32 full data sheet

2. Online Battleship game on Yahoo!