
Program/Hardware
Design
Program Details
Interfacing with the
keyboard
The first tricky portion of our program was decoding the keyboard input from the user. We basically had to map the keyboard scan code Set 2 codes sent from the keyboard onto ASCII characters to be sent over the UART and SPI. The following figure illustrates the codes the keyboard sends, and they were mapped to standard ASCII characters, uppercase for letters:
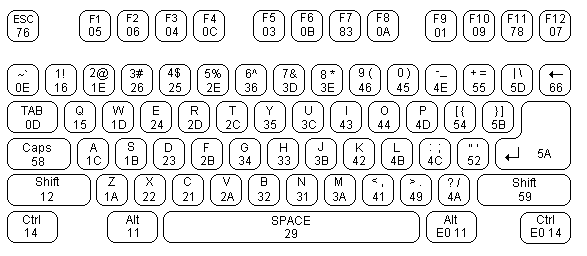
Source: http://www.beyondlogic.org/keyboard/keybrd.htm
In terms of the PS/2 protocol, when the user presses a key, the internal clock of the keyboard (which normally stays idle) begins to pulse at 20-30kHz; the data line then transmits the following 11 bits, one on each clock period: a start bit (logic 0), eight data bits (LSB first), a parity bit (odd parity), and a stop bit (logic 1). The following diagram, also reproduced as Figure 1 in Appendix 3, shows the generic keyboard transmission:

source: http://www.beyondlogic.org/keyboard/keybrd.htm
We wrote an ISR for the MCU, triggered by the falling edge of the keyboard's clock on the INT0 pin. On each call to the ISR, it reads the keyboard data line at that clock period. Once we receive all data bits, we decode the input into its equivalent ASCII character. Upon receiving the <enter> symbol from the keyboard, we transmit the input string through the UART to the PC.
Interface Between the Two MCUs
With the keyboard clock running at 12.2kHz, a single key press, which requires reading 11 bits for a make code and 22 bits for a break code, takes about 2.7ms to decode, with 33 calls to an ISR which executes on each falling edge of the keyboard clock and reads the data bit on the keyboard input. On any single key press, calls to this ISR could interfere with the sensitive timing of the video code used to output to the TV screen. The video code blasts one line to the screen every 63.625us, and refreshes each frame every 1/60 of a second, with only about 4ms between frames for calculating the new frame. Because of these timing issues, the scheme we used to decode a PS/2 keyboard input could not be implemented on the same MCU as the video code. We were forced to think of possible alternatives to allow two MCUs to communicate with one another without interfering with the sensitive timing of the video code. One possible alternative, implemented by a previous group in the past, was simply to connect ports on both MCUs directly. The disadvantage of this scheme was the lack of any protocol that could be used to send a significant number of bytes (such as in a string) serially between the two MCUs. Alternatively, another group had simply used the UART serial communication ports to transfer data between two MCUs. While this would have been the simplest solution to our problem, our serial port on the keyboard MCU was already dedicated for the connection to the PC, used to look up weather information from an Internet database. Finally, the best solution was using the Serial Peripheral Interface (SPI) provided on the Mega32 processor.
Unlike the UART, the SPI is normally used for serial communication over very short distances, such as between two adjacent MCUs, as was our case. Because it is a synchronous form of communication, both the receiver and transmitter must use the same clock. This is guaranteed by a master/slave interface; while both a master and slave MCU can send and receive data to and from one another, the master is responsible for providing the clock signal. The scheme summarizing the master/slave configuration (obtained for the Mega32 datasheet) is shown below, also Figure 5 in Appendix 3:
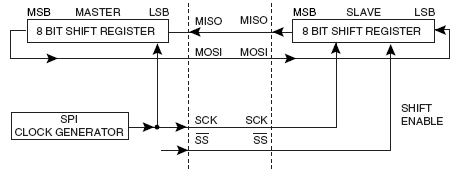
To transmit data, the master pulls down the slave select (~SS) pin on the slave to enable communication. The master then shifts out eight bits of data, one bit per clock pulse, out of its master-out-slave-in (MOSI) pin and shifts it into the MOSI pin of the slave. The slave, likewise, simultaneously shifts out eight bits of data out of its master-in-slave-out (MISO) pin and into the MISO pin of the master. The pin directions used in our scheme are shown below:
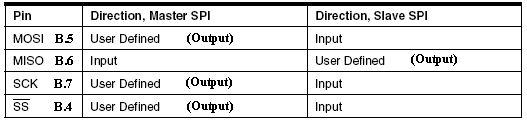
Because the directions of each of these four pins on the master and slave MCUs complement one another, they were simply all connected directly. The SPI control register, SPCR, enables or disables SPI and its corresponding interrupt mask bit, as well as sets parameters such as master/slave designation and clock rate. In our configuration, we used the keyboard MCU as the master and the video MCU as the slave. This made a lot of sense because the keyboard MCU was also responsible for interfacing with the PC over the UART serial port to receive weather data and transmit to the video MCU.
To output a byte, the master runs the following lines of code:
PORTB.4 = 0; //pulls down ~SS
SPDR = buffer[i]; //outputs value of buffer[i] to slave
When transmission is complete, a SPI_STC interrupt is called and the ~SS pin is pulled back up with PORTB.4 = 1.
On the slave side, we disabled the SPI interrupt because of the sensitive timing nature of the video code. Instead, we simply check the interrupt flag (7th bit of the SPI status register, SPSR) during the allotted 4ms between frames every time. Thus, the following line of code receives a byte from the master:
if ((SPSR & 0x80)>>7) input = SPDR;
Note that we did not need to send any bytes from the slave to the master.
Interface Between the
PC and the Internet
In order to interface the MCU with a PC to retrieve weather
information from the Internet, we needed to write a program on the PC that
would support serial communication. In
addition, we had to choose a suitable programming language on which to write
this program. Since we did not want to
spend too much time on this aspect of the project (and instead focus on the
hardware interface,) we chose to use a beta version of Visual Basic 2005
Express, made freely available by Microsoft at
http://lab.msdn.microsoft.com/express/vbasic/default.aspx. Visual Basic is a very user-friendly
programming language, often simplifying very difficult tasks to drag-and-drop
controls and a few lines of code. Also,
unlike Visual Basic .NET 2003, the beta version of Visual Basic we used
includes a basic "
SerialPort1.WriteLine(send_string)
Likewise, to receive data over the serial port, our Visual Basic program calls an "Event" that is triggered by data being placed on the serial port buffer. In this event, we simply use the following line of code to retrieve the data:
receive_string = SerialPort1.ReadLine()
Being able to output weather information from the Internet was a lot trickier than we had originally thought. We found a weather services PHP script freely-distributed for use at http://pear.php.net/package/Services_Weather/, which could retrieve and parse current weather information from freely-available METAR reports provided by the National Oceanic and Atmospheric Administration’s National Weather Service (http://weather.noaa.gov/weather/metar.shtml) for various airport locations around the world. METAR reports are rather cryptic documents containing weather conditions about a location including temperature, humidity, wind speed and direction, visibility, pressure, precipitation, and many others. The following is an example of a METAR report for the Chicago O’Hare Airport:
|
TYPE |
ID |
TIME |
WIND |
|
WX |
SKY |
T/TD |
ALT |
REMARK |
Decoding such a document so that we could retrieve simple weather conditions was beyond the scope of what we could do for this project, so we relied on the PHP script we had obtained to do just that. Neither one of us had any experience using PHP, which is a cross-platform, HTML- embedded scripting language that runs on a server and is normally used to create dynamic web pages. Since our goal was not to create a dynamic webpage, we had to find a way to run the PHP script and relay the retrieved weather information to a Visual Basic program we had written for serial communication with the MCU. To run a PHP script locally from our computer, we discovered that we needed to install a local web server. We used an installation package provided freely at http://www.hotscripts.com/Detailed/26145.html to install an Apache web server that could run PHP scripts locally. Because there is not an existing interface between Visual Basic and PHP, we decided that the easiest way to call a PHP script from our Visual Basic program was simply to execute the script from a command prompt (which could be easily done in Visual Basic) with parameters such as airport location also input at the prompt. To obtain the results of the PHP script (that is, the weather information,) we modified the script to write all pertinent values to a text file that could be easily read and parsed by our Visual Basic program. While this was clearly not the most elegant solution, it worked well enough to allow us to focus on the microprocessor and hardware portions of our project.
Interface to the TV
This interface was basically a matter of outputting the appropriate strings when necessary, and clearing old strings when new data arrived. It built upon the video game lab which we did earlier in the semester. New to the final project was consideration for how much we could output on each condition of LineCount == 231 (please see Appendix 2: Video Code). We divided the process of outputting to the screen into distinct stages, making sure to only output a small bit of video each time.
Hardware Details
We used a 6-pin mini DIN connector to produce the wires on the end of the PS/2 keyboard so that we could connect them to the appropriate pins on the boards. See Appendix 2 for the output pins of the keyboard.
We connected Clock to pin 2 of Port D on the keyboard STK500 board, and Data to pin 3 of Port D. We used Port D’s Vcc and GND for the corresponding keyboard wires.
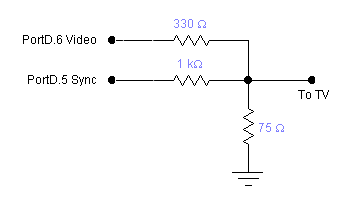
In terms of the SPI, we connected pins 4, 5, 6, and 7 of Port B on the STK500 to pins 5, 6, 7, and 8 on the video MCU. We used the following circuit, also reproduced as Figure 3 in Appendix 3, to generate the video output:
We programmed the STK500 using COM2 from the PC, and COM1 for serial communication between the MCU and the VB program.
Referenced Code
To realize the weather lookup on the PC side, we used public domain code in the form of a PHP script from http://pear.php.net/package/Services_Weather/.
Changes During the
Project
Originally, we planned to perform all functions using just one CPU, however we soon realized that this would not work if we wished to generate video as well as use other interrupts such as those for the UART and keyboard. These other interrupts interfered with the video output due to timing issues – that producing video offers little time for other processing – and they produced unacceptable flicker on the screen. We brainstormed possible solutions, and soon decided that the best way to accomplish what we wanted was to use two CPUs, one for video and one to do keyboard decoding and serial communication. There was still the problem of how to communicate with the video MCU, we would have to echo keyboard inputs by the user to the TV screen, as well as data the PC sent to the keyboard CPU. We decided to use the SPI because the two chips were in close proximity with one another and it was easy to set up in software and hardware.
Another change we made from what we originally proposed was
in additional features above and beyond the lookup of weather information. We nixed the idea of having a temperature
sensor on our CPU because the complexity of our design had increased
dramatically due to the dual processor setup and the SPI interface, and we no
longer felt that our project needed more instrumentation. Furthermore, the temperature sensor would
only serve a practical purpose if the query was for a local airport, e.g. KITH
for