Point of Sale System
by James D'Onofrio (jmd344) and Andrew Spielberg (aes89)
Introduction
Point of Sale systems typically can cost up to thousands of dollars – we do it very simply for seventy.
For small stores, point of sale systems can be very expensive. One thousand dollars for a piece of machinery whose functionality is quintessentially simple can be exuberant. Our goal was to design a point of sale system for under seventy dollars with all of the functionality of a standard cash register. While constructing and implementing the entire set of functions that a modern cash register can perform, we were able to implement most of the functionality that one would desire. Particularly, our point of sale system supports barcode scanning, inventory management, cost calculations, and purchases and returns were all implemented, along with receipt/barcode printer support. Card readers (such as debit and credit cards) and networking, while desirable in a cash register, were not ultimately implemented due to time constraints (but not cost constraints).
High level Design
A lot of the interesting problems that we originally wished to tackle had already been explored. So we thought from a different angle. What if we could do something that was simple, but normally expensive? This was our motivation in choosing a point of sale system as our design project.
Logical Structure
Here we discuss each component in our point of sale system and its purpose.
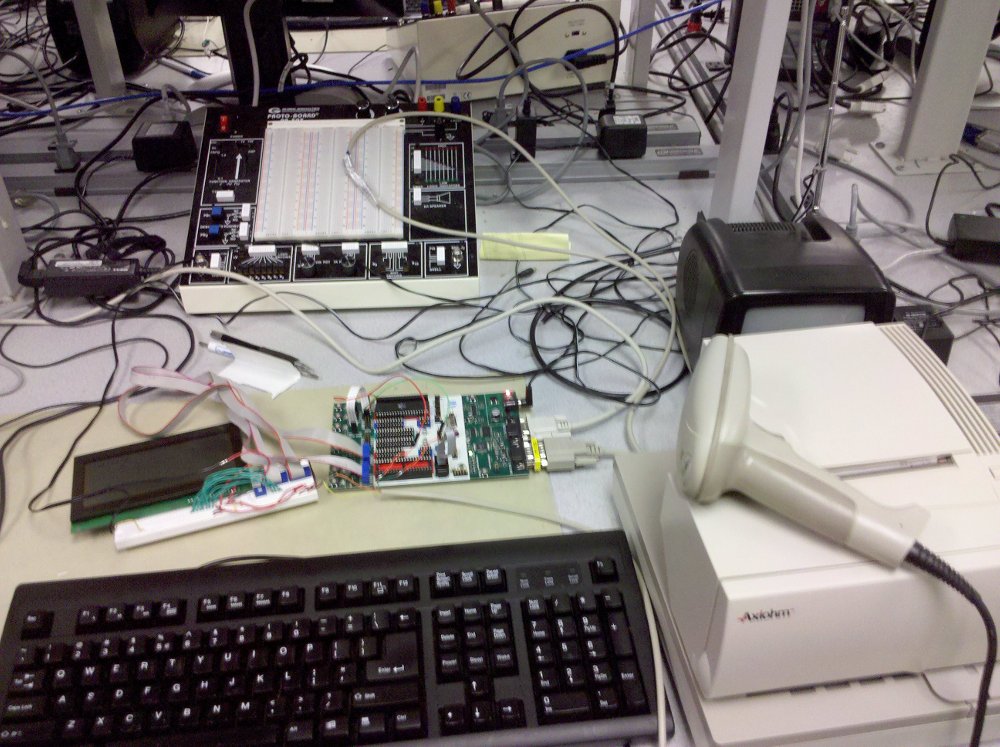
Keyboard – The keyboard is used for providing input to the point of sale interface. This involves navigating all of the menus. It can optionally be used to manually enter a barcode. The keyboard interfaces with the microcontroller using the PS/2 protocol.
Barcode Scanner – The barcode reader is used to scan items and return their ID number. The scanned value is instantly transmitted to the interface as input.
LCD Screen (Large) – The LCD screen is used for interacting with the point of sale system. It displays the menus, keyboard and barcode scanner input, and feedback.
Receipt Printer – After sales, returns, or inventory changes, receipts are printed of the transaction. Its memory is also used for non-volatile storage of register balance and inventory.
Microcontroller – The Microcontroller is the main processor of all the smaller components. It is used for managing the state machine of the menu system, interpreting PS/2 keyboard and barcode scanner input, sending receipt print commands, handling nonvolatile storage, and updating the LCD screen.
Standards
We followed RS-232 (recommended standard 232) for communication with the serial port (receipt printer), and PS/2 for communication from the keyboard/barcode scanner. The implementation code of the RS-232 standard was a modification of Bruce Land’s modification of Joerg Wunsch’s uart code; in particular, we removed the echo function, and interpretation of control characters. We also use Ascii (American Standard Code for Information Interchange) for our character interpretation.
Copyrights, Patents, Trademarks
There are no relevant copyrights, patents, or trademarks of which we are aware.
Hardware/Software
LCD Initialization
For our POS system we chose the Hyundai HG25504 because it had a large display 256 x 128 pixels and was used by ECE 476 groups in the past. The LCD uses the same standard 5V power supply for logic as the MCU uses but also requires a -10V reference for contrast. We had planned to use a inverter/regulator chip from Maxim but it was easier to just use a wall wart with a -12V reference and a potentiometer to adjust the voltage on the contrast pin. The LCD uses 5 control signals, Reset, RD, WR, CS, and A0 and one 8 bit data bus which we connected to PORTC. [Reset, A0, WR, RD] are connected to pins A3 to A0 respectively with CS set to ground because the SED1330F will ignore any commands or data if CS is not set to ground. CS is meant to select a specific LCD if multiple LCD’s are in use. RD is always set to 1 since we never needed to read from the LCD. The init function initializes the LCD by first waiting 3ms with all 4 control signals set high as they are all active low in order to allow the LCD to start up. Then Reset is pulled low for 2ms and then set high again for the remainder of the program. Once the LCD is reset we are able to send the configuration parameters using the write_cmd and write_data functions. A0 selects the data type by A0=0 signaling that the data on PORTC is data and A0=1 signaling that the data is a command. The two write functions first set the data or command value to PORTC since the data must be stable 30ns before the falling edge of WR. WR is then set to 1 and A0 is set for two cycles since the value will be set by the end of the first cycle leaving the second cycle, 62.5ns = 1/16MHz, to meet the 30ns setup time. WR is then held low for two cycles to allow the LCD to read the data or command and then WR returns to 1 to complete the write.
The function write_cmd runs first to signal the LCD which parameters will be set followed by write_data to send the actual parameter values. First, the system set command runs to set all of the necessary parameters for operating the LCD including character size and LCD screen size. The first data block chooses the internal characters and no correction for characters near the edges which can make them easier to read but was not necessary. The next data block sets the character width to 8 pixels and the following data block sets the character height to 8 pixels. The next two data blocks set 32 characters per line since each character is 8 pixels wide and the screen is 256 pixels wide. Then the next data block tells the SED1330F controller that the LCD screen is 128 pixels tall. The final two data blocks signal the SED1330F that only 32 bytes should be allocated per line, the minimum amount 256 bytes/8 pixels, because more bytes could be allocated to allow horizontal shifting of characters to the left and right out of view.
Then we set the overlay command to OR the three layers since we are only using one layer, the other two layers are turned off. The LCD has three layers which means that the screen can look at three different areas of memory at once but this is primarily used for graphics so we only use layer 1. This command also sets the layer into text mode which draws characters instead of graphics mode which draws pixels. The csrform command sets the cursor size to 5 x 7 pixels which fills most of the 8 x 8 pixel window that each character fills. The csrright command causes the cursor to move one character to the right after writing a character. The hscroll command turns off horizontal scrolling of characters. The dispon command then turns on layer 1 and prevents the layer from flashing. The last part of initialization involves clearing the LCD by writing blank spaces to all of the memory seen by the LCD. The csrw command sets the cursor location and the mwrite command writes the blank spaces to the LCD memory.
Writing Strings to the LCD
The function write_string takes a string as an input to write to the LCD starting at the current cursor position. The write_string function will only write 31 characters per line instead of 32 because the cursor hides the last character at the end of the line. Write_string handles two major cases: writing regular characters and moving the cursor to the next line when reading a newline, \n. In order to provide the appearance of a never ending scrolling command prompt, the LCD uses twice as much memory as is needed for a standard 32 by 16 character display, 1KB instead of 512 bytes. Initially the LCD writes strings to rows 0-15 or the first 512KB block of memory but then when writing to row 16, the LCD changes its view to the second 512KB block of memory, rows 16-31. When changing its view to the second 512KB block of memory the LCD writes to the same relative row in both blocks of memory so that when reading a newline on row 31 the LCD can switch the view back to the first 512KB starting at row 1 without the user noticing. When switching back to the 1st 512KB block of memory, the LCD starts to write on row 16 and scrolls the view of memory by one row for every newline. For every newline the LCD also blanks the entire next line since this line could be filled with previous data. The LCD then continues to blank the next row and advance the scroll view by one until reaching row 31.
The PS/2 protocol
PS2 protocol is the dated standard for communication between keyboards and computers. Since it is easier to implement than USB connections, however, we decided to use it for our Point of Sale system for entering commands.
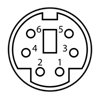
We begin by detailing the hardware. The female PS/2 connector has six pins. Pins 6 and 2 are not used, pin 3 is ground, and pin 4 is +Vcc, whose standard value is 5V DC at 275 mA (max values). Pin 5 supplies a clock, which we have set to 10 KHz, while pin 1 supplies the data bits from keyboard input.
We use the external ISR to poll the value of the data pin at each falling edge of the clock; in PS/2 protocol, one bit from keyboard input is sent at every tick of the clock (nothing is sent when there is no keyboard input). The data pin is active low.
The data stream per key input is split into eleven bits. The first bit, a 0, is a start bit. Upon receiving this bit, we expect to receive an eleven bit stream (including the start bit) beginning in 0 and ending in 1. The tenth bit is a parity bit, which we don’t need for the purposes of our application. Bits 1 through 8 are a unique 8 bit data code, sent least significant bit first. We implement PS/2 by using the external interrupt 0 to detect the falling edge of the clock signal and after a 10us delay the ISR reads the value of the data pin. The ISR shifts the new data value to the right for the first 9 bits so that scan_code equals bits 8 to 1. On the last bit, the ISR copies scan_code into the circular buffer, scan_code_buffer. The function get_input then reads from this circular buffer to turn the scan codes into ASCII values. Two pointers index this buffer, scan_in is the index for writing into the buffer and ascii_out is the index for reading the buffer. The function get_input (explained in the next section) uses ascii_out to index scan_code_buffer to convert the scan codes into printable ASCII keys or left/right arrow, backspace, or delete.

The 8 bit data code can be F0, E0 or another random hexadecimal number representing a unique key. If the key is preceded by a data stream containing the sequence “F0,” it is a “break” command; the absence of an “F0” sequence implies a “make” command. A make command means that the key was just pressed, while a break command means that the key was just released. E0 precedes the unique code for the extended keys for both the make and break codes which includes most of the non printable keys such as insert, delete, home, end, etc.
We implemented PS/2 fully for all printable characters except for excluding any keys we did not need such as the function keys. We also did not allow the microcontroller to send commands back to the keyboard because this would have only been useful to turn on the num, caps or scroll lock lights, not a critical feature.
Handling Input
The function get_input takes the scan codes stored by the ISR and converts them into meaningful printable ASCII characters or processes their function for home, end, backspace, delete, and left/right arrow. Get_input takes an input of how many characters to allow the user to input and sets the global input string which the interface reads to process user’s input. Get_input first nulls all characters of input and then enters a while that processes the scan codes until receiving a newline. There is a new available scan code for get_input to process if there is a mismatch in the two indexing pointers, scan_in and ascii_out. Get_input sets the shift flag if the shift key is currently pressed by checking if the shift make code is the current scan code and the previous code is not F0, a break code. The caps_flag is toggled when the caps lock key is pressed and is not toggled again until caps lock is released and pressed again. The shift flag causes ascii_val to be set from the shift_code_tbl instead of code_tbl if caps_lock is not set while if both shift and caps lock are set, ascii_val selects from code_tbl as usual. The one exception is for all non letter keys which caps lock has no effect on. The two tables code_tbl and shift_code_tbl, contain the ASCII values at the index equal to the scan code. All non implemented keys such as the function keys are set to null in the table. Get_input then checks for any special keys including for home, end, backspace, delete, or left/right arrow and if none are detected, get_input writes ascii_val to the LCD with write_string and added to input.
Backspace moves the cursor to the left by one position and blanks that location. Backspace checks that the index for input is greater than 0 since backspace should not blank out text written to prompt the user. Delete completes mostly the opposite action by blanking the current location and moving the cursor to the right one position. Home advances the cursor to the leftmost position where the user can enter text. End completes the opposite action by advancing the cursor to the rightmost location where the user can enter text. Left/right arrow simply move the cursor to the left or right by one position.
The Receipt Printer
The microcontroller communicates with the receipt printer through RS-232. We used the standard UART code from previous labs but had to modify it to change the code to send data in binary mode instead of ASCII mode. Binary mode simply means that the UART code must send all characters as is without any interpretation. Binary mode means that the microcontroller must also receive all byte values without any interpretation of control characters which includes turning off echo. The printf function works directly to print strings to the receipt printer after we made the modification to the UART code. The receipt printer also has a number of built in commands by sending certain byte values in a row. These functions include left, center and right justifying text, using small and large width font, bolding text, making the printer ring, making the printer cut the paper, and printing barcodes. The printer can print code 39 barcodes which is a simple barcode standard that can handle alphanumeric characters, uppercase only, and is variable length.
We also use the receipt printer as a nonvolatile memory source to allow inventory data and the total money in the cash register to not be lost when the system is reset or the power goes out. The function save_state saves the quantity, price, and name arrays as well as total_money and money_warning. Save_state works by first erasing the nonvolatile memory on the receipt printer and then using printf statements to first send 250 bytes and a second printf to send the remaining 34 bytes, 284 bytes = (2 bytes quantity + 2 bytes price + 10 bytes name) x 20 elements + 2 bytes total_money + 2 bytes money warning. The user can save the state manually by entering ‘s’ on the Welcome menu. The load_state function runs when the microcontroller boots up to save the stored values in nonvolatile memory into the quantity, price, and name arrays as well as total_money and money_warning. Load_state uses the receive_byte function which demands a specific byte from the receipt printer and then uses scanf to enter this byte into a variable.
The Interface
We tried to design an interface that is simple to use, but contains all the functionality that one would need on a point of sale system. Input can come in two forms: keyboard input, or barcode. In the event of a scanned barcode, the number if represents is displayed on the screen. First, we will explain the “special” keys, before explaining the state machine and its justification.
There are six types of special keys on the keyboard. The first is the shift key. This has the same effect of the shift key on a personal computer. The second is the caps lock key. This also has the same effect as the caps lock key on a personal computer. The third is the delete key. This transforms any character immediately after the cursor to a “space” character. The fourth is the backspace key. This transforms any character immediately before the cursor to a white space character. The fifth is the left and right arrow keys, which can move the cursor left and right on a line (the up and down arrow keys are not used here). Input is constrained to a single line, meaning it can only be at max 31 characters; however, no input needs more than 10 characters, and current implementation will ignore all input past the first 10 characters (meaning it won’t be displayed or processed). The sixth is the enter key, which we elaborate on in the next paragraph.
Input for the interface is consumed entirely with press of the enter key. It is then pattern matched to one of several options, which, unless a store item name, is a single letter or integer long. In the implementation, the function call “get_input()” puts the string value, maximum 31 characters, into the temporary storage buffer “input,” from which it can be processed. Any call to “get_input()” blocks until the enter key is pressed. This is used for controlling program flow within each state. Whenever the interface prompts for input, “get_input()” is being called.
The enter key can also be used to exit out of almost any command if it is the only input.
One goal for designing the interface was to make it very user-friendly and have effectively no learning curve – someone should be able to stand at the point of sale system with no training and know exactly what their options are, and how to fulfill their task. At each request for user input, a full list of the user’s options is always displayed. While sometimes the user has no options (for instance, when the user makes a request to scan an item), they are still told what they must input to proceed (for instance, enter/scan a valid barcode). Overflow is also caught and handled throughout.
A second goal was to help prevent user errors. Whenever invalid input is entered, the user is explained why the input is invalid, and told made to try again. The user also has the ability to undo scans in purchases and returns, or, if too many mistakes were made, the option to completely cancel a purchase or return is given.
We now explain each menu of the interface. A briefer version for the end- user is included below.
Welcome menu: This is the main menu from which each other menu is linked, and each other process ends in a return to this menu. By entering a “p,” “r,” “i,” “m,” or “b” and then pressing enter, a user can move to the purchase, return, inventory, money options, or barcode menus respectively. "s" can be used to save the state. Naturally, instructions as to the options are displayed (this should be assumed for the remainder of this report). If an invalid input is entered, the user is informed and the menu proceeds to accept input again. Here, input is limited to one character (and, as can be seen, that’s all that’s needed for any command).
Purchase menu: This is the menu at which a purchase is made. After a purchase, the user is returned to the “welcome menu.” Here, the user has a few options. They can scan an item and press enter, which adds it to the current purchase, assuming it is within the valid barcode range (0 – 19). If it is not, the user is informed that the barcode is out of range and nothing happens, and they are prompted for the next input.
A user could also press “u,” followed by enter, to turn on “undo mode.” This would undo the purchase of the next scanned item. The system then exits undo mode. If the user tries to undo past the number of a given product currently in a sale (e.g. if a user tries to undo 7 widgets when there are only 6 in the sale). The user is also told that a sale of an item cannot be made, if the in-stock quantity of that item would fall below 0.
The user can enter multiple of an item on each scan. After entering a barcode, the user can press “space” and then enter a quantity, before pressing enter. If the user does this, it adds that quantity of the item to the sale, instead of just 1 (of course, the quantity added could be 1 as well). If he just presses space and enters no quantity, then this just defaults to one of the item. For instance, if a customer buys seven widgets, the cashier could scan the widget’s barcode and press space, enter “7,” and press enter, and a total of seven widgets would be added to the sale.
If a user tries to purchase past the number of items in stock, this is also not allowed. For instance, if there are seven widgets in stock, and a customer tries to buy eight, the user will be told that this is impossible and that he must enter a smaller number, and told what the max value he can buy is (the stock quantity).
Pressing “enter” without entering anything else implies that the sale is finished. This prompts the user to enter the amount of money the customer is handing him, calculates the change if it’s at least the sale price, and tells the user that the customer must provide more money if it is below the sale price, and waits for a valid dollar amount again. Once a valid amount is entered, the register’s total cash total is updated by the value of the sale, the in-stock quantities are all updated, and the program returns to the welcome menu. At this point, a receipt is also printed (the communication is simply a modified version of the uart communication, and uses printf). Each item in the sale is printed here, the quantity of each item in the sale is printed, and the cost for each item is printed here (quantity times unit price). Then, the total price of the sale is printed. We had considered printing as each item is scanned, but decided the final receipt would be too confusing.
Return menu: The return menu is analogous to the purchase menu, with three small changes. First, there is no change calculation upon finishing. Second, it provides a warning if the level in the cash register gets beneath a set warning level (which is discussed in more detail later), which is now relevant since the cashier is losing money. Finally, if the value of money in the cash register dips below zero, the program tells the user to add more money into the register, and asks for the user to input the amount being added. Once enough money is added, the processing of the return continues.
Money options menu: Here, the user can set various money related options about the Point of Sale system. This menu is very simple. “w” prompts for a positive integer input, and then sets that value as the new aforementioned “warning level.” “a” prompts for a positive integer input, and then adds that much money to the total amount in the cash register. “s” prompts for a positive integer input, and then subtracts that much money from the total amount in the cash register. “i” simply displays the amount of money in the cash register. The user is returned to the welcome screen after each option switch.
Inventory menu: The inventory menu has six main options. “q,” “n,” and “p” allow the user to change an item’s in-stock quantity, name, and price respectively. For the name, due to memory limitations, any input past the first 10 characters is ignored. With each command, the user is first prompted to input a valid barcode (and bounds checking is implemented as in the purchases and returns), and then the user is asked to input an appropriate value (positive integer below the overflow threshold, for quantity and price, nonempty string for name). “i” returns the information of the price, name, and quantity of a valid barcode. “a” adds an item definition to the system. It allows a user to easily set all three values in succession, giving three prompts in a row in the order of name, in-stock quantity, and price, and is intended for adding new items to the records. If an item is not added specifically using the “a” command, it cannot be used for anything (and errors will be thrown to the user that the item does not exist, and the user will be reprompted to enter something, as usual). “d” allows a user to delete an item definition, and it will be as though it never existed. A user cannot add a barcode that has already been added without deleting the old version first. Records are printed for any system changes made. "l" prints a list of all inventory.
Finally, enter returns the user to the welcome screen.
Barcode menu: This is the last menu we wish to discuss. Here, the user is prompted to enter a barcode in the range of 0-19 (error checked as usual). After doing so and pressing enter, a barcode of the corresponding number is printed on the receipt printer (theoretically barcode paper could be used). Pressing enter with no input returns to the welcome menu.
Tradeoffs
Three tradeoffs had to be made, the first concerning the max item number. We restricted the total number of different items (unique barcodes) that the system could track for two reasons. First, it freed up memory so that we could dynamically use it to keep track of all the items in a sale, and write easily to the uart. This is important because it lets us print all items at once at the end of a sale, instead of each item as it is added or removed from the sale, which would be difficult to read.
A second tradeoff we made was to use integers for all prices. To use floating point was tempting, but ultimately there were so many corner cases that the trade-off for bug potential vs. robustness was deemed not worth it. The system also would have taken some performance hits. Secondly, we decided against fixed point because this would have had too small a range of integer size if we also wanted good decimal precision. In this case, the problem could be fixed by representing a number as two fixed point values (two integers), but this would have taken double the memory, which was already a valuable commodity, and thus we again opted against it.
Third, there was a monetary tradeoff in that many of our parts were store-bought (or eBay bought). If we had built some of our components, such as the LCD, the cost would have been much lower and we could have allocated these resources to other “bells and whistles.” We considered this a good tradeoff though for time and reliability purposes.
Adopted Code
As previously mentioned, we modified Bruce Land’s version of Joerg Wunsch’s uart code for RS-232. We removed echo and changed some control characters. This was the only adopted code.
However, two other pieces of code were used as references in developing our LCD code. The code found at http://homepages.sover.net/~snowleop/gdisp3/ was used as an example for determining parameters for the LCD, while the LCD write_command() and write_data() functions written by Akosua Kyereme-Tuah, Andrew K. Lee, and Susan Li-Wen Li were used as inspiration for our own version.
Unimplemented features
We had originally planned to add a card scanner to allow for purchase using Cornell Card (or credit/debit cards, in theory). Since the card scanner worked under the PS/2 protocol, it added no additional interfacing difficulties. The issues came in memory management – while information retrieved by Cornell Card is simply the student’s ID, debit and credit cards contain much more information. If we were to implement this, we would have to save much heap space for the information, and then if we wanted to save the information for billing purposes (which is the only way we saw it as useful), we would have had to allocate further information. Since we had the tradeoff of no billing information or using a lot of the microcontroller’s memory, and neither were particularly favorable options, we decided to bypass implementation of the card reader.
Although we did not initially intend to support it, networking was considered as a possible important feature in our system. Since inventory is kept track of and updated in real time in our system, a store with multiple cash registers, under our current implementation, would have different inventory reports for each register. This is a serious real world problem, but networking is a problem in and of itself and thus considered outside the scope of the project. Still, should be considered strongly for future improvements. We feel that this would be monetarily inexpensive.
Menu Reference
Welcome Menu Screen
- “p” – Perform a purchase, and go to the purchase menu.
- “r” – Perform a return, and go to the return menu.
- “i” – Edit the store inventory, and go to the inventory menu.
- “m” – Edit the station’s money options, and go to the money options menu.
- “b” – Go to the print barcode screen.
"s" - Saves the state of inventory
Purchase Menu Screen
- Scan barcode – If not in “undo” mode, adds one unit of the scanned item to the sale. If in “undo” mode, removes one unit of the scanned item to the sale. If followed by a space and then a positive integer, performs the addition or subtraction of the unit that many times (for example, “7 24,” when not in “undo” mode will add 24 of the item with barcode “7” to the sale). An undo past the number of items added to the sale will be rejected.
- “u” – Enters “undo” mode for one item. When in “undo” mode, the next scanned item is removed from the sale. Supports undoing multiples of an item at once. Commands to undo items past the number currently added to the sale are rejected.
- “c” – cancels the sale, and returns everything to the state it was before entering the sale. Returns to the welcome menu.
- Enter – Tallies the sale. This prompts for the customer’s payment amount, and requires an amount greater than or equal to the sale price to proceed. It then gives the amount of change, updates the system’s cash, finishes and cuts the receipt, and returns to the welcome menu.
Purchase Menu Screen
- Scan barcode – If not in “undo” mode, adds one unit of the scanned item to the return. If in “undo” mode, removes one unit of the scanned item to the sale. If followed by a space and then a positive integer, performs the addition or subtraction of the unit that many times (for example, “7 24,” when not in “undo” mode will add 24 of the item with barcode “7” to the sale). An undo past the number of items added to the return will be rejected.
- “u” – Enters “undo” mode for one item. When in “undo” mode, the next scanned item is removed from the return. Supports undoing multiples of an item at once. Commands to undo items past the number currently added to the return are rejected.
- “c” – cancels the return, and returns everything to the state it was before entering the return. Returns to the welcome menu.
- Enter – Tallies the return. It then gives the dollar amount of the return, updates the system’s cash, finishes and cuts the receipt, and returns to the welcome menu. If there is not enough cash in the register to complete the return, money must be added equal to or greater than [return price – total cash in register] to continue (the user is prompted for this). Gives warning upon completion if money in register dips below the set warning level.
Inventory Menu Screen
- “q” – Prompts for a barcode, then prompts for a positive integer. Sets the in-stock quantity of the scanned item to the input value. A record of the inventory change is printed.
- “n” – Prompts for a barcode, then prompts for a character string of length less than or equal to ten characters. Sets the name of the scanned item to the input value. A record of the inventory change is printed.
- “p” – Prompts for a barcode, then prompts for a positive integer. Sets the cost of the scanned item to the input value. A record of the inventory change is printed.
- “a” – Prompts for a barcode, then prompts for a name, price, and in-stock quantity, and sets the appropriate values as in the above three cases. The item is now considered part of the inventory. A record of the inventory change is printed.
- “i” – Prompts for a barcode, then displays the name, price, and in-stock quantity of that item.
- “d” – Prompts for a barcode, then deletes that item from the inventory records, sets price and quantity to 0, name to blank. The item is no longer considered part of the inventory. A record of the inventory change is printed.
- "l" - Prints a list of all inventory.
- Enter – Returns to the welcome screen.
Money menu screen
- “w” - Prompts for a positive integer, then sets warning level to this input value. Cash register will display a warning whenever its cash value becomes less than this set value.
- “a” – Prompts for a positive integer, then increases the cash value of the register by this value. Prints a receipt of the amount by which the money increased in the cash register, and the new value of the total money in the cash register
- “s” – Prompts for a positive integer, then decreases the cash value of the register by this value. Cannot decrease the cash value of the register to less than zero.
- “d” – Displays the cash value of the register.
Print Barcode screen
- Positive integer between 0 and 19 – prints a barcode of the input number.
Results
Speed of Execution
There is no flicker in our display, and input is processed and displayed effectively automatically (i.e., delays are shorter than can be noticed). The only noticeable delays come from saving and loading (once on bootup). Since only 1.2 Kbytes can be sent to/from the receipt printer a second, this causes delays of up to 3 or so seconds after each of these processes. We do not consider this a major issue, since 3 seconds is a mostly insignificant amount of time with respect to most point of sale transactions which usually have at least 3 seconds between customers. When updating the inventory, if making several changes in a row, it is possible this could become cumbersome, but we do not think that the three second delay will be very significant (for instance, making even 100 changes in the inventory, double the storage total, which is enough to delete and add 20 items, would take 5 extra minutes, and this is the most extreme realistic case we can imagine; it is not a major issue).
Accuracy
Accuracy was not an issue except in PS/2 control. In one or two times in 20-30 hours of operation we saw the input PS/2 signals shifted to the left by one bit, this was a bug that has been difficult to replicate and thus isolate. As a fix, on the off chance that this should show up again, we added a button, as discussed, to fix the data stream indexing issue by resetting the index to 0 (effectively, a recalibration).
Safety
Safety was not really an issue in this project. We do have some exposed wires; we did not address them because this is really a prototype; it would be easy to cover them in a commercial application.
Interference
Interference is not an issue in our project.
Usability
We tried to make our interface as user-friendly as possible. This meant following four of the five rules of usability as closely as possible – making the system easily learnable (giving information for the commands at each screen, giving the menus descriptive names), rememberable (implementing traditional control keys, keeping the number of menus and commands limited), error prevention (quick cancel commands, undo commands, automated error checking), and efficiency (easy input of multiple items, few keystrokes per menu, barcoding scanning). We also aimed to make the interface as consistent as possible in style.
Some common error protection included checking for overflow, out of bounds input (particularly with barcodes), sufficient funds/quantity checking, input length restriction, and checking for integers when only integers can be entered.
Saving only occurs at the save state command in main menu. This is to prevent inconsistent state in the event of a power surge.
Our LCD is scrolling, and automatically displays the most recent information. To help the user with the limited screen size, relevant information to the current task is often reprinted to the LCD.
One thing we didn’t implement was a light for caps lock. This was nontrivial because it required us to read back from the microcontroller into the keyboard, which was not worth the implementation costs.
Another problem is that deletion of characters does not shift the subsequent characters on a line as expected. This also had more considerable implementation costs with buffer allocation, but in retrospect would have been rather nice to have.
Conclusions
Overall, our project worked as hoped. Our only three main caveats are the two unidentified PS/2 errors, the lack of a card reader, and the long save/load times. Future changes might include using the system’s EEPROM instead of the receipt printer for non-volatile memory, as it would probably be faster, implementing fixed point for decimals, keeping track of the time in some way, adding networking for synchronization of inventory, a security system (either using a password system or magnetic swipe), and a digital tracking of transactions. The extensions are very open-ended, but we believe that what we constructed suffices for basic applications at an affordable price. On the less important end of the spectrum, structural additions might have been nice, such as a cash drawer.
As mentioned, we did not fully implement the PS/2 protocol, but implemented it insofar as it was relevant to our application (i.e. reading from keyboard, but not writing to keyboard). Additionally, we made minor changes to RS232 for our application. But we don’t consider these to be issues since their effects are confined to our application and are not detrimental.
No code is directly copied from anywhere, although some LCD code from other projects were used as a guide for LCD implementation. There were no patent, trademark, or non-disclosure issues. We do not consider there to be patent or publishing implications for our project, but would like to make the design and code publically available so people could cheaply build their own point of sale system.
Despite its simplicity, there are some serious ethical considerations to our point of sale system. First, there is no security feature to our point of sale system. Anybody can edit the system without clearance, so in theory, any customer (or thief!) could walk right up to our cash register and rob the place clean if the register is not being attended. Possible solutions include using the magnetic card reader for security clearance, or to set up a password system. Further, there is no digital tracking system for the register. While physical receipts are printed, they can easily be discarded and is intended for responsible users. There can still be user error where a slip is misplaced, or further, there could be corruption. For instance, there is currently no way to check if an employee were stealing from the store. These two security issues are probably something that would need to be addressed before the system could be adopted by the general public. Luckily, these are software implementation issues and could probably be added rather simply.
A hardware problem, though, involves the dangers of keeping all inventory in one storage device, namely, all on the receipt printer. It would be good to make the data exportable in some form, so it can be placed on a backup hard drive or something of the like. As it is right now, the system is reliable on the fact that the memory of the receipt printer never be corrupted or damaged; a promise that is impossible to make for almost any memory storage device.
The lack of security is considered a legal consideration, but has already been discussed in the ethics section.
Acknowldgments
We would like to thank Bruce Land and Yuchen Zhang for their laboratory help and expertise. We would also like to thank Kevin Drake and Paul Richards from the Cornell store for donating the receipt printer and card reader.
References
Sources
http://moodle.cit.cornell.edu/file.php/140/mar-26-reset-and-usability.pdf
http://www.computer-engineering.org/ps2protocol/
http://www.beyondlogic.org/keyboard/keybrd.htm
http://courses.cit.cornell.edu/ee476/FinalProjects/s2002/akl4/home.htm
http://homepages.sover.net/~snowleop/gdisp3/
http://courses.cit.cornell.edu/ee476/labs/s2010/lab1code/uart.c
http://www.allelectronics.com/make-a-store/item/LCD-101/256-X-128-LCD-PANEL//1.html
Receipt printer
http://www.cognitive.com/downloads_7.aspx
bar code scanner
http://www.instrumentsandequipmentco.com/support/welchallyn/3800usermanual.p
df
scan code ref
http://www.computer-engineering.org/ps2keyboard/scancodes2.html
lcd ref
http://www.lcd-module.de/eng/pdf/zubehoer/sed1330.pdf
Tasks
PS/2 Implementation - James, Andrew
LCD - James
Interface - James, Andrew
Printer code - James, Andrew
UArt - James
Report - James, Andrew
Website - Andrew
Costs
Cost List
Stk 500 $15
White board $6
Hyundai HG25504 18.50
http://www.allelectronics.com/index.php?page=search&search_query=lcd-101&x=0
&y=0
Mega644 $8
Ps/2 extension cable $1.13
http://www.monoprice.com/products/product.asp?c_id=102&cp_id=10204&cs_id=102
0401&p_id=93&seq=1&format=2
Axiohm A758 Receipt printer donated from Cornell store
Welch Allyn IT 3800 $9.99
http://cgi.ebay.com/ws/eBayISAPI.dll?ViewItem&item=180478702859&ssPageName=S
TRK:MEWNX:IT
PS/2 keyboard owned
-12V wall wart scrapped from ECE 476 lab
3 1 wire flat cable $3
1 2 wire flat cable $1
Serial cable $1.63
http://www.monoprice.com/products/product.asp?c_id=102&cp_id=10212&cs_id=102
1201&p_id=448&seq=1&format=2
TOTAL: $64.25
Code
uart.c
uart.h
interface.c
lcdps2.c
by James and Andrew, 2010.
Cornell University |
ECE 4760