WIRELESS TRANSMIT AND RECEIVE
PROJECT REPORT
Introduction
The purpose of this project was to research wireless transmit and receive hardware for which feasible software can be developed. Several devices were researched and selected or rejected based on hardware characteristics as well as software feasibility. The Radiotronix chips were selected and the wifi driver was written.
txrx.c is the wireless transmit and receive driver designed for the Atmel MEGA32 for use with the Radiotronix RCT-433-AS transmitter and the Radiotronix RCR-433-RP receiver. The microcontroller interfaces to the transmitter and the receiver through the serial TX/RX pins. This driver is designed to abstract away the mechanism by with a packet is transmitted by allowing the user to transmit at packet granularity without having to account for the physical layer.
This driver was tested on a system of several nodes containg receivers and transmitters.
Initial Proposal
This is the Initial proposal I submitted:
Researching Hardware
The first stage of the project will involve researching different RF transceiver hardware available in the market. The criteria of selection will also be developed here, based on cost, feasibility, design simplicity, reliability and packaging. At the end of this, I expect to have a short list of devices to try out as well as preliminary circuit diagrams and a parts list.
Developing Communication Protocol
Once the devices are selected, the next step would be to select some form of a wireless communications protocol. This will involve selecting packet formats, packet/channel identification marks, error control codes, and potentially encryption. Based on the practicality of the algorithms and formats, I will select 2 to 3 variations to implement and test for performance and reliability. Completion of this stage would be satisfied by the selection and the communication schemes and a preliminary specification of the system. [Meanwhile, during this phase, in the lab, I will start building the aforementioned circuit diagrams].
Implementing (in Code)
During this phase, the software for the system will be written. Of course, this and the next step are interleaved; while the bulk of the software would be written before testing, there will probably be significant additions and deletions during debugging. Once I have completed writing the bulk of the code for the system, I will officially move on to the next phase. [Note: software approach will be API based where the user will see TX and RX functions only.]
Testing/Debugging in Hardware
During this phase, the hardware and software will be thoroughly tested and fine tuned to account for all the corner cases. A working system would signal completion of this stage.
Final Consolidation and Report
Based on my memory of the steps above, as well as the notes I would have taken, I will write a final report. Here the circuit diagrams and specifications would be finalized and the communications protocol be clearly defined. I would also like to write a journal-level paper for submission on my research experiences. This would be populated by the criteria and results of the tests and selection between the various hardware and communications protocols.
Product Research
The Excel file DeviceSurvey contains the data produced as a result of the exhaustive research into the wireless chips that fit the characteristics desired by this project. This primary selection criteria was composed of the simplicity of the chip, either On/Off keyed or FSK protocol, and an appropriate frequency range. Of the devices reported in the file, the shaded ones were initially selected based on cost and feasibility. The Abacom chips were rejected due to cost and the RFM chips due to a non-compatible package type. Of the ones highlighted, the ones in yellow were further eliminated due to inability to soldier such small package types. This left the Radiotronix and Laipac devices, both with 2.54mm pins. After significant attempts to contact Laipac by Bruce Land, we were unsuccessful, and hence we decided not to use Laipac devices. Thus, the Radiotronix chips proved to be most cost effective and convinent to install. The simple OOK protocol also made it more compatible with software.
OOK means On/Off keyed, or that Transmit 1 mean signal and Transmit 0 means no signal. The receiver has an auto step-up on the gain to determine a transmission. If it detects nothing, it continues to increase the gain until it reaches its max, and reduces only when the transmission is detected. Hence, any transmission must first calibrate the receiver to properly detect 1's and 0's. The transmitter must also transmit equal numbers of 1's and 0's so as not to offset the calibration. Thus, in the transmission scheme below, only DC balance packets are transmitted.
Concept/Theory
OSI Model
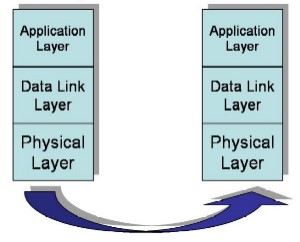
The lowest layer is the physical layer which is composed of the transmitter and receiver operating at 433MHz using On-Off keying. A transmit 1 is achieved by a signal, and a transmit 0 is no signal. (Note that because of this, the data sent must be DC balanced). The next level is the Data Link layer, which is responsible for encoding and decoding the data. As an encoding scheme, a byte is split into two nibbles. The encode method encodes each nibble separately into DC-balance bytes. There are 70 DC balanced bytes, and of those the ones that start with a 10 were selected. Of these, 10101010 is reserved for synch. This leaves 19 byes that can be used to map the Binary-4 space. The three that were removed had the most number of ones and zeros together (which would upset the DC balancing). The below table presents the character set used. Above the data-link layer is the application layer which is responsible, here, for the direct interpretation of packets.
Intended Hardware
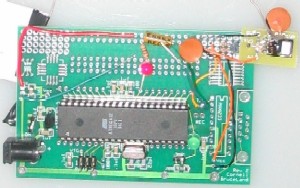
The intended hardware for this driver is the Radiotronix RCT-433-AS transmitter and the Radiotronix RCR-433-RP receiver chips interfaced to the MCU through Port D.0 and D.1, the USART TX and RX ports. The intended circuit diagrams on the connections of these chips are provided in the diagram below. Additionally, the picture shows an example of a transmitter circuit.
Packet Encodings/Variable Length
The encoding and decoding both occur through a table look up because an exhausting search for a pattern revealed nothing. Note that there is a built in 1-bit error detection code by virtue of the DC balancing. That is, that the hamming distance between pair wise bytes is a minimum of 2. (since for any 1 that becomes a 0, another 0 must become a 1). In addition to the encodings in the table above, there are two more dedicated characters, the packet start character and the packet end character. The start character is 202 and the end character is 212.
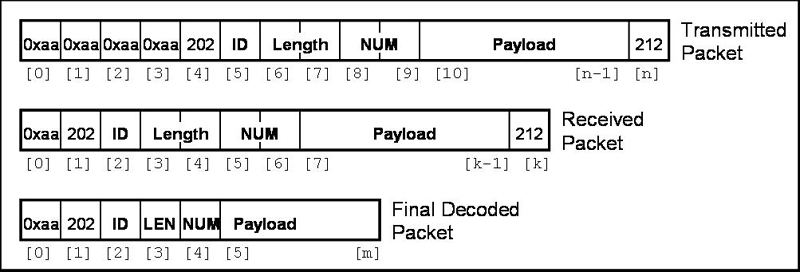
The packets can be of variable length. In the finally transmitted packet, the first four bytes are the synch character 0xaa. Next is the start character, followed by the transmitter ID. Next, two bytes provide for an 8-bit length, and 2 more bytes follow for the 8-bit packet number. Finally, the payload and the packet end character follow. The RXC ISR receives the packet without the first three synch characters. The finally decoded packet removes the DC balancing and recovers the original data, as demonstrated in the below diagram.
Usage Model
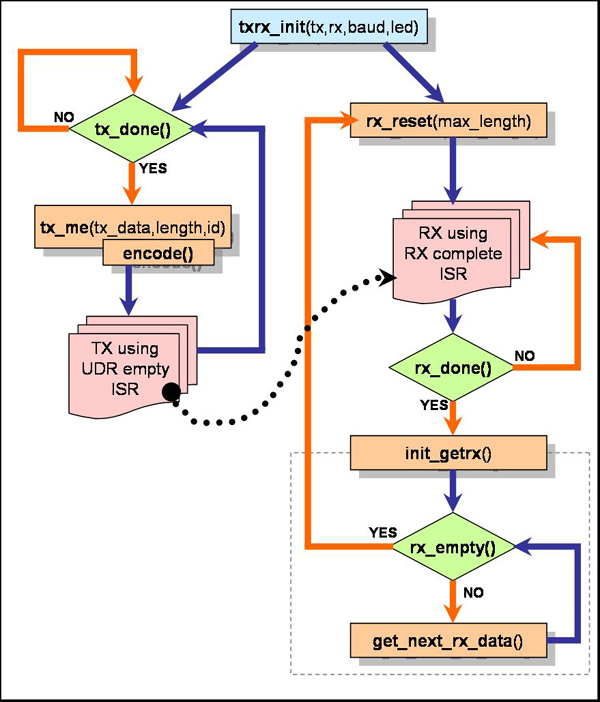
Consider the below diagram which depicts the usability of the driver functions. Notice the two flows, the transmit and receive sides. In general, it is recommended that only one side be used at a time. The provided init function can be called again and again to change the settings if it becomes necessary to oscillate between using one side or the other. The reason is to avoid cross interference when operating both wireless devices.
The gray box in the above diagram represents the iterator on the receive side used to iterate through the received bytes vector. The function specifications below will clarify how the usage model above works.
Design & Development
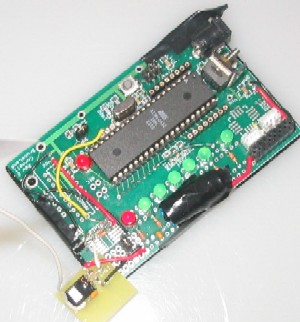
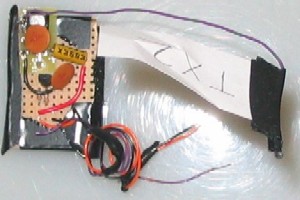
The basic design and concept of the system was adapted from my ECE476 Final Project, which involved a wireless telemetry system. The telemetry data was transmitted over a wireless network using the same packetization technique here. However, here there are several enhancements such as variable length, seperate device driver, and the start stop characters. A siginficant part of the project involved soldering, as the hardware was all put together on a BruceLand PCB. I had received several PCB's with the MCU and supporting devices already mounted. I had to mount the RX and TX chips and the basic devices that went with them such as inductors, resistors and capacitors. The power supply to the TXRX chips are capacitively coupled to ground, and go through an inductor before entering the devices. The antennae also have a capacitor. The data to the transmitter is inverted, since the USART TX port idles at 1, and we want to transmit 0 as idle. Consequently, the received input must also be inverted before driving the USART RX port. Of course, this allows the RX port to receive a cleaner signal than the one directly from the receiver chip.
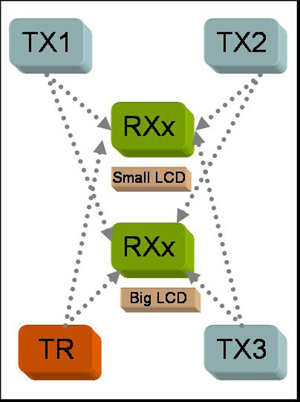
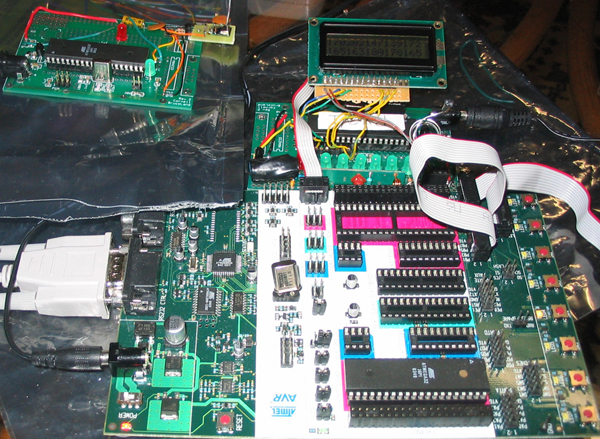
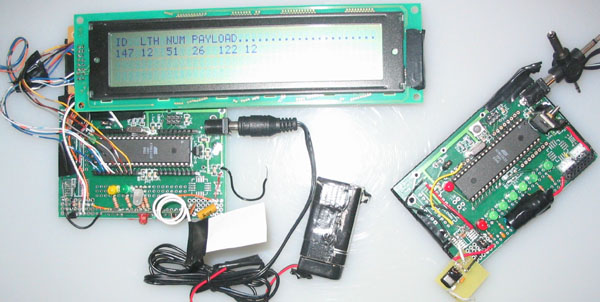
The soldiering was rather cumbersome due to the lack of appropriate utensils. Nevertheless, all the PCB nodes were soldiered properly and rendered functional. All in all, there are 3 dedicated transmitters, 2 dedicated receivers, and one tranceiver. Each receiver has an LCD display that displays the packets received. The transmitters transmit with different ID's and lengths. Below is a diagram that shows the complete system.

The next step was to write the software, which took less time than the soldering effort. Based off of the code written for the ECE476 Final Project, the transmit and receive side shell test files were quickly generated. The actualy transmit and receive functionality was collected in txrx.c, the driver file with all the functions. One of the problems encountered was returning an array from a function. After failed attempts to use pointers, I resolved to create an iterator. While slower than passing a pointer to an array, the iterator proved to be functional. The next challenge was driving the big 4x40 LCD. After playing around with the signals in creating my own drivers, I encounted an already built-in driver for the lcd. Attempting to use it failed initially because I was using the pinout specified in the spec sheet that accompained the LCD. After experimenting, I realized that that pinout was infact wrong, and the one specified in the help section of the lcd4x40.h is the correct one. Finally, the LCD was working and displaying the packets properly. In order to display the packets received properly, several scheme were explored. The display's first line contains the column headers. That leaves three lines, which can be treated as a fully associative cache. The first attempt was to keep track of the LRU ID of the ones currently displayed. When the next packed was received, the appropriate ID would be replaced or the LRU ID would be replaced. However implementing this method proved unsuccessful. The final design does an unconditional round-robin replacement policy. Hence, the 3 most recently received packets are displayed at all times.
Function Specifications
General Functions
void txrx_init(int tx, int rx, int baud_num, char led)
This function sets the UCSRB and UBRRL register appropriatly. tx and rx should be either 0 and 1, depending on whether the functionality is desired. baud_num is the value that would be assigned to UBRRL. If led is 1, then the default LED on the protoboard is used to indicated activity.
char decodeOne(char msbyte)
This function returns the decoded character of the input.
char decode(char msbyte, char lsbyte)
This function returns the decoded character formed from the two input bytes.
Receive Side Functions
interrupt [14] void RX_complete(void)
This is the RXC interrupt service routine. It takes the received byte and places it in a receive buffer, allowing the next byte to be received. The ISR check for the packet start character and does not store the synchronization bytes. It also checks for the length bytes and looks for a packet upto the appropriate length.
void rx_reset(char max_rx)
This function is used to reset the receiver to allow it to receive the next byte. This function must be called inorder to receive the next transmission after one has been received. The max_rx input tells the receiver what is the maximum length of packet to expect. The bui;t-in max is 32bytes, this merely provides a failsafe incase one is desired.
char rxdone(void)
This function, when called, return 1 or 0 depending on whether the current packet has been fully received.
void init_getrx(void)
This function initiates the iterator that will return the bytes received.
char get_next_rx_data(void)
This function returns the next byte of the received packet.
char rx_empty(void)
This function returns whether the iterator has reached the end of the packet or not.
Transmit Side Functions
interrupt [15] void udr_empty(void)
This is the UDRE interrupt service routine. When the current byte has been transmitted, and the UDR becomes empty, the ISR takes the next byte off of the transmit buffer and places it in the UDR for transmission. If all bytes have been transmitted, then the ISR zeros the tx_ing flag.
void encode(void)
This function encodes the given data vector into a zero-balanced packet for transmission.
void tx_me(char tx_data[], int length, int id)
This function accepts the given data, the length, and the transmit id and sets up the transmission. If a transmission is in progress, the function ignores the inputs.
char txdone(void)
This function returns whether the previous transmission is completed or not. This must be called before the next transmission is setup.
Tests
Device: Packet
TX1 : {4,count,26,122,75,52}
TX2 : {5,count,26,122,75,52,98}
TX3 : {3,count,26,122,75}
Results
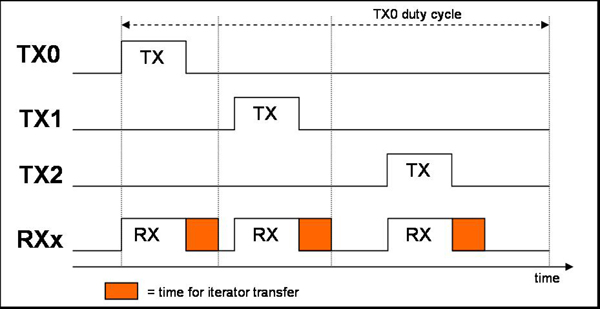
The above packets were received successfully by the receiver systems. In fact, the receiver was able to pick up transmissions from two different users transmitting at the "same" time. The diagram below explains how the transmission worked to receive multiple transmissions. The time in the orange reflects the time the iterator takes to give you the data. You can reduce this time by replacing the iterator mechanism by a pointer based transfer. I intend to add this enhancement to the code shortly.
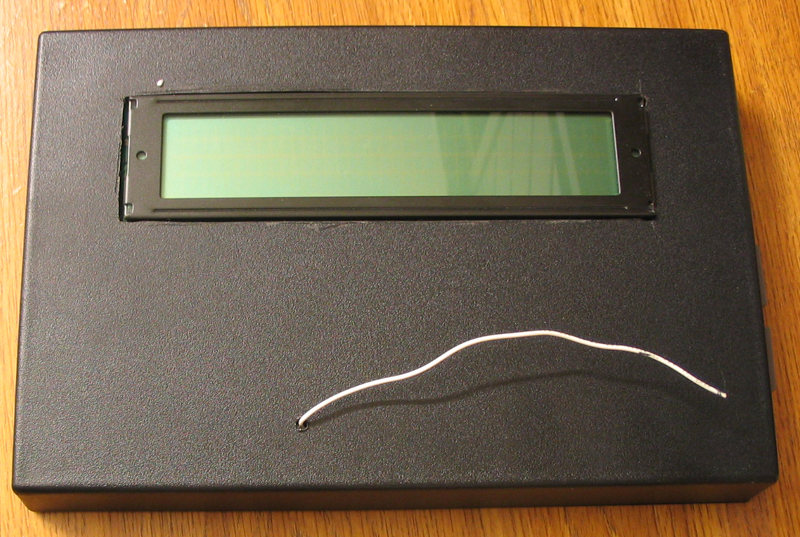
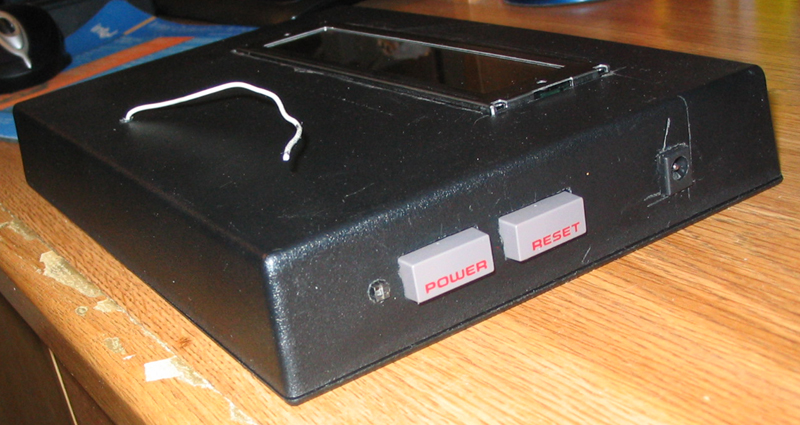
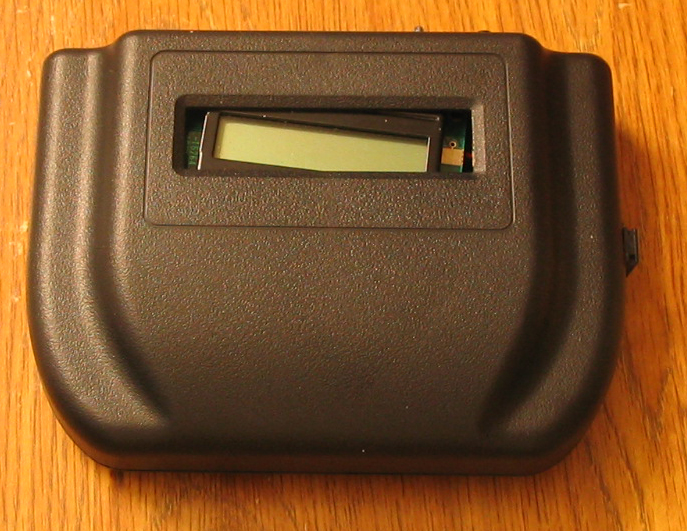
Below is the new system:
Conclusions
Overall, the project goals have been acheived. A functional system was developed, and a usable packet sniffing RX device has been constructed for future use in a Lab setting. Of course, the UBRRL would have to be modified based on the baud rate of the expected transmission. Due to time limitations, I was unable to try some of the examples listed in Appendix A, such as packet-loss free network or MAC.
Cost Analysis
Figure Parts.List
|
Part Name
|
Model No.
|
Mfr.
|
Supplier
|
Qty.
|
Unit Price
|
Total
|
|
Atmel Mega 32
|
ATMEGA32
|
Atmel
|
Bruce Land
|
6
|
$8.00
|
$48.00
|
|
Custom PCBoard
|
BruceLand rev2
|
PCB Express
|
Bruce Land
|
5
|
$5.00
|
$25.00
|
|
RF Transmitter
|
RCT-433-AS
|
Radiotronix
|
Mouser Electronics
|
4
|
$3.50
|
$14.00
|
|
RF Receiver
|
RCR-433-RP
|
Radiotronix
|
Mouser Electronics
|
3
|
$4.50
|
$13.50
|
|
Dual PC Board
|
276-148
|
RadioShack
|
RadioShack
|
1
|
$1.79
|
$1.79
|
|
2x16 LCD Display
|
|
|
|
1
|
$8.00
|
$8.00
|
|
4x40 LCD Display
|
|
|
|
1
|
$24.00
|
$24.00
|
|
Other Lab Components
|
R's, C's, Wires
|
N/A
|
Bruce Land
|
1
|
$1.00
|
$1.00
|
|
|
TOTAL:
|
$135.29
|
Appendix A - Usage Examples
How to set-up a transmission
In order to setup a transmission, one must first call the txrx_init function as follows: txrx_init(1, 0, 249, 0) This sets the UCSRB to transmit, the UDRIE to 1, UBRRL to 249 and makes it so that the LED will not be used. After this, one must use the follwing function
tx_me(tx_data[],length, id) which will setup the necessary variables and call the encode()function to setup the packet. The next packet cannot be sent until the txdone() function returns a one.
How to set-up a reception
In order to setup a reception, one must first call the txrx_init function as follows: txrx_init(0, 1, 249, 0) This sets the UCSRB to receive, the RXCIE to 1, UBRRL to 249 (should be the same as the transmitter) and makes it so that the LED will not be used. Note that the rx_reset method need not be called here since it is a subset of the init method. However, it must be called again after the first packet is received. Once the rxdone method reveals that the packet reception is complete, the iterator must be initiated to extract the packet byte-by-byte. The get_next_rx_data function is called until the packet buffer is empty. Again, before being able to receive the next packet, the rx_reset function must be called.
How to set-up a packet loss free network with transceivers
With two nodes that have tranceivers, one can set up a system of packet-loss free transmission. When one node transmits a packet, it can require a confirmation from the receive side that the packet has been received. If no confirmation arrives with a constan period of time, the packet is re-transmitted. This process is repeated until the transmitting node receives confirmation that the packet has been successfully received. With this scheme, one must worry about the No Progress situation. If no confirmation is received after a few iterations, then perhaps the transmitting node and signal a loss of communication with the receiving node. The functions provided in the driver can be used to set this up, but remember to not have both transmit and receive active at the same time.
How to set-up a possible medium access contention (MAC) layer
With multiple nodes that have tranceivers, one can set up a system with MAC layer, where each node who wants to transmit turns the receiver on first to check whether there is an active transmission. If not, then the node can begin transmitting. If there is an active transmission, the node must wait until the transmitting node is done before transmitting.
Appendix B - Pictures
Appendix C - Videos
Large Display
Small Display
Appendix D - The Code
The receiver test file is rx.c. Note that the baud rate is hard coded to 2400 baud for the test receivers.
The transmitter test file is tx.c. Note that the baud rate is hard coded to 2400 baud in this file.
The driver is txrx.c.

