
Bob Amidon
Cornell University, 1995

The goal of this project was to create a more advanced volumetric rendering module for Data Explorer that provides realistic shading and perspective camera views. Due to the large amount of data that must be processed when volume rendering, secondary goals of the project were to conserve memory resources and keep the processing time to a minimum.
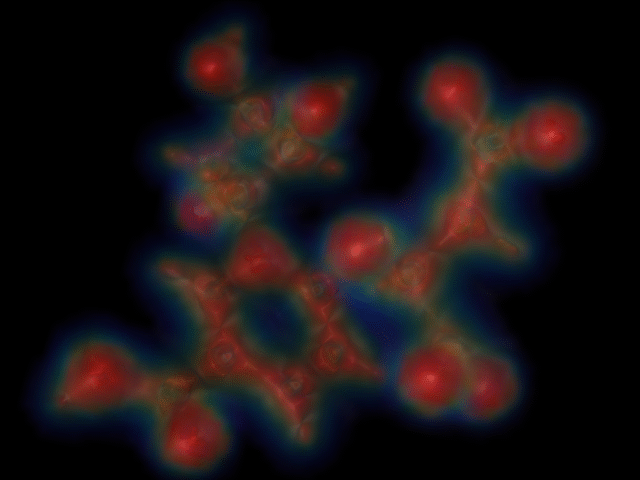
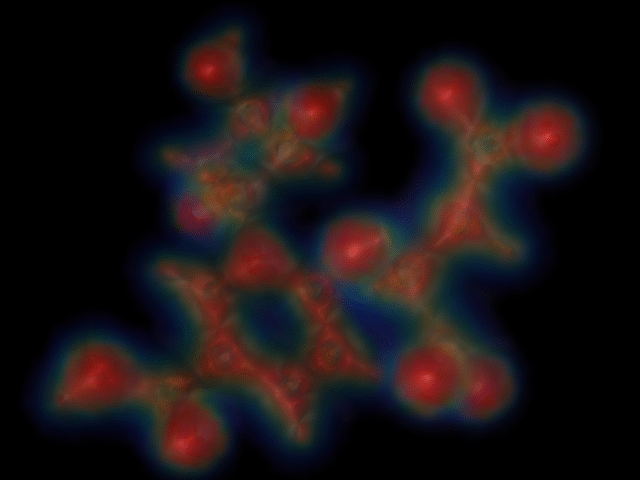
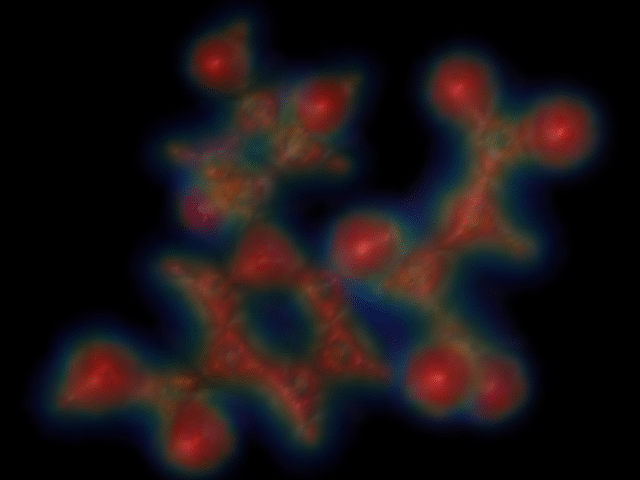
The Vol module has six inputs and one output. Here is a sample network showing how it is used.
The Colormap module selects the colors and opacities based on the density of each voxel. For performance reasons, it is suggested that opacities be clipped when they fall below a minimum threshold value. The rendering algorithm is optimized to bypass the shading calculations when a voxel is completely transparent, therefore, by changing near-zero opacities to zero allows more voxels to make use of this optimization. If the threshold value is chosen well, no information should be lost in the rendering.
The normal vectors are calculated by the Gradient module. These vectors should not be normalized. During the rendering process, the normal vector for a voxel is calculated by interpolating the normal vectors from the eight surrounding voxels. By using the non-normalized vectors in the interpolation, the magnitudes of the vectors affect the outcome of the interpolation by giving a proportional weight to each vector.
When the data set being visualized is composed of discrete materials, then it may be desirable to assign colors and opacities based on the materials contained by the voxel rather than by density alone. For these data sets, a probablistic classifier can be used to extract the percentage of each material contained by the voxel from the density. Then attributes can be assigned accordingly. Refer to "Volumetric Rendering" by Drebin, Carpenter and Hanrahan for more information on extracting material percentages from density values.
Grid size/spacing information and shading properties are also extracted from the first input. The grid information includes grid dimension, grid counts, grid origin and grid deltas. The grid dimension must be 3, volumetric data. Non-orthogonal grids are permitted.
The surface shading properties include the ambient (Ka), diffuse (Kd) and specular (Ks) shading coefficients as well as the shininess level (n). These values are added to the volumetric data stream by using the Shade module. If a Shade module is not used, the default values of Ka=0.4, Kd=0.6, Ks=0.3 and n=15 are used.
The use of the surface strength component is selected by setting the second input value, strength, to 1. When this component is used, the densities must be normalized. This is necessary to keep the magnitudes of the normal vectors, and therefore the surface strength values, between 0.0 and 1.0, otherwise, the resulting image colors will be scaled past their maximum component values of 1.0 and the resulting image will look over-exposed.
If the data set being used does not have strong surface boundaries, i.e. the densities are continuous, it is probably better if the surface strength component is not used (set the strength input to 0).
Note that the strength input must be fed by an Integer interactor when the default value of zero is not used.
The width and height parameters select the resolution of the viewing window and therefore, the size of the rendered image. Because the size of the view window and rendering time are directly related, it may be more efficient to render to a smaller window and then enlarge the result.
The view window size determines the number of samples taken along the x and y axis in view space. If the view window resolution is much greater than the data set size, then most of the samples are just going to be further interpolations between the same data points. By rendering to a smaller image, the amount of oversampling is reduced and the same result is accomplished by interpolating the pixels of the final image.
For example, a 64 cubed data set rendered at 640x480 pixels will take approximately 10 samples between data points along the x-axis and 7.5 samples between data points along the y-axis. By rendering to a 320x240 image, the job will finish in a 1/4 of the time and the volume is still being sampled adequately (5 x-samples/voxel and 3.25 y-samples/voxel).
640x480 resolution (time=2:25).
320x240 resolution; enlarged to 640x480 (time=0:37).
200x150 resolution; enlarged to 640x480 (time=0:16).
There is no noticeable difference between the 320x240 rendering and the 640x480 rendering. The 200x150 rendering starts to look jagged, though.
Also note that if a large data set is rendered to a small image, the effect will be that some the data points will not be used in the rendering. This could cause discontinuities in the image when abrupt changes occur in the data set or if the mismatch between the data set size and image size is significant.
The z-buffer filename must be fed by a FileSelector interactor, otherwise the default of no z-buffer is assumed.
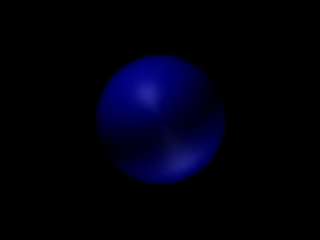
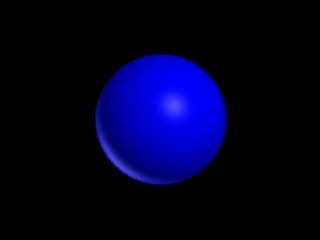
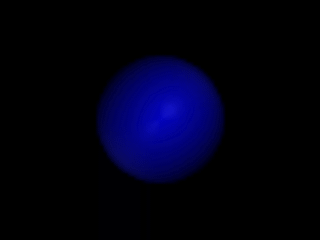
Some ambient shading is needed to fill in the area on objects where the diffuse and specular terms go to zero. The spheres rendered below show the affect that no ambient lighting has. Also notice how the specular reflections appear throughout the object.

To avoid having to allocate memory for the intermediate images, the order that the depth planes are processed is from back to front. This allows each newly rendered point to be merged into the final image immediately, using the opacity to interpolate the point with the image pixel. Therefore, only the memory required for the final image need be allocated.
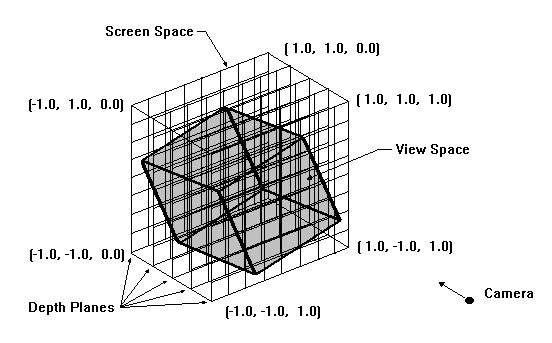
The increment parameter selects the resolution that screen space is sampled at. This parameter is a 3-vector of floats containing the X, Y and Z increments. The Z increment selects the distance between the depth planes and the XY increments specify the regular grid spacings that each depth plane is sampled at.
The depth planes map directly to the final image. Therefore, the XY increments are determined directly from the image size. Since screen space spans a distance of 2.0 (from -1.0 to 1.0) along the X and Y axis, these increments are calculates as 2.0 / (width-1) along the x-axis and 2.0 / (height-1) along the y-axis.
There is no rigid definition for choosing the Z increment as there is for the X and Y increments, however, to satisfy the Nyquist theorem, the Z increment is chosen to correspond to a 1X sample rate. The number of samples required for this rate is found by dividing the view depth (the distance between the far and near clipping planes) by the maximum distance along the z-axis between neighboring data points. Since screen space spans a distance of 1.0 along the Z axis, the Z increment is calculated by 1.0 / (#samples-1).
The images below illustrate the effect of increasing the number of depth planes used in the rendering.
1X sample rate (time=2:25)
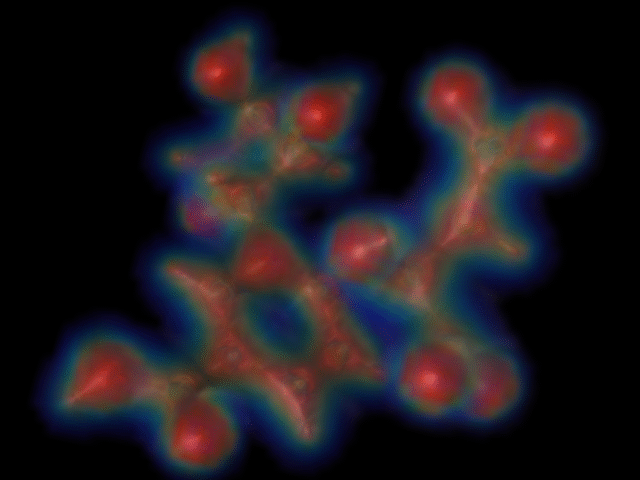
2X sample rate (time=4:48)
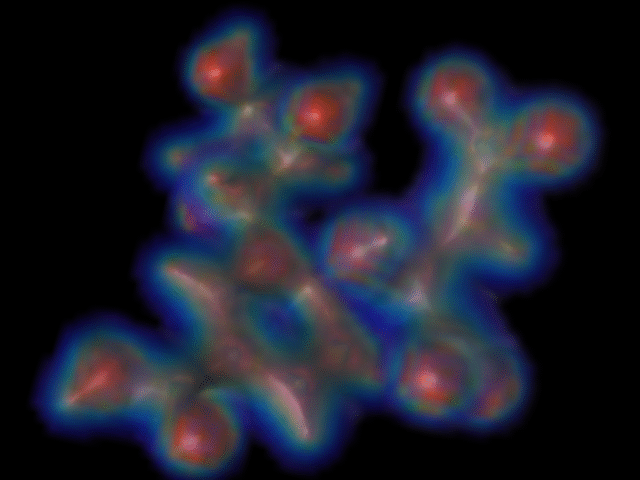
4X sample rate (time=9:35)
To minimize the number of screen points that map outside of the data set, and therefore reduce the overall rendering time, the clipping planes are chosen so they abut the data set. To find these values, the corners of the data set are transformed to view space, and the minimum and maximum depths are located and assigned as the near and far clipping planes distances respectively. The auto_limits subroutine implements this process. The width and height boundaries of screen space are based on the near cutoff plane and the perspective values and are calculated in the view_to_screen subroutine where the perspective transform matrix is formed.
The auto_resolution subroutine calculates the increment parameter as described above. Of course, this routine could be bypassed and the increments chosen manually or by a different method (e.g. if an approximate X and Y sample rate is preferred to an exact image size or if a finer depth resolution is required).
The view space depth of a screen point is calculated prior to transforming it to grid space. The macro calculate_zv performs this calculation using the equation -df / (Zs(f-d)-f). Zs is the screen depth, f is the distance to the far cutoff plane and d is the distance to the near cutoff plane. This value only has to be calculated once per depth plane because all the points on a depth plane have the same view space depth.
The processing order of this algorithm makes compositing an external image straightforward. The memory allocated for the final image is initially assigned with the external image colors. Then, before each screen point is mapped to the data set, the view space depth of that point is compared with the corresponding z-buffer value. If the screen point is in front of the z-buffer depth, then the point is shaded, otherwise it is not. The XY position of the screen point maps directly to the image and z-buffer indices. Appendix B details the z-buffer file format.
The screen point is transformed into grid space to get the data required for the shading calculations. The steps required to perform this transform are:
The transform matrix used to convert screen points to grid points is the product of three matrices: screen-to-view, view-to-world and world-to-grid. The formation of these individual matrices are detailed in Appendix A. The only significant note about the transforms is that the world-to-grid matrix removes the assumption of an orthogonal grid.
After the matrix multiply, the w-component is dropped to return the grid point to three-dimensional space. The w-component can be dropped because the inverse perspective matrix makes this value 1.0 and the view and grid transform matrices do not alter its value.
When a screen point is transformed into grid space, it falls within a cube formed by the eight closest data points. The term "cube" is used loosely here since non-orthogonal grids are allowed. The integer value of the grid point locates the lower-right-front point of this cube (right-handed coordinate system for grid space) and the fractional part identifies the relative location of the point within the cube.
The grid indices of the eight neighboring data points are [X,Y,Z], [X,Y,Z+1], [X,Y+1,Z], [X,Y+1,Z+1], ..., [X+1,Y+1,Z+1], where X,Y,Z is the integer value of the grid point. The data set is stored with the z-axis as the fast axis, therefore, to access the data set memory, the following equation is used:
((X*Grid_Count_Y*Grid_Count_Z) + (Y*Grid_Count_Z) + Z) * Data_Size
Grid_Count_n is the number of grid points in the data set along the n-axis and Data_Size is the size of the data type that stores the information at each point. The array_index macro implements this equation a bit more efficiently.
Tri-linear interpolation is the method used to interpolate between these points. This involves performing seven linear interpolations. The first four are along the z-axis between the points:
The next two interpolations are along the y-axis between the results of interpolations (1) and (2), and (3) and (4). The results of the initial four interpolations are stored in local memory and therefore the ordering of later interpolations has no affect on access time. The final interpolation is along the x-axis between the results of the last two interpolations.
The relative location of the point within the cube (i.e. the fractional part of the grid point) determines the weight of each point along each axis for the interpolations. All components of the data points (color, opacity and normal) are interpolated to get the 7-vector used to shade the screen point.
Tri-linear interpolation does a good job of creating a smooth image provided that the data set has been sampled adequately. If there are not enough data points to sufficiently reproduce the original object, the interpolation will fail and a "stair step" will be visible.
The first example below shows a sphere rendered from a 50 cubed volumetric data set. The edges appear jagged. When a 100 cubed data set is used instead, as in the second example, the jagginess goes away.

A way to increase the smoothness along object edges without increasing the size of the data set is to reduce the opacity delta between surfaces. In the above renderings, the opacity of the sphere was 1.0 and the surrounding area 0.0. In the image below, the opacity of the sphere was reduced to 0.025 and the shading coefficients were increased to brighten the object.
If further smoothing of the image is required, a filtering operation that uses more distant data points in the computation could be implemented.
Before the shading calculations are worked, the opacity and surface strength components of the point are examined. Surface strength is calculated by taking the magnitude of the interpolated normal vector. If either of these values are zero, then the point is completely transparent and is not shaded and the image color does not change. NOTE: If the surface strength calculations have been turned off by the user, then only opacities are checked here.
For the points with non-zero opacities and strengths, ambient, diffuse and specular shading terms are calculated. The Phong reflection model is used for these calculations. The normal vector of the data point, as calculated by the interpolation, must be normalized before the diffuse and specular terms are calculated. The specular calculation also requires the view direction vector to be formed and normalized.
There is an absolute value taken in the diffuse and specular terms that is not typical of Phong shading. The purpose of this operation is to make the normal vectors bidirectional. This makes the light reflect off the front and back sides of voxels. Since most of the voxels in the data set have some transparency, this is necessary so all surfaces, even those facing away from the light source, are visible.
Performance considerations force four simplifications to be made in the shading calculations. Most of these can be removed quite easily if their worth exceeds the performance hit.
To overcome this last simplification, a volume of light intensities needs to be formed before the data set is rendered. This volume is generated much in the same way that the volumetric data is rendered. View space is divided into a series of planes perpendicular to the light source, a regular grid of points is sampled on each plane, each point is mapped back to the data set (using a transformation matrix based on the light source position) and then the opacity of the point is determined by interpolating the neighboring data set points. The opacity of the point and the intensity of the light at that point determine the intensity of the light at the point directly behind it.
Once the light intensity volume is created, the rendering process proceeds as normal until the shading calculations are reached. Here, the light intensity is needed to scale the diffuse and specular reflections. It is found by transforming the point into the light intensity volume and interpolating the surrounding values.
Adding this feature would have a significant impact on performance (I'd guess rendering time would double) and memory requirements, however, the result would have the effect of casting shadows within the volume.
Once all of the screen points have been rendered, the final image is complete and returned to the calling routine.
This rendering algorithm is implemented by the render.h, render.c module. Vol.c is the interface routine to Data Explorer and the mainline routine for this program.
There are many inherent benefits to this algorithm:
Subroutine overhead in an application like this becomes significant because the same processing is repeated many times. This overhead was mostly eliminated by using macros for the short subroutines of about 2-3 lines. There were also a couple of calls to longer subroutines called within the main rendering loop that were replaced with the actual subroutine code. These routines had been broken out for readability reasons alone.
Cache misses are a big performance impediment when dealing with large amounts of data. Accessing data sequentially, whenever possible, is the only way to address this problem. The macros and inlined subroutines mentioned above helped to reduce cache misses on instruction fetches by extending the number of instructions that follow sequentially in memory. Cache misses on data access were controlled by accessing the image and z-buffer memories sequentially and by reducing the random access of the interpolation process as much as possible.
Computation time can be reduced by eliminating instructions with long execution times. Where possible, equations were rearranged to eliminate these long operations or reduce the total number of operations required. As mentioned before, the "loop" nature of this application magnifies any delay caused by inefficient calculations. Therefore, any calculations that could be moved outside of the rendering loop were.
Subroutines, such as the generic matrix multiply procedure, are very useful because of the flexibility they provide. However, that flexibility comes at the price of performance. Therefore, generic routines that were called from the rendering loop were replaced by macros that handled the job directly. The vector-matrix multiply macro is an example.
Conditional checks can go a long way in eliminating unnecessary calculations; they can also diminish performance if not chosen carefully. Three conditional checks are used by this algorithm. The first is required for compositing an external image. If the point is behind the composite image, the point is never transformed, interpolated or shaded. The second check is done after the screen point is mapped to the data set. If the point falls outside of the data set, it is not interpolated or shaded. The third check is made after the interpolation and checks the opacity and strength of the point. If either is zero, then the point is completely transparent and is not shaded.
Since times vary depending on the machine used, an overall worst case time cannot be given. To get an idea of the time it will take to render a data set, the worst case times for a 320x240 image with 68 depth samples on an IBM R6000 workstation and an SGI Onyx are given:

63x69x68 data set
d      = 2000.0
f      = 2013.6
fov    = 0.00315  (0.1805 degree perspective angle)
aspect = 1.09524
SGI Onyx: 3 minutes 18 seconds
IBM R6000: 2 minutes 25 seconds
The effect that camera angle has on rendering time is based in the size of the view volume that screen space maps to. As the camera angle approaches 45 degrees on any axis, the orientation of the data set will increase the distance between the near and far clipping planes. This requires more depth planes to be processed in screen space in order to form the final image. (Note that the XY sampling remains the same because it is determined by the image size.) This is balanced out, though, by the increased number of screen points that don't map to the data set and, therefore, are not interpolated or shaded.
Rendering time increases linearly as the number of screen space samples is increased along any one axis. Therefore, doubling the number of depth samples will double the rendering time. Remember that the number of depth samples depend on the size and resolution of the data set and on the camera angle. Similarly, since the image size determines the number of X and Y samples taken in screen space, doubling the image size (e.g. 320x240 to 640x480) will result in quadrupling the rendering time.
C_COLOR         -- Creates an RGB color data type given three scalars.
C_ADD           -- Adds two colors.  This routine is used when
		   multiple colors contribute to a final color (e.g.
		   diffuse + specular).
C_SCALE         -- Multiplies the R, G and B color components by a
		   scalar.  This routine is used to attenuate a color.
C_MULTIPLY      -- Multiplies each component (R, G, B) of one color
		   by the corresponding component of the other.  This
		   routine is used to determine the resulting color
		   when a colored surface is illuminated by a colored
		   light source.
C_MIX           -- Merges two colors by interpolating the resulting
		   color using the given ratio.  This routine is used
		   to overlay individual pixels from one image onto
		   another, using the opacity are the mix ratio.
V_VECTOR        -- Creates a vector type given three scalars.
V_CREATE        -- Creates a vector type given two vectors.
V_DOT_PRODUCT   -- Calculates the dot product of two vectors.
V_CROSS_PRODUCT -- Calculates the cross product of two vectors.
V_MAGNITUDE     -- Calculates the magnitude of a vector.
V_ADD           -- Adds two vectors.
V_SUBTRACT      -- Subtracts two vectors.
V_SCALE         -- Scales a vector.
V_REFLECT       -- Calculates the reflected vector given a normal
		   and incident vectors.  Input vectors must be
		   normalized.
V_NORMALIZE     -- Normalizes a vector.
M_MULTIPLY      -- Multiplies two matrices.  This routine will
		   handle matrices of any size.  The size of the
		   matrices are input parameters. **1
M_MULT_WV       -- Multiplies a matrix with a vector.  This is a macro
		   that assumes a four vector is being multiplied with
		   a 4X4 matrix.  This macro was added to improve the
		   performance of this common operation. **1
M_INVERSE       -- Calculates the inverse matrix of a 3x3 matrix.
**1 result matrix must be unique (i.e. it cannot be one of the operand matrices). If not, the operand will be destroyed during the calculation and an incorrect result will occur.
AMBIENT         -- Calculates the ambient term.
DIFFUSE         -- Calculates the diffuse term.
SPECULAR        -- Calculates the ambient term.
AUTO_LIMITS     -- Calculates the near and far clipping planes in
		   view space.
AUTO_RESOLUTION -- Calculates the resolution that screen space is
		   sampled at for the rendering.
RT_PRODUCT      -- Forms a rotation:translation matrix product.
TR_PRODUCT      -- Forms a translation:rotation matrix product.
VIEW_ROTATION   -- Calculates the camera rotation matrix given the
		   camera position, up direction and look-to point.
GRID_TO_WORLD   -- Calculates the grid-to-world and world to-grid
		   transform matrices.
WORLD_TO_VIEW   -- Calculates the world-to-view and view-to-world
		   transform matrices.
VIEW_TO_SCREEN  -- Calculates the view-to-screen and screen-to-view
		   transform matrices.
TRANSFORMS      -- Main routine for forming the transformation
		   matrices and other inputs required by the
		   renderer.
ALLOCATE_IMAGE  -- Allocates the memory required for the image and
		   initializes it with the background color.
READ_ZBUFFER    -- Opens and reads in the contents of a z-buffer file.
DEBUG_WRITE     -- Debug routine for writing out the contents of
		   various data structures.
WRITE_ERROR     -- Converts status values into error messages.
Grid Deltas Matrix:               Grid Origin Matrix:
Xdx  Xdy  Xdz  0.0                1.0  0.0  0.0  0.0
Ydx  Ydy  Ydz  0.0                0.0  1.0  0.0  0.0
Zdx  Zdy  Zdz  0.0                0.0  0.0  1.0  0.0
0.0  0.0  0.0  1.0                Ox   Oy   Oz   1.0

Grid-To-World Matrix:
Xdx  Xdy  Xdz  0.0
Ydx  Ydy  Ydz  0.0
Zdx  Zdy  Zdz  0.0
Ox   Oy   Oz   1.0

Xdx reads "the rate of change in the world X-axis along the grid X-axis".
Xdy reads "the rate of change in the world Y-axis along the grid X-axis".
Ydx reads "the rate of change in the world X-axis along the grid Y-axis".
etc...

O = [Ox,Oy,Oz] is the location of the grid origin.
The inverse of the grid-to-world matrix is formed by multiplying the inverse grid translation matrix with the inverse grid rotation matrix. The result is shown below:
Inverse Grid Origin Matrix:       Inverse Grid Deltas Matrix:
1.0  0.0  0.0  0.0                Xdx  Ydx  Zdx  0.0
0.0  1.0  0.0  0.0                Xdy  Ydy  Zdy  0.0
0.0  0.0  1.0  0.0                Xdz  Ydz  Zdz  0.0
-Ox  -Oy  -Oz  1.0                0.0  0.0  0.0  1.0

World-To-Grid Matrix:
Xdx         Ydx         Zdx         0.0
Xdy         Ydy         Zdy         0.0
Xdz         Ydz         Zdz         0.0
(-O dot X)  (-O dot Y)  (-O dot Z)  1.0

X = [Xdx,Xdy,Xdz];  Y = [Ydx,Ydy,Ydz];  Z = [Zdx,Zdy,Zdz]
Note that the matrix notation for the world-to-grid matrix above is simplified by assuming that the rotation matrix from the grid-to-world transform is orthonormal and therefore the inverse matrix is just the transpose of the matrix. In the actual code, this assumption is not made and the inverse matrix is computed.
Camera Translation Matrix:        Camera Rotation Matrix:
1.0  0.0  0.0  0.0                Ux   Vx   Nx   0.0
0.0  1.0  0.0  0.0                Uy   Vy   Ny   0.0
0.0  0.0  1.0  0.0                Uz   Vz   Nz   0.0
-Cx  -Cy  -Cz  1.0                0.0  0.0  0.0  1.0

World-To-View Matrix:
Ux          Vx          Nx          0.0
Uy          Vy          Ny          0.0
Uz          Vz          Nz          0.0
(-C dot U)  (-C dot V)  (-C dot N)  1.0
C is the camera position, N is camera direction vector, V is the camera "up" direction vector and U is the camera "right" direction vector (left-handed coordinate system).
The inverse of the world-to-view matrix is formed by multiplying the inverse camera rotation matrix with the inverse camera translation matrix. The result is shown below:
Inverse Camera Rotation Matrix:   Inverse Camera Translation Matrix:
Ux   Vx   Nx   0.0                1.0  0.0  0.0  0.0
Uy   Vy   Ny   0.0                0.0  1.0  0.0  0.0
Uz   Vz   Nz   0.0                0.0  0.0  1.0  0.0
0.0  0.0  0.0  1.0                Cx   Cy   Cz   1.0

View-To-World
Ux   Uy   Uz   0.0
Vx   Vy   Vz   0.0
Nx   Ny   Nz   0.0
Cx   Cy   Cz   1.0
The same assumption, concerning orthonormality, made in the world-to-grid matrix formation applies here, however, in this case, the rotation matrix should actually be orthonormal.
View-To-Screen Matrix:
d/w     0.0     0.0     0.0
0.0     d/h     0.0     0.0
0.0     0.0   f/(f-d)   1.0
0.0     0.0  -df/(f-d)  0.0
w is the view window width, h is the view window height, d is the distance to the near clipping plane and f is the distance to the far clipping plane.
The inverse of the perspective matrix was taken and the result is shown below. Since this matrix does not account for the non-linear divide performed after the view-to-screen transform, points to be transformed by this matrix must be multiplied by the view space depth prior to the operation.
Screen-To-View Matrix:
w/d     0.0     0.0     0.0
0.0     h/d     0.0     0.0
0.0     0.0     0.0  (f-d)/-df
0.0     0.0     1.0     1/d
data           type        quantity      size (bytes)
-------------- ----------- ------------  --------------
magic number   int         1             4
width          short int   1             2
height         short int   1             2
matrix 1       float       16            64
matrix 2       float       16            64
depth values   float       width*height  width*height*4

The magic number is 0x2F0867AB.
Matrix 1 is the product of the view and perspective matrices.
Matrix 2 is the view matrix.
Status  Message
------- ------------------------------------------------------
100     ERROR: File read error.
101     ERROR: Z-buffer file has wrong magic number.
102     ERROR: Z-buffer size is not compatible with image size.
103     ERROR: Could not allocate z-buffer memory.
104     ERROR: Premature EOF on z-buffer read.
105     ERROR: Could not open z-buffer file.
106     ERROR: Could not allocate image memory.
107     ERROR: Data set is not volumetric.
108     ERROR: Far and near clipping planes are equal.
109     ERROR: Perspective angle is zero.
110     ERROR: Increment value of zero detected.
111     ERROR: View direction vector is null.
112     ERROR: Up direction vector is null.
113     ERROR: Light source direction vector is null.