Electronic music has been a hobby of mine for several years now, and the final project for EE476 gave me a great opportunity to design my own piece of gear. The one thing I do not own is a hardware sequencer for my MIDI equipment, so I decided to build one. My goal was to create a sequencer that is basic, yet has enough functionality to be useful, and not just an academic exercise. Because of hardware contstraints, I decided to build something that was more of a "sketchpad" for musical ideas with several basic functions that could be used with ease. This is something that is fairly unique in the world of MIDI sequencers, which generally tend to try to pack in as many functions as possible, resulting in a complex user interface using multiple menus, and requiring many button-pushes just to perform simple editing functions. The scope of this project would have prevented me from attempting a professional MIDI sequencer like this, but that would not have been my goal anyhow, since it is possible to perform more complex editing using a PC. My philosophy with this project was to try and provide essential editing functions that can be performed using a minimal number of button-pushes, to display information about the sequence in an intuitive manner using no menus, and to make the sequencer be a tool to facilitate, not impede, creativity.
For those unfamiliar with the production of electronic music, the preceding paragraph may have been slightly confusing. You probably have guessed that a sequencer is a tool to generate music, but where is the actual sound coming from? Many are familiar with the MIDI files available on the internet, and may be wondering if I am referring to the same thing. First of all, MIDI is not involved with the creation of sound, but instead is a protocol for sending messages to digital music equipment. The most basic setup consists of a sequencer and a synthesizer. The sequencer is responsible for transmitting the messages that make up a song, while the synthesizer is responsible for receiving these messages, and generating sound. In the case of MIDI files on the internet, the program that is used to "play" midi files is in fact sending messages to your soundcard which has a built-in synthesizer containing a set of sounds that are standard across all soundcards (this set of sounds is called General Midi, or GM for short). What MIDI boils down to is a way of storing music in a small amount of memory. Recorded .wav files take up about 10MB per minute of music, while each note of MIDI only takes up a couple bytes. Another advantage of MIDI is that the information can be edited as a "work in progress", while it is impossible to change the music in a .wav file. For an electronic musician, MIDI is only one step in composition, the sound from the synthesizer must be recorded in some fashion, either on to a PC in .wav format, or some other recording device, so that it can eventually be put into a medium that the general public can listen to, like CD's.
MIDI consists of many different types of messages, but the only ones dealt with in this project are the Note On, and Note Off messages. They act just as their names suggest, when the sequencer wants the synthesizer to start playing a note, a Note On message is sent, and when it wants to terminate the note, a Note Off message is sent. A basic Note On message consists of 3 bytes: the status byte, the pitch byte, and the velocity byte.
The status byte for a Note On message is 0x9c, where c is the MIDI channel to be sent on. Some synthesizers are capable of receiving on several different channels, which means that they can play several different sounds at once. If multiple synthesizers are connected together, the channel number can be used to specify which synthesizer should play the note. In the sequencer I built, the channel number is hardwired to 1, which makes the control byte 0x90 (the 0th channel in the digital world corresponds to the 1st channel in the real world, because the designers of the MIDI specification probably assumed most musicians wouldn't understand how to count from 0).
The pitch byte specifies what note to play, where 0x3C corresponds to middle C. The high bit in any byte sent is only set if the byte is a status byte, so this leaves 7 bits to specify pitch, giving a range of 128 notes, which is a little more than 10 octaves.
The velocity byte is usually used to specify how loud the note should sound, although this may differ in some synthesizers (it is also common to use the velocity to specify the filter cutoff for the note, and with many synthesizers the user can set what function the velocity performs). The range of velocities is from 1 to 127, where a velocity of 100 (0x64) is considered the default. If the velocity is 0, then the Note On message is reinterpreted as a Note Off message. All equipment receiving MIDI messages must remember the last status byte sent, and apply it to all subsequent bytes until a new status byte is sent. This allows the sequencer to send a group of Note On/Off messages while only transmitting one status byte.
If the sequencer wanted to play a chord consisting of C5, E5, and G5, all with velocity 100, it would send:
0x90 0x3C 0x64 0x40 0x64 0x43 0x64
Note how there is only one status byte, and three pairs of pitch/velocity bytes. To make the chord stop sounding at some later time, the sequencer would send:
0x90 0x3C 0x00 0x40 0x00 0x43 0x00
The velocity of 0 causes the note to be stopped. If no intervening status bytes have been sent, then it is not necessary to send the 0x90 the second time around. It is naturally also possible to send a combination of Note On and Note Off messages in the same manner, if the sequencer desired to turn off one note and start another at the same time.
Sequencer Overview:
Each track is monophonic, which means that it can only play one note at a time. However, polyphonic operation can be achieved by using multiple tracks. So it is possible to think of the sequencer as a 4-part polyphonic sequencer, or as 4 separate synched monophonic sequencers, or some combination of both. Many synthesizers contain drum kits in which each note corresponds to a different drum. Making a drum loop in this case is very easy with the sequencer, each track can correspond to a different note, and hence a different drum sound. It is just as easy to sequence a set of chord changes, because the note in each beat in a track can be set individually if desired.
The display consists of a 4 X 20 character LCD. An example display:
| 0 | 1 | : | 0 | 1 | : | 0 | 1 | 1 | 2 | 0 | b | p | m | ||||||
| C | # | 5 | V | = | 1 | 0 | 0 | L | = | 1 | |||||||||
| X | - | X | x | - | - | X | x | - | - | X | X | x | x | X | X | ||||
| | | + | - | - | - |
The display will be referred to using the following fields:
The position field tells the user what the rest of the information on the screen is describing. The first number is the track number (1 through 4), the second number is the measure number (1 or 2), the third number is the beat number (1 through 16).
The tempo field tells the user the speed at which the sequencer will play, in beats per minute. In this case the "beat" is a quarter note because of music standards. In all other places in this document, a beat will refer to a sixteenth note, the smallest division this sequencer uses, since there is no reason to refer to a quarter note division.
The note info field gives information about the beat described in the position field. First is the pitch of the note, where the sharp sign (#) is always used instead of the flat sign for ease of use. The pitch includes the octave number, where C5 is middle C. The second piece of information is the velocity of the note. As described in the introduction, the velocity will be 0 if the note is turned off. The third piece of information is the length, in sixteenth notes, which can range from 1-32. When one of these (pitch, velocity, length) is being edited by the user, an "@" character will appear next to what is being edited. The editing procedure will be described in the following section
The measure overview field is a graphic description of what is going on in the measure described by the position field. The 16 characters describe each of the 16 beats in the measure numbered 1 through 16 from left to right. If a note is present in the beat (ie. the velocity is greater than 0), an "X" will appear. If no note is present a "-" will appear. If the beat contains a continuation of a note being held, then a "x" will appear. For example, in the display above, beat three contains a note of length two, which is shown by a "X" in beat three, and a "x" in beat four. Another character, "=", may appear in this row also, and is the equivalent of "x" where the first note is turned off. This has to do with an editing feature, and will be covered in the following section. The measure overview also contains the 16 characters on the bottom row. A "|" will appear underneath the last beat in the track, and the rest of the characters will be empty. In the example above, the track is 16 beats, 1 measure, long because the "|" character is under the sixteenth beat and we are currently looking at measure 1 as described by the position field. The measure overview field allows the user to quickly understand the rhythmic placement of all notes in the measure at a glance, and to determine the length of the track.
The track overview field is a graphic description of what is going on in each track. The four characters describe the four tracks numbered 1 through 4 from left to right. A "+" indicates that the track is non-empty, ie. contains at least one note. A "-" indicates that the track is empty. In the example above, the first track is the only one containing any notes.
The sequencer is controlled via a 16 button keypad. There are five modes for the keypad, a sequence-control mode, and four edit modes corresponding to tempo, pitch, velocity, and length.
When powered on, the sequencer starts in sequence-control mode, which contains the master controls for the sequencer. The keys on the keypad perform the following functions:
| Beat Down | Beat Up | Stop | Play |
| Measure Down | Measure Up | Edit Pitch | Edit Velocity |
| Track Down | Track Up | Edit Length | Edit Tempo |
| Loop Pointer | Trigger | Preset | (not used) |
Beat/Measure/Track Up and Down: These allow the user to change the currently selected beat, measure and track, which is displayed on the position field on the LCD. When the beat is changed, the note info field on the LCD will change to reflect the new note selected. When the measure or track is changed, the note info field will change, and the measure overview will change to reflect the new position. Each of these controls is cyclic, so when the user tries to advance past the maximum or minimum value, the position will loop around.
Stop/Play: These stop and play the sequence. When play is pressed, the sequence will start from the beginning. When the sequence is stopped, all notes will be turned off.
Edit Pitch/Velocity/Length/Tempo: When pressed, the sequencer will enter the corresponding mode, as described below.
Loop Pointer: The loop pointer determines how long the track is. Pressing this button will cause the sequence to loop when it reaches the current beat as described by the position field on the LCD. A "|" will appear in the measure overview field on the LCD, as described previously. It is important to note that the beat above the "|" character will be played before the loop resets its position, so the loop pointer should be placed at the last beat desired to be heard in the track. When using the full two measures of the track, the loop pointer should be set to the sixteenth beat of the second measure, which is the default. The loop pointer allows the user to change the length of the track without erasing any data. It also allows each track to loop independently. For example, if track 1 is 2 measures long and track 2 is 1 measure long, track 2 will play twice in the time it takes track 1 to play once. This also provides a way of doing songs with complex meters (many modern songs are felt with four quarter note pulses, but this is not always the case). Perhaps the most interesting capability is to have tracks with different lengths, because the notes on different tracks will not always fall at the same time in respect to one another if the track lengths do not share a common factor. This can make the sequencer to sound like it has more than 2 measures, because the tracks may be out of phase with one another for some period of time!
Trigger: When pressed, the trigger button sends a MIDI note corresponding to the pitch and velocity of the currently selected beat, with a duration of about half a second. This is a very important feature because it allows the user to hear the note without having to play the sequence, and wait for it to come around.
Preset: To make use of this button, it must be held down while turning the power on (if used during normal operation, nothing will happen). This button will load a preset sequence into the sequencer as a sort of "demo" song. To hear this song correctly, on your synthesizer, C#5 should be set to a bass drum, D5 should be set to a snare drum, and notes C3-G3 should be set to a bass sound.
The tempo edit mode allows the user to edit the tempo, which can be set to an integer value from 60 to 240 bpm. While in the tempo-edit mode the keypad functions as follows:
| 1 | 2 | 3 | (not used) |
| 4 | 5 | 6 | (not used) |
| 7 | 8 | 9 | (not used) |
| (not used) | 0 | Cancel | Enter |
Upon entering the tempo-edit mode, an "@" character will appear next to the tempo on the LCD, and will disappear when the user exits the tempo-edit mode, either by pressing the enter or cancel buttons. To enter a tempo, you must enter three digits, even if the number is below 100. If a number entered is higher than the maximum, then the maximum will be used. Similarly, if a number entered is lower than the minimum, then the mimimum will be used. When the tempo-edit mode is first entered, the display will show "___" in the tempo field, and will show the digits as they are entered. If a digit is entered after the first three, then the process will start over. If a mistake is made, the user can simply press any number key until a set of three digits is shown, then enter the proper number. Pressing the cancel key will clear any number that has been entered, and exit tempo-edit mode. Pressing the enter key will save the value that has been entered, and exit tempo-edit mode.
This allows the user to edit the pitch of the currently selected note, with the keypad functioning as follows:
| C | C# | D | D# |
| E | F | F# | G |
| G# | A | A# | B |
| Octave Up | Octave Down | Cancel | Enter |
Upon entering pitch-edit mode, an "@" character will appear next to the pitch value in the note info field. To enter a pitch, the user simply pressses the key corresponding to the correct pitch, and then pushes the octave up/down buttons until the correct octave is reached. The range of notes is from C0-G10, and it is not possible to enter notes outside of this range (for example if the octave is 10 on the display, and the user pushes the "A#" button, nothing will happpen). The user can continue to edit the note if a mistake is made until cancel or enter are pushed. Enter and cancel work the same way as with the tempo-edit mode.
This mode works in the same way the tempo-edit mode works. To turn on a note, a value greater than 0 must be entered. To turn off a note, a value of 0 must be entered. The measure overview field on the display will immediately change to reflect a note being turned on or off even before the enter key is pushed (if cancel is pushed, the display will revert to its old state).
This mode works in the same way as the tempo-edit, and velocity-edit modes, except a two digit number must be entered instead of a three digit number. When a length greater than 1 is entered, an "x" will appear in all the positions in the measure overview field that the selected note is held over (a "X" will still appear in the first beat of the note). Since each track is monophonic, no other notes can be in these positions. When a "x" is displayed in a position, it becomes impossible to edit that beat, but the display will reflect the note and velocity values of the note that is being held over (the length will read "-"). It is possible to edit the beats with "x"s in them only if the length of the note being held is set to not be held over that beat, in which case the "x" will turn to a "-" indicating that the beat is empty. If a held note has velocity set to 0, the held beats will contain "="s indicating that nothing will be sounding during those beats, but that they are not free to be edited until the length of the held note is decreased. A handy trick using the length-edit mode is to initialize a whole track to one note. Simply go to the first beat of the track and set the length to 32, enter the desired pitch, and then set the length to 1. Now all beats in that track will contain the same pitch. This is useful when programming drums, where the whole track will be at the same pitch.
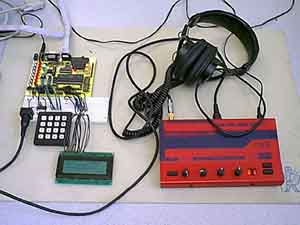
The hardware used for this project was one Atmel 8515 MCU, a MIDI Out circuit, a 4x4 keypad, and a 4X20 character LCD display. The only hardware design element was choosing what hardware to use. The project guidelines restricted me to using an MCU in the same family as the Atmel 8515, and since I didn't need anything fancy like an A/D converter, I stuck with the 8515. The MIDI Out circuit is fairly simple, and provides a way to interface from a serial MIDI cable to the UART controller on the MCU (see appendix for schematics). The 4x4 keypad I used is the same as was used in previous labs, and can be read using a simple scanning routine. I purchased a large LCD because the user interface was very important to the project. To manipulate the LCD, I was able to use the same C library as used in previous labs.
There are several things going on simultaneously in the sequencer program. These can be broken up into sequence-play code and user-interface code. But first, let's take a look at how the sequence is stored in memory.
The sequence is stored in two 2D arrays of chars indexed by track number and beat number, corresponding to pitch and velocity. In these arrays it is assumed that the first measure is indexed by a beat number of 0-15, and the second measure is indexed by 16-31. If you have read the above sections about the operation of the sequencer you may be wondering where the length of the note is stored. I was able to conserve memory space by using the fact that each track is monophonic and midi bytes for pitch only make use of 7 bits. In the pitch array, I used the high bit to signify the fact that a note is held. Besides saving space, this makes the code to determine which notes to turn on/off very simple (ie. do not start a new note or turn off a note if the high bit of the pitch is set), and makes it easy to determine when to display a held note in the measure overview field of the LCD. A 1D array of chars, indexed by track, holds the position of the loop pointer for each track, and a char variable holds the tempo of the sequence. The rest of the data structures used by the sequencer are for internal use, and will be discussed later along with the functions that use them.
Timer1 is used as a time-base to determine how fast the sequence should be played. The timer1 compareA match interrupt and timer1 clear_on_match are enabled. When a play command is detected, timer1 is started, when a stop command is detected, timer1 is stopped. Timer1 is set to interrupt every 16th note. When the user enters a tempo, the correct period for a sixteenth note is calculated using floating point accuracy (this is necessary because the calculation involves division), cast to an integer, and loaded into OCR1A. During the period between interrupts, a buffer is loaded with all of the bytes to be transmitted on the next beat. This includes both messages to turn off old notes, and turn on new ones. The timer1 interrupt handler simply outputs the buffer to UART using a blocking send, at a rate of 31.25 kBaud. The send is done in the timer1 interrupt handler in order to achieve the maximum precision possible. The buffer is used in order to decrease the amount of work the handler has to perform. The timer1 interrupt handler also increments an array holding the current beat for each track in order to determine which beat to buffer values for next. If the beat reaches the value of the loop pointer for that track, it is reset to 0. The last thing the timer1 interrupt handler does is to set a flag saying that it is done so that the main method can start the procedure to buffer values for the next beat.
The main method polls the flag set by the timer1 interrupt, and when it is set calls a procedure to set up the buffer. In this procedure the data structures for pitch and velocity for the upcoming beat are checked. If the high bit of the pitch is set, then nothing happens for that track, because a note is being held over. If it is not set, then the velocity is checked. If the velocity of the last beat is greater than zero, then a Note Off message is put into the buffer. This works in the case of a held note, because while the pitch of the held note will be altered by having the high bit set, the velocity will always be set to match the original note being held. If the velocity of the upcoming beat is greater than 0, then the proper Note On message is put into the buffer. Again this works in the case of a held note, because the first beat of a held note looks just like a note of length 1.
The only method that writes to the LCD is a method to refresh the screen. Whenever the state is changed somehow by the user, the screen is refreshed to update any new values. The refresh method is fairly simple with only a couple of interesting details. One is displaying notes. Since the notes are stored as bytes, they must be converted into a format recognizable to musicians containing the pitch (ex. 'C', 'C#', etc.) and the octave number. Unfortunately the only way to do this is to use division. The octave number is determined by dividing the pitch value by 12, and the remainder determines what the pitch is. The method of displaying values changes slightly when the user enters one of the edit modes. When the sequencer is in an edit mode, an "@" character is placed next to the value being edited, and instead of displaying the saved value, a string set by the state machine controlling the edit mode is displayed. This string starts out as "___" and gets updated as the user enters values. For example, if the user entered 100 into the velocity field, the display would progress from "@V=___" to "@V=1__" to "@V=10_" and finally "@V=100". This is used as an alternative to a cursor, and is a bit easier to read.
The keypad is scanned by using a debouncing state machine that operates at a time-base of 30ms generated by timer0. The keypad scanning code is the same as in previous labs, except it acts as the producer in a producer-consumer relationship with the state machine that performs the commands and keeps track of the mode of operation. When a key is pressed, the keypad scanning routine sets a variable corresponding to the key pressed. The code that executes the command polls this variable, and when it sees a value other than 0xff, records the value and promptly sets the variable back to 0xff before executing the command. The code to execute the command consists of an outer switch statement on the mode of operation, and inner switch/if statements on the command itself. The following actions are taken:
Play: A flag is set to let the main method know it is the first time playing the sequence, so that the buffer should be set up. Also, the status byte (0x90) is sent at this time.
Stop: Timer1 is turned off, and all the notes that are currently on are turned off.
Track/Measure/Beat Up and Down: The appropriate variable corresponding to the current position is modified.
Loop Pointer: The loop pointer variable for the currently selected track is set to the current beat.
Edit Tempo/Pitch/Velocity/Length: The mode variable is set appropriately, and the string to be displayed for that value is initialized to "___". In some cases the current value being edited is stored so that it can be restored if the user presses cancel.
Trigger: A counter variable is started. When the main method detects that the counter is non-zero, it will play the currently selected note, and turn it off again once the counter reaches 0 (the note will last about 270ms).
If the sequencer is in one of the edit modes then the commands have to be interpreted in the correct fashion. In the case where a value is being entered, an array holding the digits is updated. When the proper number of digits have been entered, the value is checked to make sure it is in the proper range, and then saved in the correct place. Each time a digit is entered, the string used by the display is changed to show the new digit. In the tempo edit mode, the value to put in OCR1A must also be calculated. In the length edit mode, the pitch and velocity values for the current note are copied to all beats that the note will be held for. If the length has been decreased, then the velocity values for all the beats no longer held are set to zero, and the high bits of the pitches are cleared. In the pitch edit mode, either the pitch is entered, or the octave is shifted up/down. In either the pitch or velocity edit modes, in the case where a note with length greater than 1 is being edited, the values must be copied to all beats that the note is held over.
Since note lengths are not stored directly, I wrote a method to calculate the length of the currently selected note. This is used both in the LCD display code to display the length, and in the keypad code to determine how many pitch or velocity values should be modified.
Another feature mentioned previously is the preset, or "demo", song. In the initialize method, if the preset button is detected, the sequence data structures are set to values corresponding to a sequence I used to test the operation of the sequencer. This saved me from having to enter in a new sequence every time I reprogrammed the chip, and is a good way to demo the sequencer.
Since there are no real quantitative results of this project, I will give the qualitative results: I was very pleased! There is nothing that I would have done differently if I had to do it over. I had most of the design done in my head and on scratch paper before I wrote even one line of code, which helped me out a lot in the long run. This also helped distribute the workload, because I had most of the design problems solved already when I sat down to code it and had to deal with coding problems. Of course, improvements can always be made, and here are some that I have thought about along the way, but did not have time to implement:
Here is the code: midiseq.c
A schematic of the MCU setup:

A schematic of the MIDI Out port:

MIDI Spec - a simplified version of the MIDI spec, where I got most of the information about MIDI that I did not know previously, including the circuit for MIDI Out.
Clavia - the makers of the Nord Micro Modular, and its big brother the Modular, probably the most interesting synths built ever. I used a Micro to test out the sequencer because I could carry it around in my backpack, and I could easily configure it to make full use of the sequencer.
Sieve Ochre, Dream Long Dead - shameless self-promotion, my music projects on mp3.com.