ECE476 Final project (SP 2003)
RC NSX special edition
by Lam, Kwan Him (kl259) & Wong, Kim Fung (kw84)
Introduction | High Level Design | Hardware design | Software design
Results & Pictures | Conclusion | Programs Listing | Schematics | Cost & Parts | Tasks Specified | References
We like car and we like to build our own Atmel Mega32 MCU based radio-controlled NSX. We set three goals in the initial project proposal and they are as the following:
(1) Build a RC NSX with the same performance as the original car.
(2) Add extra features such as headlights and brake lights.
(3) Add distance IR sensor to avoid collision.
Our objective is to build a RC car with all the circuitries including two H-bridges, a 433MHz transmitter and a receiver, a remote controller and Mega 32 prototype boards. We expect it to perform or even out-perform the stock NSX with better steer and speed handling and longer operating range. We also want it to have some cool features such as distance sensor to avoid collision and brake lights to blink when the speed is lowered.
Rationale & project idea:
We played RC car when we were small and now we are capable to build our own RC car and we like to make this hobby more interesting with some cool features that are hardly seen on the toy market. With a limited $25 budget, it made this tasks to be more challenging but also interesting. We were very clear to set out preliminary design and very careful to order parts.
Logical structure:
In this project, we use radio frequency to transmit and receive data and hence we implement this design with a transmitter end part and receiver end part. The receiver end has plenty of circuitries and the transmitter is relatively simple to build. The detail of hardware design is explained in next section. We were lucky enough to find a pair of cheap receiver and transmitter from www.radiotronix.com.
Two H-bridges are built to in this project . One is used to control the DC motor for speed and another is used to control the steering of another DC motor. We successfully had the stepper motor in the lab worked but we decided not to use it to provide variable turning angles for the steering. It was because we were unable to find gears to fit into the NSX and hence unable to test and determine if the output torque was large enough to turn the car.
Two prototype boards are built for the Mega32 MCUs. On the transmitter end, there is a 3-pot slide for varies speed control. Interpretation of the potentiometer value is handled with ADC0 of Port A. Four switches are used for left or right turn, headlights and bottom lights on/off and a last button for resetting the Mega32 MCU.
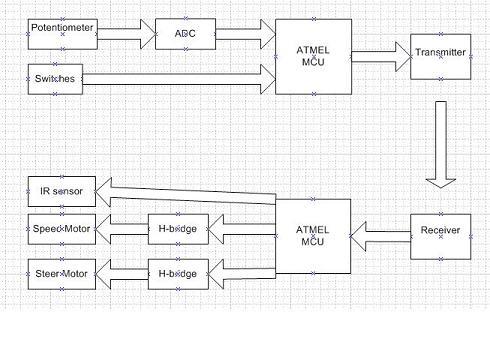
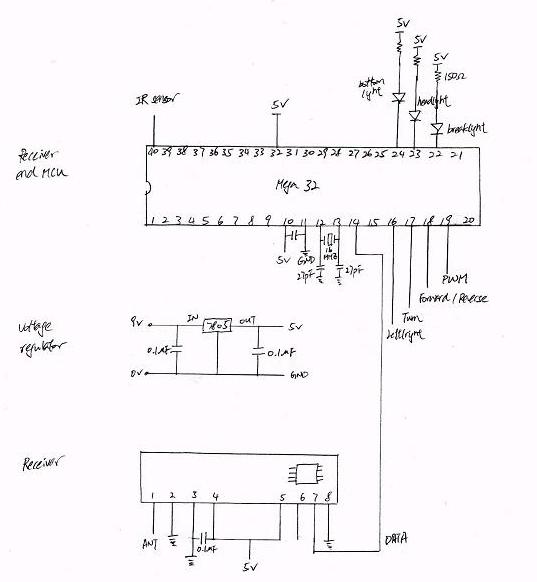
Below is our schematic of high level design.
Hardware/software tradeoffs:
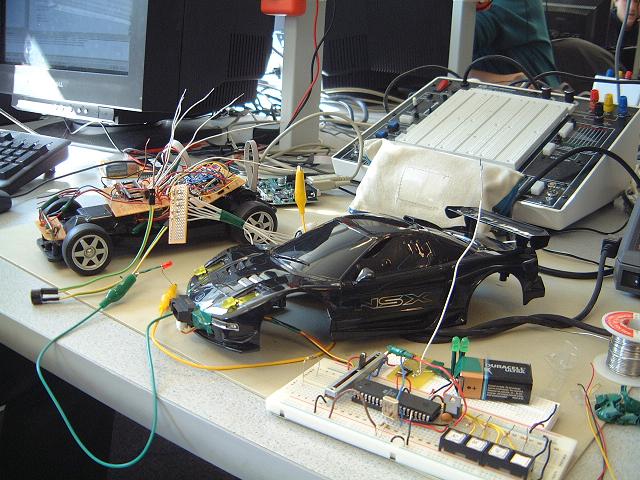
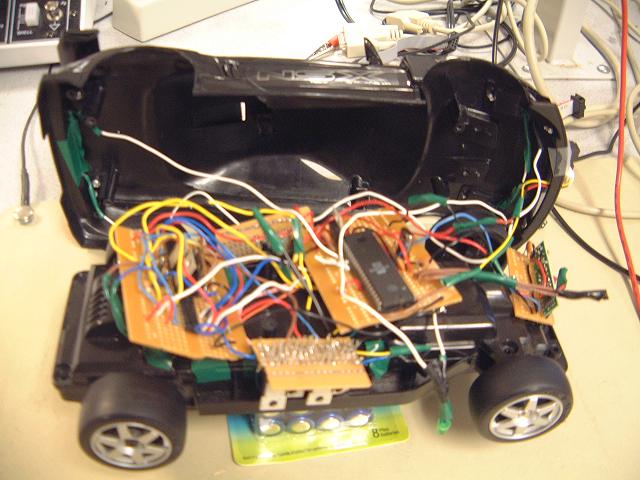
This project includes plenty of hardware circuitries and we spent roughly 80% of our work time to develop, test and revise our hardware components and designs. Soldering of parts together is not easy and they do break occasionally in so many different unexpected ways. This can waste tremendous of time when only one wire is loose. It is even more challenging when we would like to fit all the circuitries into this small car. On the other hand, writing codes and designing algorithms are relatively straightforward.
We have a timeline that was nicely planned....

Prototype board: Two boards are built and they are for transmitter and receiver end each. The fundamental components that needed to make the board work is explained here but other pin connection can be seen from the schematic on the appendix section below. Since both boards are powered up by a 9V battery, voltage regulators are used for them to output a 5V to the Mega32 MCUs.
--LM7805 5V regulator pin1 is input, pin2 is ground, and pin3 is output. Input pin and ground are connected (bypassed) with a 0.1µF capacitor. Output pin and ground are connected with a 0.1µF capacitor also. The capacitors should be put as close as possible to both voltage pin and ground to provide a stable voltage.
--Ground and output voltage pins are connected to pin 11 and 10 respectively to the Mega32 MCUs. A 0.1µF capacitor is put to bypass. Pin 32(AREF) is connected to 5V supply because of analog-to-digital conversion needed.
--Pin 12 and 13 are connected with 27pF capacitors to ground and pins are connected together with a 16MHz crystal.
The boards were tested with a program that blinks the LEDs on Port B every second (see appendix A). With luck, the boards could work without bypassing the Vcc and ground. However, it does help to stabilize the system when a capacitor is added.
Receiver & transmitter: Connection of receiver and transmitter are done according to the datasheet from radiotronix. Again, capacitors are added to bypass the voltage input and ground. Antenna pin of receiver is bent 180 degree in order to receive data. Although they can send and receive data up to 4800 baud rate, we only use half of its capability as we find that 2400 baud rate is relatively stable. For communicating between the two Mega32 MCUs, we use the UART and when the specified registers were set, it works without any problem except conflicting with other groups when more than one group is working on it. Data pin of transmitter is connected to pin 15 (TXD) of transmitter end MCU while data pin of receiver is connected to pin 14 (RXD) of receiver end MCU.
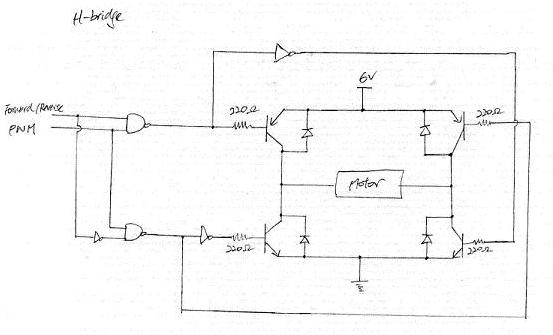
H-bridges: H-bridge is commonly used to drive DC motor in two directions. With limited budget, we decided to build H-bridge using the transistors and other parts available in labs. Components used in our H-bridge include two power NPN BJTs (TIP32C), two power PNP BJTs (TIP31C), four diodes (IN4001) which used to protect the transistors, and four 220Ω resistors. To protect the H-bridge from possible wrong input from micro-controller (shorting the transistors by attempting to drive the motor forward and reverse simultaneously), we insert additional logic circuitry, which consists of two NAND gates and three Inverters, to make forward and reverse operation exclusively on. (But they can be off simultaneously) Since two H-bridges are built (one for speed and one for steering), 74LS00N and 74LS04N, which provides four NAND gates and six inverters, are perfect choice of the logic circuitry.
Speed of DC motor can be controlled either by varying the currents passing through the motor or switching the transistors on and off using Pulse Width Modulation. We chose PWM since it reduces both the power consumption and hardware complexity. Instead of using extra DAC to provide proportional analog voltage, PWM waveforms can be easily generated, as it is one of build in function of our micro-controllers.
Stepper Motor: The H-bridge that is used for steering do not required any variation of current or PWM since we cannot vary the turning angle using the original motor. Servo motor is the best choice for this application but we decided to save the money for distance sensor. We attempted to replace the role of servo motor with stepper motor, which is available in our lab and capable of high precision control. The stepper motor can be easily controlled by activating magnets in a correct sequence. We had successfully controlled the stepper motor to turn correctly using the micro-controller and transistor arrays (Current from micro-controller is too small to drive the stepper motor), but unfortunately we cannot solve the mechanical problem. As a result, we build another H-bridge to drive the original motor to perform the steering.
The micro-controller at the transmitter end performs three major tasks; converts the analog input signal generated by the potentiometer to digital signal, debounces three input buttons (left, right, light), and transit the encoded command using UART protocol.
Analog digital conversion is one of the build in functions of the micro-controller. Eight bit accuracy of ADC is used since only seven distinct levels of input are required. (three levels forward, three levels reverse, one stop) Simple debounce state machine is used to debounce the three input buttons. Both tasks are running continuously inside the while loop. The debounce instruction is performed when the program is waiting for the ADC result to save process time.
Since the receiver that we have contains automatic gain controller function, in order to operate it correctly, we have to either transmit the data continuously or sending some ones and zeros before each true command. We decided to transmit the data continuously to simplify the software. This is accomplished using transmit complete interrupt at the transmitter end. In the transmit complete interrupt service routine, we send the next command by writing the UDR. The eight bit word command is encoded in the way that avoids running long consecutive ones and zeros. The 8-bit command format is shown as below.
| --- | lights | --- | direction | steering | turn | speed1 | speed0 |
At the receiver end, the micro-controller decodes the command, drives the car using control logic and PWM according to the command, and performs analog to digital conversion to the signal generated by the distance sensor. Since the analog input from sensor only updates every 33ms, a Timer0 interrupt is used schedule the conversion. In our program, Timer0 generates interrupt for every 34ms and ADC starts at the interrupt service routine; but instead of waiting for the conversion to be completed in the ISR, polling of ADC complete flag is used in the while loop. Once the analog voltage from the sensor surpasses certain level as obstacle is detected, the PWM signal turns to zero and the car stops. Update of command is established by polling the data receive complete flag. Once this flag is set, the data in UDR is copied and the command is updated.
We also use the software to imitate the real brake light. The brake light is on if the car is stopped or a decrease of speed is detected. Decrease of speed can be detected by comparing the previous speed value with current speed value. A simple count, which does not block any other function, is used to let the light be on for a period long enough to be visible to humans.
 Picture 1 | Picture
2 | Picture 3 | Picture 4 |
Picture 5 | Picture 6 |
Picture 7
Picture 1 | Picture
2 | Picture 3 | Picture 4 |
Picture 5 | Picture 6 |
Picture 7
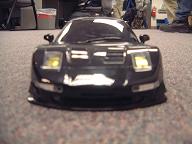
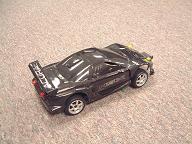
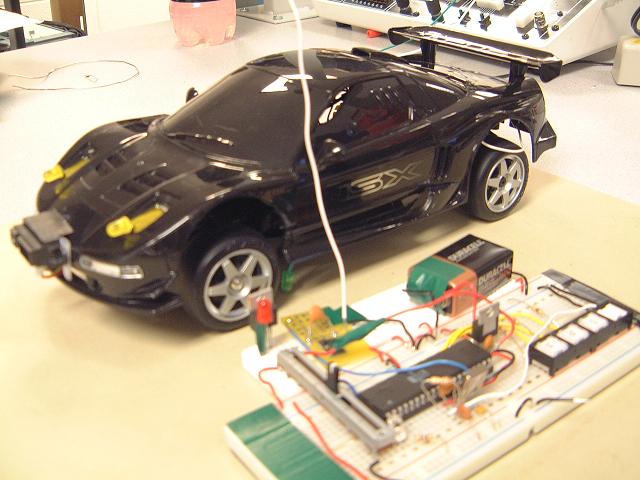
We have a favorable result as we have met all our goals. The car runs
as fast as the original one and it is more interesting since there are variable
speed, brake lights, headlights and distance sensor. It looks like a real
car from pictures and it is especially cool at dark environment.
The communication during start-up between receiver and transmitter do have some
latencies and the receiver end must be turned on before the transmitter end is
on. In case of losing control due to the wireless communication
interference, we do have a reset button on the handler. This can easily
correct the communication problem by resetting the transmitter end MCU.
There is no safety violation in this project and the car is even safer to play
around with the enhanced feature - IR distance sensor. We encountered RF
conflict with other groups and this issue is explained in the IEEE code of
ethics (2) of the conclusion section.
This is definitely a very interesting project and people can easily play around
with it. No prior driving skill is necessary. However, user must be
gentle with the handler since the parts are not securely enclosed. Violent
behavior to the handler will not be tolerated and it will cause immediately
expelled from this exercise.
The digital laboratory was our home for the past month and we had a very
intensive schedule to occupy the workstation that we used to work at. We
started early and finished the project just few days before the demonstration
date. We managed to finish all three goals that we set for this project
and it is amazing that we were ahead of our planned schedule. Generally,
it was a fun project for us and we have met all our expectations. Our
recommendation to the future groups is to set different goals for the project
and start EARLY!
Things tried and worked but not used...
We had also tried couple other features such as variable steer angles, siren
sound and flashing blue and red police car lights. All these features work
without problem. However, we decided not to use them in this project
because of mechanical, space and wiring problem. First, the circuitry
wiring was more than we expected and we can barely put the cover back on the NSX.
As a result, it is impossible to wire more parts than what we currently have.
Indeed, we tried to wire a speaker and we could not put the cover back.
For the various steer angles, we wired and programmed a stepper motor and we
successfully had it worked. However, we do not have the necessary gears
and chains. Hence, we do not use it.
Next time...
We would plan the circuitry more careful and do a better soldering job.
We would like to put speaker to generate horn sound and this can make our NSX
even more interesting and real.
We would buy a long range IR sensor to provide a better safety range since our
sensor can sense only up to 30cm. Our car cannot stop automatically when
it is running at full speed. (note: but it works perfect when the speed is
lower.)
We would design a better controller on the transmitter end instead of using
breadboard (although it is still nice) and we definitely want to fit the parts
back into the original controller.
Intellectual property considerations:
In this project, all the designs are original thoughts. The hardware circuitries and codes were designed and written by ourselves. We believe that it will waste our time and will be very hard to follow other people hardware design or programs. As a result, we had a very intensive work on this project and started working on it very early.
All the parts were either ordered by Professor Land or acquired from the digital laboratory. No sample was got and no non-disclosure was signed.
About patent opportunity, hmm.......maybe next time.
IEEE Code of ethics considerations:
2. to avoid real or perceived conflicts of interest whenever possible, and to disclose them to affected parties when they do exist;
RF conflict: there were about 5-7 groups using 433MHz from radiotronix and we got a very nasty situation when groups were transmitting data. During the first three weeks of extended laboratory time, no RF conflict happened to us and we believed that it was because we worked on the wireless communication relatively early and other groups hadn't worked on that during those time. However, this changed within 7 days of project due date. Data received were very unstable and our RC car behaved abnormally. In order to solve this conflict, we did walk through the entire laboratory to notice people that we would test our project with wireless communication. We turned off the transmitter when we were not using it. When groups wanted to test their communication simultaneously, we allocated time slots such as every group tested their project for about 10 minutes each.
4. to reject bribery in all its forms;
There was no bribery in this final project. We didn't take any advantage of ordering parts with specified retailer. Parts were ordered with following considerations: delivery time, price and availability.
7. to seek, accept, and offer honest criticism of technical work, to acknowledge and correct errors, and to credit properly the contributions of others;
H-bridge design was modified to add the inverters into it for safety reason. Prototype board problem was solved after bypassing voltage supply and ground. Wireless communication was corrected for adding initial start-up bytes. This was the credit of Professor Land and we accepted his technical help and this helped us successfully to build our RC car.
8. to treat fairly all persons regardless of such factors as race, religion, gender, disability, age, or national origin;
Cornell is certainly a very diversified community. ECE department is even more diversified with different races, nationality, gender and religion. We observed no discrimination in this class and people do respect individual differences.
9. to avoid injuring others, their property, reputation, or employment by false or malicious action;
Basic laboratory safety rules were followed and there was always teaching assistant or Professor during lab hours. The most dangerous equipments - soldering iron and voltage supply were carefully used.
Appendix A (Programs Listing):
H-bridge
Transmitter & Transmitter end MCU
![]()
Receiver & Receiver end MCU
433MHz Receiver: RCR-433-RP $3.53 (quantity:1)
433MHz Transmitter: RCT-433-AS $2.24 (quantity: 1)
Sharp GP2D120 infrared ranger: R146-GP2D120 $13.5 (quantity: 1)
100K linear slide potentiometer: CAT# LSP-100K $1 (quantity: 3)
Darlington transistor arrays: 296-1979-5-ND $1 (quantity:2)
From Digital Lab or used part
Total cost: $21.27
Preliminary design & review: Lam and Wong
H-bridges: Lam
Prototype boards: Wong
Infrared sensor: Lam and Wong
Receiver & transmitter circuitry: Wong
Receiver & transmitter programs: Lam
Overall circuitries & Soldering: Lam and Wong
Overall car polishing: Lam and Wong
System testing: Lam and Wong
Documentation: Lam and Wong
Cornell ECE 476 past projects: http://instruct1.cit.cornell.edu/courses/ee476/FinalProjects/
DC motor for speed: www.mabuchi-motor.co.jp/english/cat_files/rc_260rasa.html
Receiver: www.radiotronix.com/datasheets/rcr433rp.pdf
Transmitter: www.radiotronix.com/datasheets/rct433as.pdf
Sharp IR sensor: www.acroname.com//robotics/parts/R146-GP2D120.html
Transistor arrays: http://rocky.digikey.com/WebLib/Texas%20Instruments/Web%20data/ULN2001A-4A,ULQ2003A-4A.pdf