MISSILE COMMAND
Final Project
By James Prudhomme
Introduction | High Level Design | Program Design | Hardware Design | Results | Conclusions | Pictures/Movies | Appendix 1 | Appendix 2 | Appendix 3 | Appendix 4 | References
For my ECE 476 Design Project, I built Missile Command using the Atmel Mega 32 microcontroller. My version of Missile Command is based on Atari’s 1981 version. After looking at some of the past ece476 final projects, I noticed no one had tried to build Missile Command. This game was one of my favorites games of all time and I thought it would be fun to recreate the game after more than two decades after the original came out.
I decided to display the game on a television screen, which can produce unwanted flicker or artifacts when the timing is off. I used the television because I assumed that the implementation of the game would not be too difficult since most of the animated graphics are lines and dots. It proved to be a lot more complicated.
The game takes place during the Cold War era of the 1980’s. Major cities are being attacked from the sky by falling nuclear warheads. You are a pilot who has to target the warheads so that your base command on the ground will be able to fire a rocket to intercept these warheads. If you are too slow and allow the warheads to destroy all your cities, the world is destroyed and the game is over.

A Screenshot from the Atari version of Missile Command
Rationale
After being stuck doing a project without a partner at the last minute, I could not think of any original ideas at the time that I felt one person could do. My limited experience with hardware made me look more towards a project that was manly software oriented, like a video game. After looking at previous video game ece 476 projects, the first idea that came to mind was to create Missile Command. To my knowledge, no one had done it recently in the past and it is a fun game, and contains simple graphics. I figured using a TV to display the game would be the best way to simulate the original and was a cheap source of hardware.
The Game
The game starts with an introduction screen, which displays the game title and my name. A short little song will play repeatedly while this screen is displayed. Once the start button is pressed, the player will enter the first level. The first level will have 7 objects drawn at the bottom representing six cities and a missile base command. Up to six, seemingly random lines (Warheads) will slowly be drawn downward from the top of the screen. The player is able to move around a small rectangle (ship) to intercept the lines and fire missiles at it from the missile base command. Once the fire button is pushed, a small dot (missile) travels from the missile base command all the way to the exact point where the ship was located when the fire button was pressed. Upon reaching its destination, the missile will grow slowly into a large ball and then disappear, simulating the missile exploding. If the front of the Warhead is anywhere inside the explosion, it is erased (destroyed). The player can only fire three missiles at a time and receives 50 points for every warhead he destroys. If a Warhead makes its way all the way down to the city, the city will be replaced by a destroyed city. The player only gets a limited supply of missiles that are stored in four cargo holds that look like four small dots below the missile base command. For every Warhead that hits the missile base command, a cargo hold will be destroyed. For example, if four warheads hit the missile base command, the player will be unable to fire any more missiles for the remainder of the level. After a certain number of warheads have been drawn, the level will end and display the number of the next level. After each level, the player is given 500 points for every city that remains undestroyed. The player will then press start to proceed to begin the next level. Unlike the original Atari version of the game, a player may pause the game at anytime by pressing the start button. Upon the completion of each level, the speed of the Warheads increases. If at any time, at least one city is not still standing, the game will end and “GAME OVER” will be displayed on the screen.
Video
The Television screen was used to play the game. I had had experience using the TV in Lab 4, and new it could be used to display the output of a video game. The television uses the NTSC standard, where black=0.3V and white = 1.0V. The TV input requires sync pulses to be generated every 63 micro seconds, to draw each line on the screen and then a series of inverted sync pulses to reset each screen frame. RCA video composite phono jack cords were used to connect the MCU to the TV.
Controls
Originally, I was going to implement a keypad to control my game, since I had had experience using it in Lab 3 of ece 476. I then realized how much diagonal and non-linear movement that my game would require and considered using a gamepad or joystick. I finally picked the Sega Genesis game pad because it uses basically the same logic as the push buttons on the DSK-500 board. All button are logically high when unpushed and logically low when pushed. The Up, Down, Left, and Right buttons control the ship’s movement and buttons B and C will pause the game and fire a weapon, respectively.
Logical Structure
A state machine was used in the program to help organize the games. Below is a basic state diagram used in the code to build Missile Command. The Intro State initializes all the variables and prints out the game title and my name. The Ships and Cities State draws all the cities and initially draws the ship. The Missile State is the main state of the game. Most of the actual game movement and game algorithms are in this state. In this state Warheads begin to be drawn and the player can begin firing at these Warheads. If a City is hit by a warhead, the City Destroyed State will replace the city with a damaged one. The Paused State freezes the game if the start button is pushed. Game Over is the final state, after all cities are destroyed.
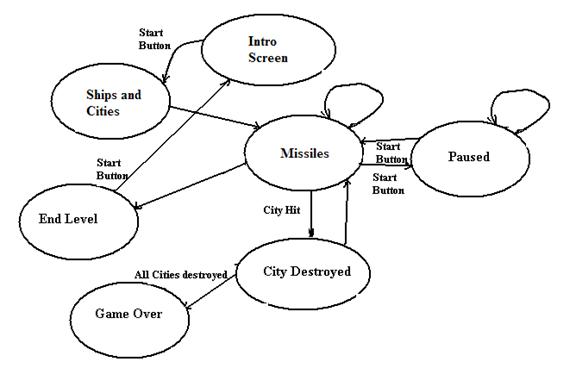
State Diagram of Missile Command
Hardware/Software Tradeoffs
To make programming more simplistic and faster, I implemented my code completely in C instead of assembly. Using assembly would have decreased the amount of frames required to do all the computations.
Intellectual Property
Missile command is copyrighted by Atari, 1981. All ideas for my version of Missile Command were taken from Atari’s version and therefore all credit to its creation is given to them.
Nuclear Warheads
I started with professor Land’s Mega32 version program of a bouncing ball and kept adding to it. I first tried to draw lines by using some of the bouncing ball logic. The basic algorithm consists of two variables, called x and y which define the position of the ball on the tv screen. The ball is drawn to the tv screen using the video_pt function, which was contained inside professor Land’s example. The ball’s position could be changed as a function of time by using the variables, vx and vy. Each time x and y change, the original was then erased to simulate movement. This is shown from some of the example code below:
//the animated point
video_pt(x,y,0) ; //erase old one
x = x + vx;
y = y + vy;
s = video_set(x,y);
if (s>0) vy = -vy; //if true, must be a line there
if (x==124 || x==1) vx = -vx;
if (y==88 || y==12) vy = -vy;
video_pt(x,y,1) ;
I first tried to create a line (Warhead) by commenting out the video_pt(x,y,0) part of the code above so that the ball would leave a trail behind. This worked, however, in order to erase only this line, all previous x and y positions would have to be stored some how in memory. I finally decided on an algorithm that replaces all video_pt functions from the code above with video_line. The video_line function is also included in the example program and draws a line between two points. Starting from some point near the top of the screen, my algorithm draws a line from a starting point to another point at position (x,y). Once (x,y) are changed, the line is erased and replaced with a new line from the starting point to the new position, (x,y).
The variables vx and vy control the speed of the warhead in the x and y direction respectively. Originally, in the program above, the slowest speed that vx and vy could be defined as besides zero was 1, which corresponded to one screen pixel per frame. This was too fast. To solve this problem, vx and vy were defined as int’s and only the highest byte would be read. Speeds less than one pixel per frame could then be used by incrementing only the lower byte of vx and vy. For example, incrementing the lower byte of vx and vy would produce a warhead speed of 1/ 256 pixels per frame.
The Ship
Most of the graphics for Missile Command were stored in flash memory as a combination of char bitmaps. Each corresponding bitmap could be drawn on the tv screen using the function from the Professor Land’s example code, video_putchar. The ship was a simply a length 5 pixel line. Using the same idea as the bouncing ball code above, I replaced the video_pt function with the video_putchar to draw the ship at a certain position, (xship, yship). The controller buttons Right, Left, Up, and Down, will decrement xship, increment xship, decrement yship, and increment yship, respectively, by one pixel, every frame. When each button is not pushed, the speed variables go to zero.
The Cities
Like the Ship, the creation of the cities and missile command base required graphic images to be created as bitmaps to be drawn on the tv screen by the video_putchar function. Below is a sample of my code that stores all city graphics as bitmaps in flash. I tried to copy the shapes of the cities from the original video game as much as possible. To create one city, the bitmap indexed to [45] [7] and [46][7], which correspond to the left and right side of the city. These cities were placed at equal distances from each other, with the missile base command in the center. Damaged cities were drawn the same way. The missile base command required four bitmaps to represent it.
// 45 new city left side
0b00011000,
0b00011000,
0b00011000,
0b01111000,
0b01111000,
0b11111000,
0b11111000,
// 46 new city right side
0b00000000,
0b00000000,
0b10000000,
0b10010000,
0b11110000,
0b11111000,
0b11111000,
Difficulty, arose when I tried to draw the missile base command and all the cities to the tv screen in one frame. Artifacts would appear because my code could not finish writing to the screen array between one frame. Placement of the cities had to be drawn between two frames, the left side cities plus missile base command for the first frame and then the other cities for the next frame.
The Missile Base Command weapon
The missile base command weapon was the hardest and most time consuming task for me to implement for this video game. I split the task up into two parts: 1. Get the missile to travel from the missile base command to the old location of the ship when the fire button was pressed. 2. Make the missile explode and erase any warheads that are contained in the explosion.
I modified the video_line function so that a point would travel in a straight line to the old location of the ship. This involved having video_line calculate a straight line, but only draw a specific point along the line. This specific point would change every frame until it reached the end. Once this was completed, a button debounce state machine, like the ones required for Lab1 in ECE 476, was needed for the fire button to work.
The second task proved to be more time consuming than the first. There are two major parts to the explosion, one using 4 bitmaps and another using 6 bitmaps. The explosion would start off as a dot, grow to 14x10 pixels, then grow to 16x16 pixels, then shrink back to 14x10 pixels, and then gets erase. Warheads become erased if they occupy the explosion region where the pixel value is 1. The explosion required 4 frames to write to the screen array without artifacts appearing.
Adding more
By this point I had added all the basic elements that make up my game. I was able to move my ship around and destroy one warhead that repeatedly traveled down to destroy my cities. But the original game had up to six random warheads falling at the same time. I learned from playing the game that all six warheads are not independent of one another. There are actually two sets of warheads that fall toward the cities. If one warhead is destroyed in the set, another warhead will not begin to fall until every warhead in that set either hit a city or are destroyed by the player. This allowed me replicate all the warhead code into two arrays. Each of these arrays can draw up to three warheads, which all travel side by side at the same trajectory. The number of warheads that are drawn in each set is determined by a random number created using the last two bits of the output of the rand() function. The rand() function was also used to produce a warhead set velocity range and a starting position range for each warhead. After this, I used a 3 element array to help control the three missile base command weapons that can be drawn to the screen at one time.
Timing to eliminate artifacts
After using arrays to draw three times as many graphics on the screen, the computation between frames increased significantly and the tv would produce artifacts. Therefore, each individual warhead was computed in one frame and the missile base command weapon used 7 frames to finish its computation. The finished game had its computation spread out through 15 frames in the Missile command state. Less frames could have been used, but the game would not have resembled the original Atari version as well.
Sound
Sound effects for the Warheads destroying a city, explosions, and empty cargo hold were added last. Luckily, this did not cause any unwanted artifacts to appear on the tv screen. I created my own intro theme song that plays at the beginning of the game by trial and error. This song was my own original creation.
Overall
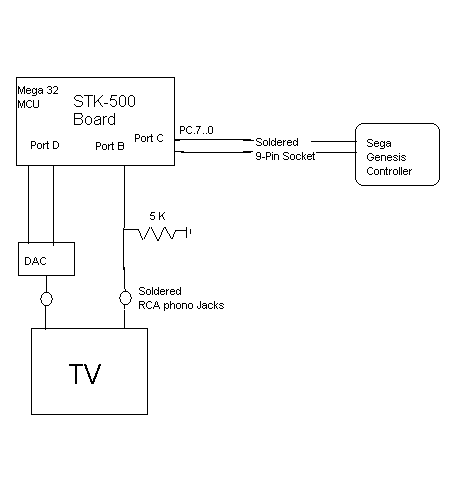
The Atmel AtMega32 microcontroller was programmed on an STK-500 board. An overall schematic of my hardware design is displayed below.
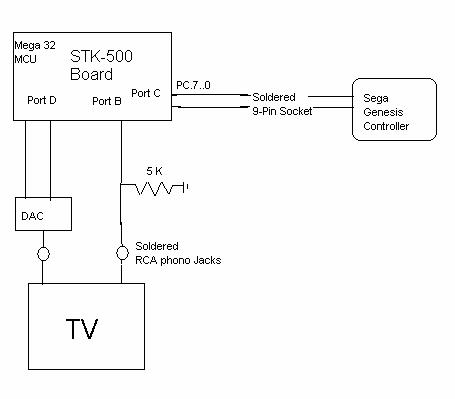
Overall Schematic of Missile Command
Video Generation
Port D.6 and Port D.5 were used by the Mega 32 MCU to control the TV display. Timer1 was used to properly time the sync pulses. To create the proper sync pulses to be sent to the TV, a digital to analog converter (DAC), which is displayed below, was created that converted the digital signals from the PortD.6 and PortD.5 outputs into an analog signal appropriate for output to the TV's video input. To simplify the set up, an RCA phone jack soldered terminal was soldered to the output of the DAC so that a RCA composite video cord could be plugged into the TV and DAC with ease.
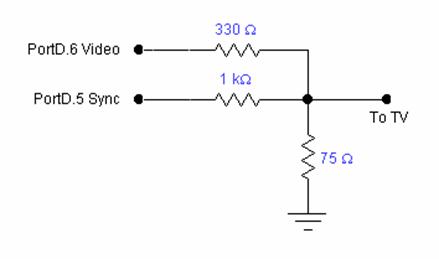
Digital to Analog converter (DAC) for input to television.
Game Controller
A genesis controller was connected to Port C. The original Atari version of the game only required a joystick with one button. The Genesis controller was perfect for this because it was really easy to implement buttons: Up, Down, Left, Right, B, and C., which were all I needed. Below are the pin assignments for the controller, which was borrowed by Chris Moschner and Matt Cantlon’s final project Spring 2003. The select bit (Pin 7) was constantly set high because there was only a need for six buttons. I soldered a 9-pin female socket to the output of Port C, to allow the game controller to be easily plugged into.
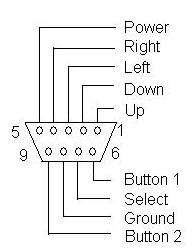
Pin assignments for the Sega Genesis controller
|
Sega Genesis Controller Pins |
Mega 32 Port C Pins |
Function (Select = 5V) |
|
1 |
2 |
Up |
|
2 |
1 |
Down |
|
3 |
4 |
Left |
|
4 |
3 |
Right |
|
5 |
Vcc |
+5VDC |
|
6 |
0 |
Button B |
|
7 |
Vcc |
Select |
|
8 |
Ground |
Ground |
|
9 |
5 |
Button C |
Pin assignments for the Sega Genesis controller pad
Sound
Port B.3 was used to output sound to the Television. Just like the video generation, a RCA phono Jack was used to connect this output to the Television’s audio port. The output of Port B.3 was connected to ground by a 5 Kohm resistor.
Sound was generated using timer 0, which produced tones at different specified frequencies. These frequencies were produced by the toggling the output control register for a specific period of time or count. These count values were stored in flash memory.
Speed of execution and accuracy
The signal timing of my code seems to be very well synchronized since no artifacts or noticeable flickering is ever present on the tv screen. Though the game requires 15 frames to completely draw all animation to the screen, the player hardly notices. As the levels increase, the falling warheads begin to fall so fast that the 15 frames per computation becomes noticeable. The accuracy at which a warhead will destroy a city is not perfect, especially at higher levels when the warhead speed increases. This was not a big issue to the final design of the game since in war there are always a few bombs that are duds.
Safety
Safety was taken into account when designing this game. The outputs of the video game are at most 5 volts and do not posses enough power to cause serious bodily harm. In addition, to reduce the chance of video game epilepsy, outputs to the screen array were kept at frequencies much, much greater than 50 MHz.
Interference
There was no interference with other people’s projects. To not bother other people working, earphones were used to help debug the intro music and sound effects.
Usability
This game is very simple to play and very straight forward to understand, since I was only about 4 years old when I started playing the original on Atari. The sega genesis game pad allows the user easy control of the game. Implementation of the start button makes the game able to pause and resume anytime the player wants.
Expectations and Improvements
My design of Missile command almost met all my expectations. Implementation of the genesis controller and the soldering devices were not part of my original expectations. There was not enough time nor frames to add explosions to each city. In fact, the game would only function if the total number of frames per computation exceeded 16. In the future, I would create a stand alone board, so that the game could be used outside the ece476 lab. In addition, I would also improve on the sound effects to more resemble the original Atari game.
Intellectual property
The video generation and sound generation part of my code was based on Bruce Land's example code. The rest of the game’s algorithms I came up with on my own by playing and observing the original game. This project is strictly for educational purposes and is not intended to be used for profit.
Ethical Considerations
My implementation complied with all the IEEE code of ethics requirements. Code 1. I made sure my video game was safe and would not cause any harm to individuals. Code3. I was very honest with the performance and results of my game design. Code 6. I maintained my technical competence and disclosed all design limitations my final report. Code 7. I give sole credit for the creation of Missile command to Atari. Code 9. I avoided damaging other people’s property with my design. Code 10. I assisted fellow designers when they asked for help.
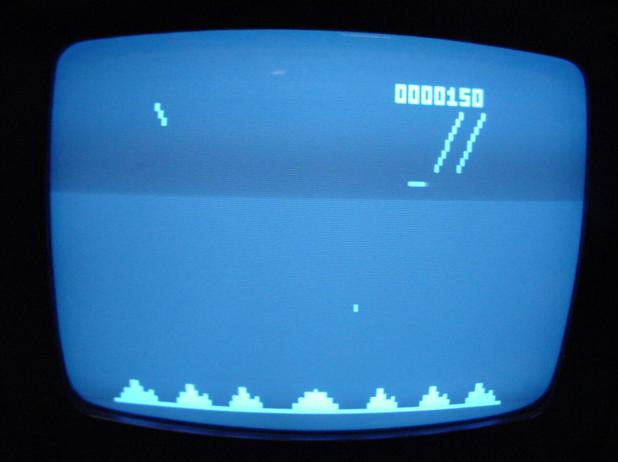
Screen shot of Missile Command
Appendix 1: commented program listing
My code was divided up into four main files. They can be found in the finalproject zip file.
Appendix 2: Schematics
Appendix 3: Cost Details
|
Part |
Quantity |
Vendor |
Part # |
Cost |
|
Atmel Mega32 CPU |
1 |
Supplied by Lab |
|
$8.00 |
|
330 resistor |
1 |
Supplied by Lab |
|
$0.01 |
|
1K resistor |
1 |
Supplied by Lab |
|
$0.01 |
|
75 resistor |
1 |
Supplied by Lab |
|
$0.01 |
|
5K resistor |
1 |
Supplied by Lab |
|
$0.01 |
|
RCA phono jack cord |
2 |
One Dollar Store |
|
$1.00 |
|
Phono Jacks: solder terminals |
2 |
Radio Shack |
274-346 |
$2.00 |
|
9-pin socket |
1 |
Basement of Clark Hall |
|
$0.50 |
|
Genesis controller |
1 |
Provided by a TA |
|
$3.00 |
|
Total |
|
|
|
$14.54 |
For reasons beyond my control, I did not have a partner this Project. This made the workload required to create this video game exceptionally large. Without a partner’s insight or second opinion, creating algorithms and debugging were extremely time consuming.
1. Professor Land’s Mega32 version program of a bouncing ball, ECE 476, Spring 2004.
2. Moschner and Matt Cantlon’s final Project “Cantneroid”, ECE 476, Spring 2003.