Software Design
Interface
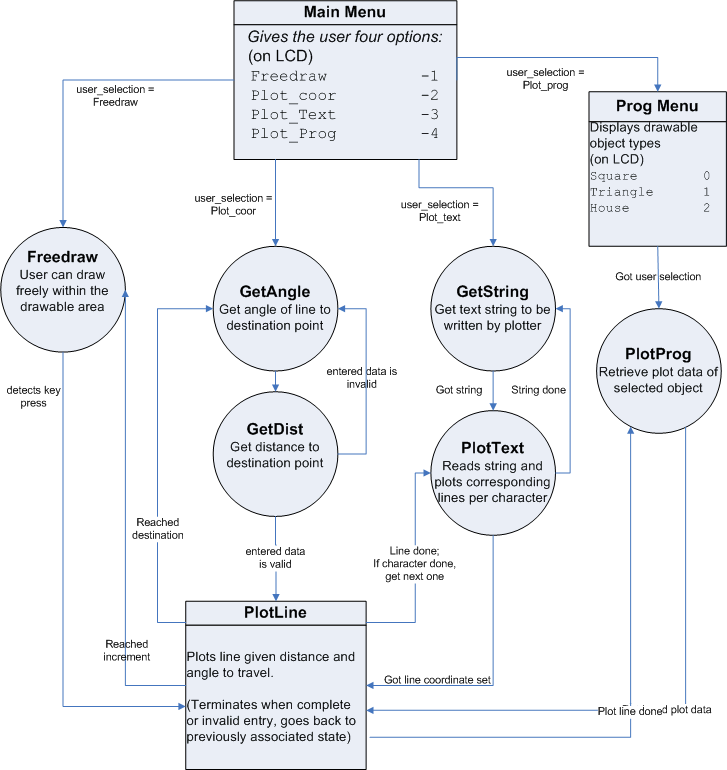
Because our device uses a great deal of math in determining its current and next plot position with its unique plotting method, the control software has a significant role in its operation. Our interface software is essentially a state machine that handles transitions from one mode to another, as well as the internal states within each operation mode - The user can choose which mode to go into by looking at the available options displayed on the LCD and press the keypad to make the selection. The state machine shares the same time counter with a variable timeframe. We adopted some of the structural aspects of the state machine used in the Vertical Plotter project from Spring 2001 in the initial development, but over time, the code gradually developed to a very separate form as we extended its capabilities. The software interface offers 4 different plotting modes to the user: Freedraw, Plot Coordinates, Plot Text, and Plot Programmed objects, all utilizing the universal plotting function plotLine(), which handles motor movements to draw the desired lines and/or objects.
Fig. 6 - Control program State Machine
PlotLine()
The center piece of this device, the plotLine() function is responsible for making the necessary calculations and controlling the stepper motors appropriately in order to plot the lines as commanded by the user. It takes in two values, dx and dy, which is obtained by other mode functions from the user, and determines the amount of winding or unwinding for each motor to plot the correct distance and angle.
The software has a series of condition checks to make sure that the plotter can travel to the destination point safely, which is necessary to maintain its accuracy. One problem is that there is no default position in the stepper motors, meaning that they can step in either direction indefinitely. This can be a serious problem because as the motor unwinds the string to move the plotter and reaches a point where the string is fully extended, it does not realize that the motor has returned to its initial point, and continues to step in that direction – i.e. changing the unwinding motion to a winding motion. To prevent this, we keep track of motor steps taken in both directions, and take that into account when determining whether the plot request that the user entered can be made or not.
Once the plotting is accomplished, it then updates the coordinate values, x and y, and the string length values, a and b, to their most recent values, and depending on the mode it will either go back to the parent mode that called plotline() or retrieve a new coordinate set and plot the next line.
Associated functions are as following.
enter_plotLine() – sets appropriate
parameters to make transition to plot_line state. Also calculates da and db to
be traveled, motor steps necessary, and determines whether the plot can be
done within the drawable area with the given coordinate set.
runMotorR() – called by plotLine(),
keeps track of steps taken and necessary for right stepper motor to complete
the plot.
runMotorL()
– called by plotLine(),
keeps track of steps taken and necessary for left stepper motor to complete
the plot.
tickBL() – back motor step function for left stepper motor.
tickFL() – forward motor step function for left stepper motor.
tickBR() – back motor step function for right stepper motor.
tickFR() – forward motor step function
for right stepper motor.
Update() – updates x, y, a and b values after completing the plot. Then depending on the mode, it returns to the appropriate position of the operation.
The details of each plotting mode and associated programs are listed below.
Freedraw
As its name implies, this mode allows the user to have direct control of the pen apparatus. It draws lines of desirable length in the allowed 8 directions (up, down, left, right and diagonal directions 45 degrees in between) corresponding to the directional keys on the keypad. The line increment is predetermined (default at 0.3cm) and the number of times it travels at that increment is determined by the length of time that the user holds the key of the corresponding direction. Each time the plotter reaches the increment, it updates the x and y-position of the plotter, and if it still detects the button press, it recalculates the da and db which it has to travel and repeats the process. If the user releases the button before it reaches the increment, additional adjustment schemes have been made so that it reverse-calculates the dx and dy traveled by using the number of steps it has taken from the starting point and adjusts the x and y-positions to its most recent values.
Associated functions:
enter_freedraw() – sets the
appropriate parameters to make transition to freedraw state.
freedraw() – detects button press from
user, determines direction and plots line at given increment.
adjust_xy() – adjusts x and y-values when user terminates the plotting procedure before completion by using the number of steps it has traveled from the beginning of the increment.
Exit from this mode is done by pressing the ‘* ‘ key, which takes the user back to the main menu.
Plot Coordinates
We implemented a coordinate system loosely based on polar coordinates, where the line plot is expressed by two values: plotDist, which is the length of the line, and plotAngle, the angle of the line in respect to the y-axis in the clockwise direction. After entering this mode it first prompts for the length of the line to be drawn and its angle of direction. It then checks whether if it can plot to the entered position, and if not it would indicate “Out of bounds” and will prompt for a new distance and angle – otherwise it will continue with executing the plotting function. After finishing the plots returns to length entry state for the next line to be plotted. The diagram below shows how the entered values relate to the coordinates on the plotter system.
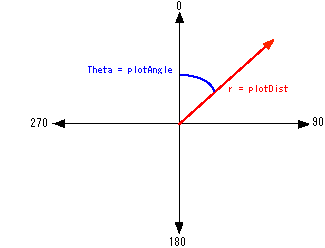
fig. 7 - device coordinate set values
Again, exit from this mode is done by pressing the ‘* ‘ key when prompted for the values, but not when it starts plotting, which it takes the user back to the main menu.
Associated functions:
getAngle() – a debounce state machine
that retrieves the angle value entered by user.
getDist() - a debounce state machine that retrieves the distance value of the line entered by user.
Plot Text
This mode being and extended feature of the plot coordinates function, allows printing of a single line text string entered by the user at its last placed pen location. Each character roughly at a size of 1cm x 1cm, the plotter will start writing the character from its lower left corner, and ends at the lower right corner. It is also designed to allocate a 1mm space after the character automatically to allow the continuous printing of multiple characters. User can enter the characters using the keypad, where each key is responsible for the printed segment of characters on it. The user can hold on to the key to scroll through the list of character it handles, and release once it reaches the desired character. The user repeats this process until he or she completes the target string, then the press of ‘C’ key will initiate the writing process. Once completed the software will return to the string entry prompt for the next string to be plotted. Printable characters are numerals 0-9, upper case alphabets A-Z, period(‘.’), hyphen (‘-‘), and space (‘ ‘).
Associated functions:
GetText() – records and stores characters
entered by user as a string array. Once completed the ‘C’ key press will
initiate the writing process.
plotText() – takes in the string previously entered by user and retrieves from a series of stored data arrays the following values: line angle, line distance, and whether the pen is lifted or not (discussed later). The function will also keep track of which line is currently being plotted and moves onto the next one upon completion; when the character is completed it advances to the next character, and continues until the string is completed.
Plot Programmed-objects
As another extended mode of the plot coordinates function, this mode will plot preprogrammed simple objects selected by the user onto the sheet. We implemented 3 objects for this mode: a square, equilateral triangle, and a simple house graphic, and by using methods similar to those mentioned in Plot Text mode, it retrieves a series of coordinate sets for that specific object and plot lines one by one until the object is completed. For the square and the equilateral triangle, the user can scale it to a larger size by entering the scale factor that is applied on to a base length of 1cm. The house is drawn with a series of fixed-length lines, roughly occupying 2.5cm x 2.5cm space.
Associated functions:
progMenu() – displays plottable
objects onto LCD and stores selection made by user.
getLength() – prompts user for the
length of the variable-length object, which is applied during the plotting of
the lines.
plotProg() – based on the user selection retrieves the set of coordinate values and calls plotLine() for each line. The scaling factor is applied to the shapes being drawn as well if entered.
Other functions
Other independent functions that were necessary in the operation:
penlift() - sets a voltage which turns on the solenoid and as a result lifts the pen in the apparatus. This simple yet significant function makes possible text printing and drawing multiple shapes in a non-continuous fashion.
key_press() - scans keypad using the port-switching routine to detect a key press.
getKeyChar() - converts obtained key value to the corresponding character.
LCDscrUP(), LCDscrDOWN() - scrolls up and down the menu list displayed in the menu state - allows displaying of longer menu list.