
Graduate from Cornell Video Game
By Susan Kuo and Jennifer Owens
Spring 2004
The Graduate from Cornell video game helps the user understand what it is like to make it through Cornell's Engineering School.
Introduction | High Level Design | Program/Hardware Design | Results | Conclusions
Appendix A | Appendix B | Appendix C | Appendix D | References
1.1 Project Summary
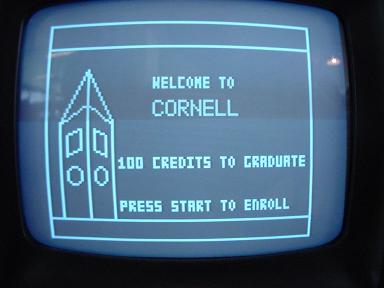
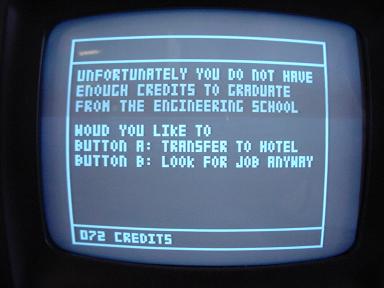
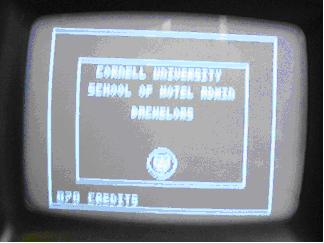
For our final project we implemented a “Graduate from Cornell” video game that puts the user through three challenges (one for each year of an accelerated three year program) which they must complete to earn credits toward graduation. Our original plan was to simulate a typical four year program but memory constraints forced us to cut out a year. The number of credits earned decides the fate of the user, whether it’s graduating with a Masters Degree or transferring to another school.
We decided to create this video game because we thought it would be something we could enjoy for years to come. We envisioned ourselves playing the game a few years from now and having a chuckle at the small inside jokes only a Cornell Graduate could appreciate. Since this is also our last year at Cornell, the game is also somewhat symbolic of our personal struggles to graduate. But mostly it’s for our entertainment.
2.1 Rationale of Project
When deciding on a final project idea, we both agreed that we should try to find something more software oriented since neither of us has had much experience with hardware design. We toyed with the idea of creating an electric keyboard since we are both interested in music but wanted to be able to express more creativity. We also wanted something we could easily and cheaply make two of so we could each take something home at the end of the year. Once we started thinking about possibly implementing a video game, we decided that it would be better to actually create something new since we could easily buy already existing video games. The idea of a “Graduate from Cornell” video game was jokingly suggested and the more we thought about it the more we liked the idea. Thus, we finally settled on a project idea that was creative, original, and required little hardware knowledge to implement.
Once we agreed upon a project, level ideas were quite easy to come by. We both graduated from Cornell University with Bachelors in Electrical and Computer Engineering so we knew of small challenges that could easily be converted into video game format. The four large challenges (language barriers, finding your advisor, keeping up with Delchamps, and balancing projects) became our four main levels. Ideas on how to format each level came from games that are currently in existence such as tag and Dance Dance Revolution.
2.2 Logical Structure
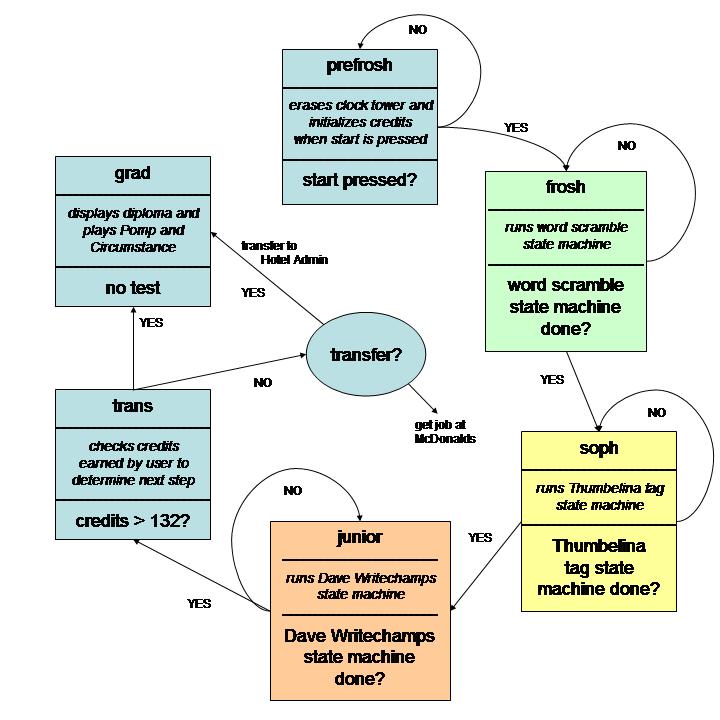
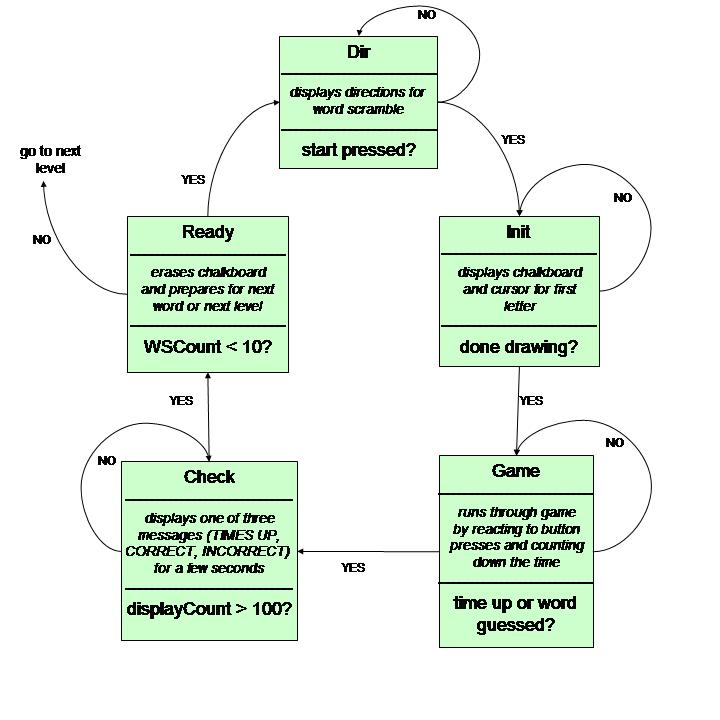
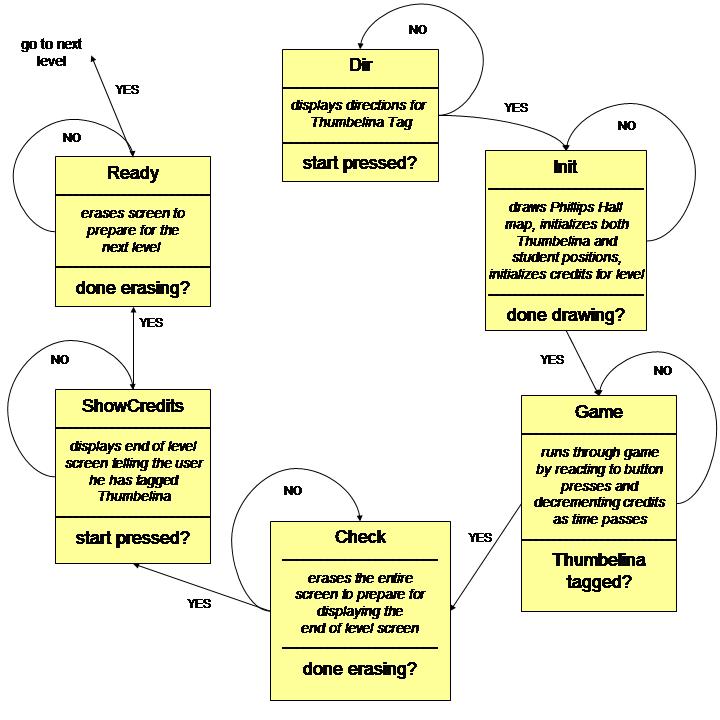
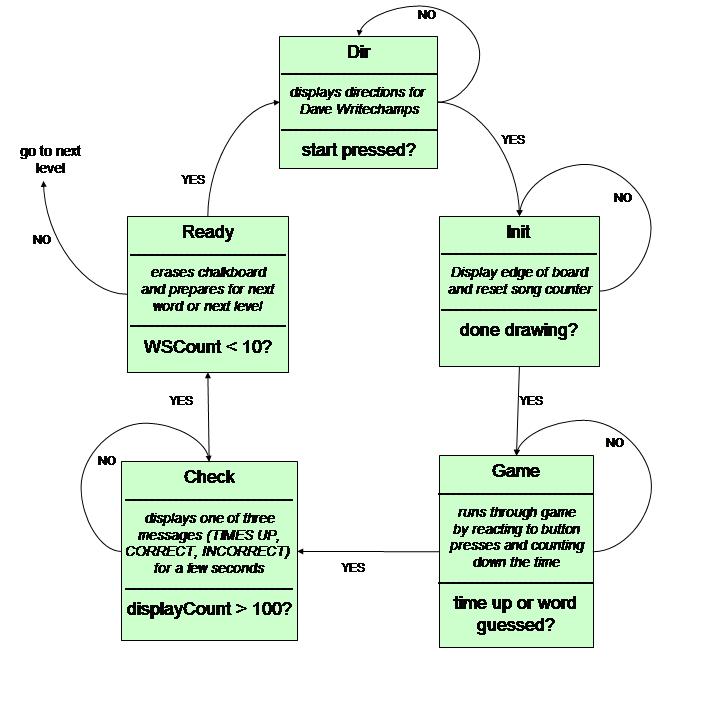
The basic structure of our design is actually quite simple despite the fact that it appears to be complicated at first glance. We begin with an overall state machine that controls the flow of the game from one level to another. Inside each different level lies another state machine that controls the flow of that level. Each level starts by displaying directions for game play on the screen and then progresses through initialization, game play, and an end screen. Once each level is complete, the state for the overall state machine is incremented so the user can progress to the next level. To make coding and debugging easier for ourselves we divided our code into separate “.c” files one that contains the main function and graduation functions, three that each contain a different level and its respective functions, one that contains all the video functions, and one that contains all of our flash variables. See Appendix A for our code listing and Appendix B for schematics of our state machines.
2.3 Hardware/Software Tradeoffs
To keep our stress levels down, we decided to use the Atmel Mega32 CPU that we had used throughout the semester. This was a big time saver because it would let us reuse the video code provided by Professor Land and it meant that we did not have to learn to use a new piece of hardware. Unfortunately this decision led to severe limitations on game sophistication due to a lack of memory. We simply were not able to include everything we wanted (four main levels along with some fun transitional screens).
We also decided to do all of our coding in C rather than assembly since we had a lot of code to write and using assembly would have slowed our progress drastically. Unfortunately, this placed great restrictions on us in terms of timing. Creating stable video images requires all calculations to be done in a rather short amount of time. With most of our code in C, fewer commands (compared to assembly) could be performed at calculation time. This forced us to split our drawings between two to four frames to avoid video problems.
One final tradeoff was our decision to optimize for speed rather than size when compiling our code. This allowed us to perform more tasks in each frame but cut back considerably on the amount of memory available to us. We tried to optimize for size when we started running out of memory but our video images started to flicker. We could have solved this problem by going to assembly or creating more frames for drawing but we decided to just cut back on game sophistication to save time and memory.
2.4 Design standards
Since we will be using a black and white television, we will need to follow the EIA RS170 and NTSC video standards. As we learned in class, EIA RS170 is a standard that is used for generating black and white video signals for televisions in the US. It specifies three different voltage levels (sync, black, and white) along with two sync pulses for horizontal and vertical alignment. The voltages levels we will be using come from a slightly updated version of RS170. These levels are sync=0V, black=0.3V, and white = 1.0V. The NTSC standard details how the video signals will be used to create pictures. It specifies 525 lines per frame and a frame rate of 30 frames per second. To reduce flicker, it uses an interlacing of the 525 lines that displays first the odd lines then the even (odd field then even field). We will use a modified version of this that has 100 lines in each field and displays each line twice.
2.5 Intellectual Property
While we doubt anyone has created a graduation based video game such as ours, there are many elements inside the game that do have copyrights and trademarks. Obviously all of the songs that we use are most likely copyrighted and we use a phrase that has been trademarked by McDonalds. Hopefully this will not be a problem if we give credit where credit is due and don’t claim that the songs and slogan are ours.
3.1 Program Details
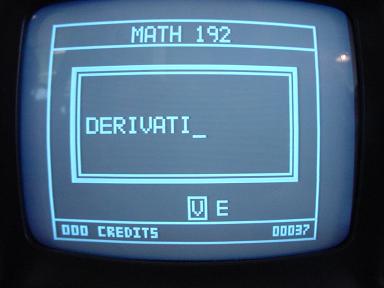
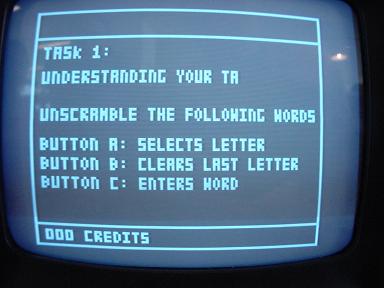
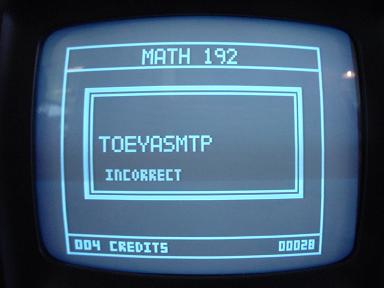
To create the word scramble, we first needed to decide on a topic to choose our words from. Since we have both had trouble understanding our math T.A.s at some point during our Cornell career, we selected Math 192 as our representative class. From there, we were able to create an array of 20 words to choose from. At the beginning of each word scramble, a random number is generated that serves as the index into our word array. A check is done to ensure that the selected word has not been used. If it has, the random number is incremented until it indexes a word that has not been used yet. Once a word is finally selected, the index of that word is stored in an array of used words and the word itself is stored an array called wordSelected. Next, the letters of the word are scrambled and stored in another array (wordScrambled) which is blasted to the screen. Game play can now begin.
As the user presses the left and right arrow buttons, the cursor position (box around the selected letter) is incremented or decremented as appropriate to move the box. Once the A button is pressed, the selected letter is stored into the next index of wordGuessed. To allow for backspaces, the index of the letter in wordScrambled is also stored. This allows us to retrieve the last letter selected and place it in its original scrambled position when the B button is pressed. When the B button is pressed, the last letter to be displayed on screen is also removed from the screen and the wordGuessed array. Finally, when the C button is pressed, the letters in wordGuess and wordSelected are compared. If they match a message stating that the word is correct is displayed on screen. Otherwise, the word incorrect is displayed.
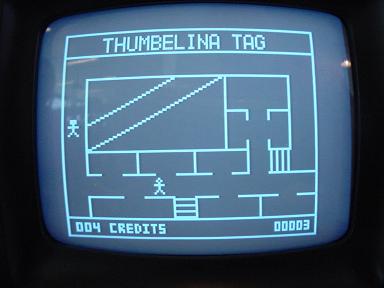
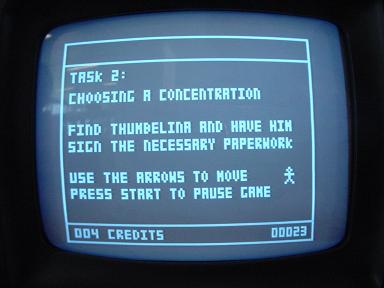
The heart of Thumbelina Tag lies within the low-level A.I. we programmed into Thumbelina himself. This is what allows Thumbelina to avoid the student and make the level more interesting. To make things easier for ourselves (and probably for game users), we force Thumbelina to move along a specific path through Phillips. To make the game less predictable, we also selected several decision points at which Thumbelina can change his direction based on the student's general location. It is up to the student to find ways to trick him into taking a path that will allow him to be tagged. The student can also move slightly faster than Thumbelina since it was nearly impossible to catch him otherwise.
In order to catch Thumbelina, the user must use the arrow buttons. At each button press, an imaginary line is created that is perpendicular to the direction the user wants to move. We then check to see if there are any obstacles that cross that line. If there aren't, the student moves one step in the desired direction. For example, if the user presses the up button, an imaginary horizontal line is created above the student's head. If any of the pixels in this line are white, an object resides there and the student is not allowed to move. If all the pixels are black, his path is clear and the student moves up. Once the student is within a specified distance from Thumbelina, he "tags" Thumbelina and the level is completed. For every 5 seconds that Thumbelina averts the student, one credit is subtracted from the student's possible level credits.
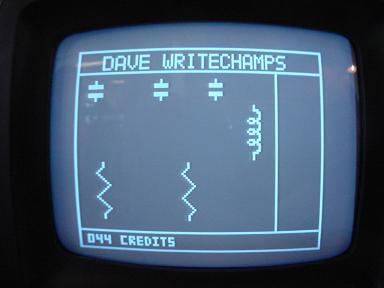
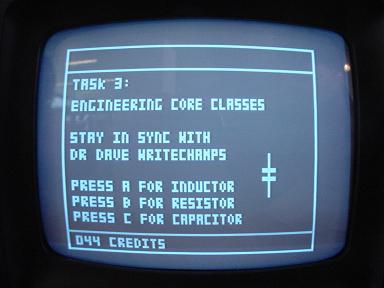
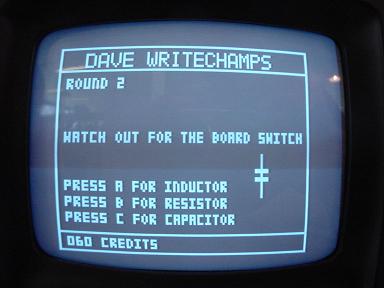
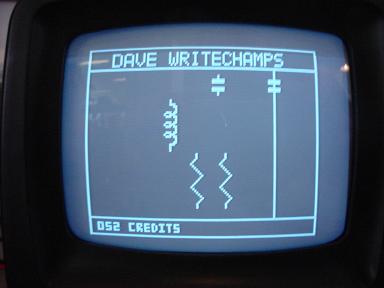
In Dave Writechamps, we animate three different circuit components: a capacitor, an inductor, and a resistor that move along with the notes of Cornell’s Fight Song “Davy” or “My Old Cornell.” This is supposed to represent trying to keep up with Professor Writechamps’s notes as he writes them on the board. We created a running counter and predetermined when a series of components would need to be written to the screen to make it to the edge of the board at the right time. To keep the music in sync with the animated circuit components we update only when a new note is played. This makes the pieces jump along with every note. In round two we alter the location of each circuit element to represent a board switch. Whenever the student presses the correct key at the right time they receive two credits.
3.2 Hardware Details
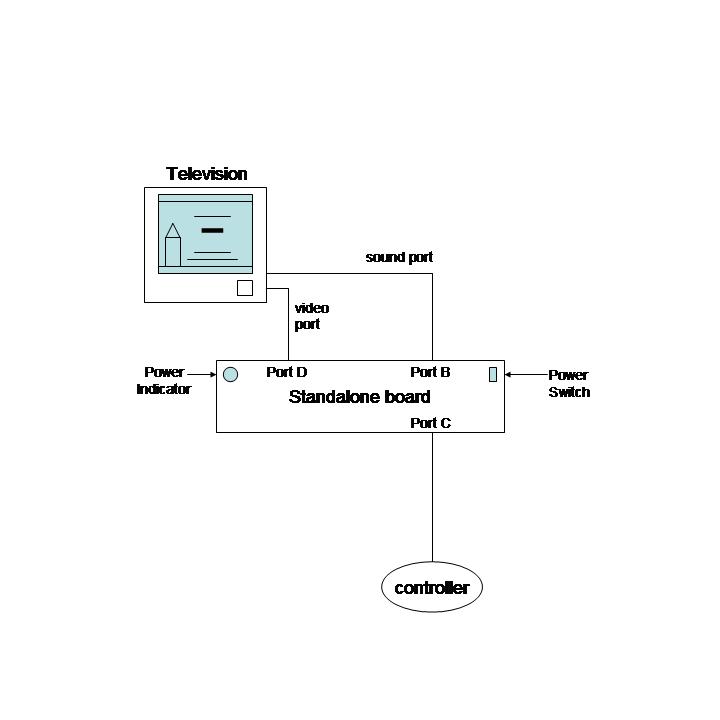
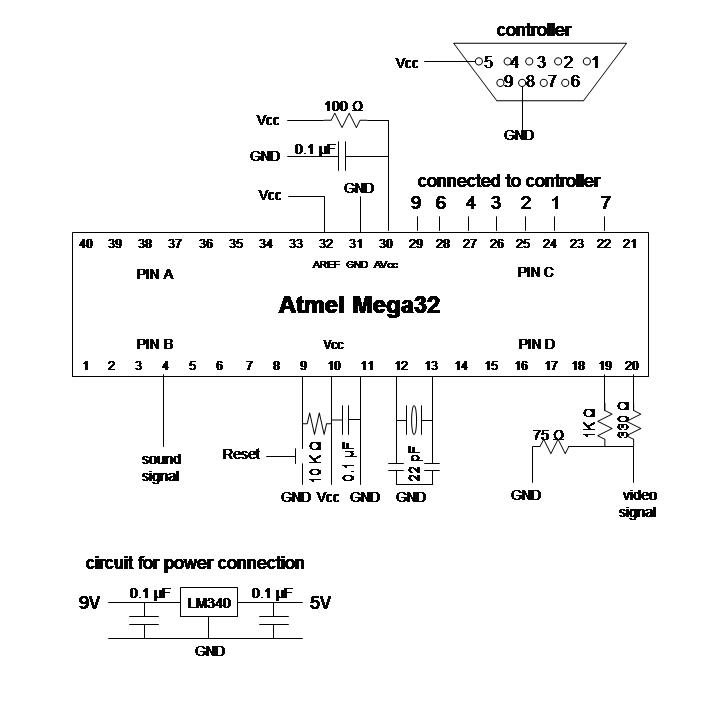
We used an Atmel Mega32 microcontoller, running at 16MHz. The MCU has four I/O ports. Port C is used for input from the Sega Genesis controller. Port D serves as the output for the NTSC video and Port B outputs sound signals.
The NTSC video signal is sent to the TV using a two bit digital to analog converter. Since we’re using the black and white video standard we needed three voltages: 0V is for sync generation, 0.3 V is for black, and 1 V is for white. To accomplish this we used three resistors 300, 75, and 1k Ω.
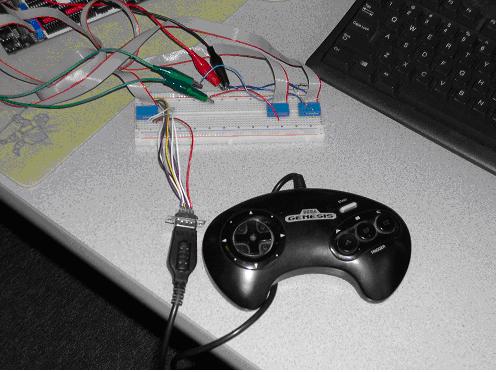
The Sega Genesis controller required a DB9 connector (we purchased ours from Radio Shack). One pin is used for power and another for ground. A third pin serves as a MUX select line while the other six carry data. Eight buttons are included on the controller and the MUX determines which buttons affect the six data lines. To read the buttons we first set the select signal low and read the 6 data pins. When select is low, only two buttons affect the data lines (Button A on line 5 and Start on line 9). The values of these lines are shifted to the top of a char variable. Then we set the select signal high and read the six data pins again. These six values are associated with the remaining buttons and are placed in the six remaining bits of our char. Button presses are then easily deciphered since each bit in the char is associated with a different button.
The sound hardware is outputted from a single port pin, Pin B.3. Timer0 is used to output bits at a specified frequency to this pin (the OC0). Using this method we were free to generate about 2 octaves of notes enabling us to add a variety of music to our game. More octaves would have been achievable through the use of integer frequencies (rather than char), but memory space was limited.
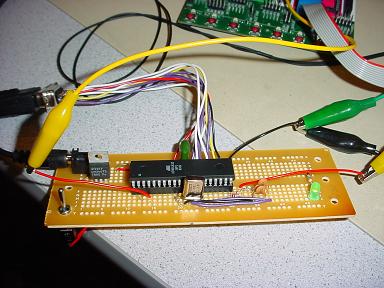
All of this is put together and soldered onto a small circuit board. There is an on/off switch, a port for a Sega Genesis controller and two RCA output plugs for video and sound.
3.3 Acknowledgements
While most of the code for our game was written by us, we must admit that a few tidbits were taken from friends who were in the class last year or Professor Land. The song matrices for both Cornell’s “Alma Mater” and Cornell’s fight song “Give my Regards to Davy” were taken from the CU Hockey project written last year by Rives Borland, Ryan John, and Brian Tarricone. Their method of song specification (a vector of notes and a vector of note lengths) was also adopted. We also used Professor Land’s video code given to us for Lab 4: A Digital Oscilloscope as a basis for our program.
Since we needed to produce more songs than the Hockey game could provide, we also needed to specify note frequencies. We started out using the scale provided by Prof. Land but Jason Pagnotta and Nick Xenias were kind enough to provide the chromatic scale the created for the Tetrus game they created last year.
All of the code used to produce the video signals needed to implement the NTSC video standard was provided by Professor Land in lab 4. This code also included functions that are used to draw pictures and letters on the screen. Our portion of the code depended heavily on these timing and drawing functions.
Finally, the creation of multiple .c and .h files must be attributed
to Desmond Lee. We originally had all of our code in one file and merely
sectioned each level off using commented lines. However, Desmond was kind
enough to spend an evening helping Susan divide the code into more manageable
pieces.
3.4 Attempts that did not work
Our original plan for our game required too much memory. First, we attempted to optimize for size instead of speed. While this allowed us enough room for our entire program, video artifacts were present on the screen and the image became distorted. So we decided to simplify our design, sacrificing some artistic detail for at least three levels. We removed the last level of our game based on project management during senior year and added points from that level into the other three years. Also, we removed parts of the Phillips Hall model in Level 2. The diagonal walk way required extra logic to allow the user to just zip down the walk way by pressing either a sideways or down button on the controller. These two adjustments allowed us to run our program without timing issues.
4.1 Speed and Accuracy
Since video is very time sensitive, allowing only a certain number of command lines to be performed between frames, speed was an important factor in our game. The use of separate drawing frames for pictures that required more time than allotted to display helped us meet this speed criterion. This is evident in the lack of flicker and artifacts in our video displays.
Another important issue was reaction time to user commands. In video games, the user is constantly inputting information to the CPU via the game controller. It is extremely important that all this information be read and acknowledged so as to minimize frustration to the user. To ensure that this is true, button presses are read and processed at each time frame. After playing through the game several times it appears that speed in reacting to button presses is within the tolerable time limit. There does seem to be some hesitation when the user switches directions in the Thumbelina Tag level, however. The most likely cause of this problem is poor controller data. By this we mean that it is more than likely that the user will press two directional buttons at once during game play. Since we did not write code to handle this (due to memory constraints) nothing happens. However, once the user is pressing only a single button again the student moves and all is well. This can be somewhat frustrating during directional changes but we did what we could to minimize the hesitation.
Finally, the music frequencies used were within 1% of the actual frequency desired according to Jason and Nick. This fact is proven by listening to the songs we play throughout the game. All the notes seem to be related correctly and the songs are pleasing to the ear.
4.2 Safety considerations
Since we created a video game, there were not too many safety considerations for us to consider. Most of the room for safety problems stems from video flicker (which can cause eye strain) and cramped muscles from button pressing. To avoid causing users eye strain, we ensured that our timing would cause no video flicker. We also made sure nothing blinked at a frequency that could cause seizures. In fact, nothing in our video game blinks. To avoid hurting fingers, we allow the user to continue moving in a specific direction by merely holding the arrow buttons down. This reduces the number of button presses needed for a given level and should help keep users from hurting themselves.
In terms of the actual standalone, we added safety features such as an indicator LED to tell users when power is being supplied to the circuit. If we were to market this game, we would also have placed out standalone board inside a project box leaving the user with access only to a 9-pin connector for the controller, the video and sound cables, the power supply, and the power button. This would keep the user from coming into contact with any of the circuitry.
4.3 Impact on other people’s designs
Since we were simply creating a video game, our project did not interfere with the design of anyone else’s (to our knowledge anyway).
4.4 Usability
While we have no problem playing the game, we’ve noticed that passersby’s will often have trouble figuring out which buttons to press. This was generally caused by failure to read the directions, but we still asked them for feedback on which buttons they would intuitively use. This feedback was then used to increase usability for future users. For instance, in our word scramble were had originally specified button C as the button for letter selection. However, most users stated that they intuitively used button A so we made this alteration. It seems to have helped other users play the game more intuitively.
5.1 Improvements
Despite the problems we’ve experienced, we feel that our design is a good one. It is rather intuitive and allows us to include as much sophistication as we please. The biggest problem we ran into was a lack of memory. Thus, if we had another chance to produce this game we would definitely search for a CPU that contains more memory. We would also try to add at least one level to make the game resemble a typical four year program as it was originally intended to.
5.2 Ethical considerations
1: to accept responsibility in making engineering decisions consistent with the safety, health and welfare of the public, and to disclose promptly factors that might endanger the public or the environment;
We kept the well being of the public in mind when designing our video game. For instance instead of putting unnecessary pressure on the players’ fingers we designed the debouncer to allow the user to simply hold down the button instead of pressing it as fast as possible. We also made sure our video did not flicker or blink is such a way that could cause eye strain.
3: to be honest and realistic in stating claims or estimates based on available data;
We feel that we were open about the limitations of our design and how we decided to cut things out of our game to compensate for timing constraints instead of finding other solutions. When designing our project we were also realistic about what we could actually achieve. We envisioned a rather thorough game with multiple sublevels and possibly animations, but new that the most we could do was four levels. We set this as our realistic goal and that is what we strived to meet.
4: to reject bribery in all its forms;
When we realized that we did not have enough memory to proceed with our game, we rejected the offer of more points for turning in our project early, knowing that there were still improvements that we wanted to include. We did not want to shortchange all the work we had already put in. We also wanted to create a final product that was as close to our original proposal as possible. We couldn’t hand in a game with two levels knowing that we had promised more than that.
7: to seek, accept, and offer honest criticism of technical work, to acknowledge and correct errors, and to credit properly the contributions of others;
Since we were creating a game that other people would (hopefully) be playing, we sought feedback from people as we were creating it. We asked fellow students and various teaching assistants to try some of the levels and let us know what they thought. They helped clarify what logical button choices were and helped us to make sure our game would be challenging and fun. We have also made an effort to acknowledge individuals who helped us in our efforts by contributing code or their time.
8: to treat fairly all persons regardless of such factors as race, religion, gender, disability, age, or national origin;
As we were creating our project in the lab, we respected our classmates and TAs. The population of Cornell is diverse and we have come to appreciate learning about each other’s backgrounds.
Appendix A Commented program listing
Our code listing is quite long so you'll have to download it to view it. (Final Code.zip)
Appendix B Schematics and Pictures
State Machine Schematics:
Dave Writechamps state machine
Hardware Schematics:
Screen shots:
Word Scramble
1. directions
2. game play
Thumbelina
1. directions
2. game play
Dave Writechamps
3. game play
Appendix C Parts Listing
|
Part |
Quantity |
Jameco # |
Estimated Cost |
Actual cost |
|
Atmel Mega32 CPU |
1 |
|
$8.00 |
$8.00 |
|
Switch |
1 |
#204142 |
$0.40 |
$0.00 |
|
LM340 voltage regulator |
1 |
#260259 |
$1.65 |
$0.00 |
|
16MHz crystal |
1 |
#14453 |
$0.62 |
$0.00 |
|
330 resistor |
1 |
#30867 |
$0.01 |
$0.00 |
|
1K resistor |
1 |
#29663 |
$0.01 |
$0.00 |
|
75 resistor |
1 |
|
$0.01 |
$0.00 |
|
100 resistor |
1 |
#29946 |
$0.01 |
$0.00 |
|
10K resistor |
1 |
#107676 |
$0.01 |
$0.00 |
|
160 resistor |
1 |
|
$0.01 |
$0.00 |
|
0.1uF capacitor |
6 |
#15270 |
$0.90 |
$0.00 |
|
22pF capacitors |
2 |
#15405 |
$0.14 |
$0.00 |
|
40 pin socket |
1 |
|
$0.99 |
$0.00 |
|
9-pin socket (male) |
1 |
#111691 |
$0.55 |
$0.00 |
|
solder board |
1 |
|
$2.50 |
$2.50 |
|
Genesis controller |
1 |
|
$5.00 |
$0.00 |
|
Total |
|
|
$20.81 |
$10.50 |
Appendix D Contributions of each partner
Once the general ideas for each level were agreed upon each partner was assigned two levels to fully specify and implement: Levels 1 and 2 went to Susan while Levels 3 and 4 went to Jennifer. Creation of music was also divided between the two of us with Jennifer creating music arrays for “My Old Cornell” and “New Cornell Fight Song” while Susan created the arrays for “Flight of the Bumblebee”, “Pomp and Circumstance”, and the McDonald’s theme. The overall software design (specification of state machines for both the overall game and within each level) was created jointly and then coded by Susan. Soldering of the standalone board and controller connection was performed by Susan since she had more experience in that area. And finally, the start and end screens of the game were created and coded by Susan.
Atmel32 Data sheet
http://instruct1.cit.cornell.edu/courses/ee476/AtmelStuff/full32.pdf
Code/designs borrowed from others
1. Ryan John, Rives Borland, Brian Tarricone’s songs:
“Alma Mater” and Cornell’s fight song “Give my Regards to Davy”
http://instruct1.cit.cornell.edu/courses/ee476/FinalProjects/s2003/bjt23/index.html
2. Jason Pagnotta and Nick Xenias
Frequencies for the various notes of our chromatic scales.
Background sites/papers
http://www.hardwarebook.net/connector/userinput/genesiscontroller.html
Sheet Music
1. Free Sheet Music Plus
"Pomp and Circumstance" by Edward Elgar
http://www.freesheetmusicplus.com/
2. 8Notes.com
"Flight of the BumbleBee" by Rimsky Korsakov
3. Cornell University Big Red Marching Band
http://www.rso.cornell.edu/marchingband/