Automated Juice Mixer
ECE 476 Final Project
by Lucas
Patrick and Danny Tsung
Introduction High Level Design Software Design Hardware Design Result Conclusion Appendix I Appendix
II Appendix III Appendix IV
|
|
|


Sound Bite
The
Automated Juice mixer is a juice mixing device that allows user to create
desired drinks with up to four different ingredients through a user friendly interface.
Summary
Mixing juices can be a very tedious
job. We have created a juice mixer
that allow user to mix drinks with desired amount and manage their recipes with
ease. We use RS232 serial port
connection between the computer and our unit so that user will be able to
dispense/blend their desired recipe easily. The connection also allow user to
upload/download recipes to the EEPROM embedded in the microcontroller.
High Level Design
Idea
We decide to make a juice mixer
after observing many people complaining how tedious it is mixing any kind of
liquids. Many people would be happy
to see a device that would allow the user to create drinks and manage recipes
using easy to understand graphical user interface.
Background Math
The background math has to do with
formulating the conversion between the time we open the valves for each of the
bottles and the amount of liquid that comes out from the tubes. In order to do so, we need to record the
time required to dispense a certain amount for each individual bottles due to
the fact that each of our valves are handcrafted by us so that the dispensing
rate might vary quite a bit and also due to the fact that we placed the blender
cup at the very right edge of our machine and each tubes travels different distance
to the cup. The final equation we
formulated are based on the test result we use and linearizing them.
Logical Structure
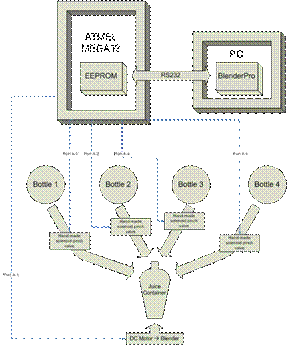
Figure 1. Logical Flow Diagram
The
diagram above shows our basic design.
In our hardware design, signals are sending from the microcontroller
unit to each solenoid and motor for dispensing/blending purposes. Much of our effort goes into building
the valve and finding appropriate orientation allowing liquid to flow and stop
smoothly though our tube. Our
software design consists of two parts, a C code that takes appropriate command
send via RS232 port. The C code
will determine whether to dispense the liquids or store/load recipes to/from
EEPROM. The second part of software
deal with user interface. Graphical
user interface software (BlenderPro) is designed in C#. It allows user to send
commands or recipe data through the RS232 port without knowing how it works.
Tradeoffs
There are several tradeoffs we have
throughout this project
1.
Hand-made valves VS pre-made valves. We took our time by doing trial and
error while building our valves while we can actually purchase some machine
made valves. The obvious advantage
is that we save quite a lot of money (around 50 dollars or so) so our budget
won’t exceed the limit but we encountered several hardships during our valve
implementation. We have made
several design changes along the way to compensate for our hand-made valves.
2.
GUI VS Simple Command line terminal. In order for user to control our device
easily without knowing how everything works, we took our time learning how to
write a simple GUI program using C# language. Although it takes much longer than doing
HyperTerminal menu display, it makes the whole project look better and more
complete.
3.
RS232 VS RF. We
choose RS232 instead of RF transmitter/receiver since we know how it works
already and the C# programming using serial ports are far easier than using RF
signals. Using RS232 will not
generate radio signals and cause any interference with other people’s project.
4.
Spinning Blender VS Shaker. We decided to use a revolving stick
attached to the motor as our blender instead of motor that would move the
bottle up and down. While the
shaker seems like a very nice idea in the beginning, it requires motors with
strong torque and by shaking the cup up and down might pour liquid out quite
easily. We changed to the spinning
stick design based on safety concern and budget concerns.
5.
Parallel dispensing VS Serial dispensing. While dispensing the ingredients all at
once might seem to be a favorable approach, it requires more power to
manipulate and it’s not easy to implement in the lab since we don’t want to use
more than one power supply. The
circuitry might get really hot if all the valves are turned on at the same
time.
Adopted Standards
The only standard we utilize in the
final project is the RS232 standard.
We transmit the signals through RS232 at 9600 baud with 8 data bits and
no parity and no flow control. This will ensure our communication between the
GUI and microcontroller unit.
Intellectual Properties
We used
We also used Tupperware Quickshake
as our blender cup. Tupperware
Quickshake is a registered trademark by Tupperware Worldwide.
Communication Scheme
The communication scheme we use is
quite straightforward. BlenderPro
will send out a string of data when user clicked on Start/Stop blend, dispense
and download/upload recipe. The way
we designed the data string sent from the BlenderPro is as follows,
|
Functions |
Command |
Rest of the command |
|||||
|
Start Blend |
b |
|
|||||
|
Stop Blend |
s |
|
|||||
|
Download Recipes |
l |
Number of recipes (2 characters) |
Recipe Name (10 characters) |
Ingredient #1 (1 character) |
Ingredient #1 Amount (3
characters) |
Rest of Ingredient (up to total
of 4 ingredients) |
Rest of recipes … (depends on number
of recipes) |
|
Upload Recipes |
v |
|
|||||
|
Dispense |
d |
Bottle #1 Amount (3 characters) |
Bottle #2 Amount (3 characters) |
Bottle #3 Amount (3 characters) |
Bottle #4 Amount (3 characters) |
|
|
Each recipe consists of a string name
that is 10 characters long and four ingredients follow by one another. Each ingredient consist of an ingredient
code (0 – 10) follow by 3 digit representing amount of that ingredient. This will make each recipe string
exactly 10 + 4*4 = 16 characters long.
Depending on how many recipes we want to store, we just append recipes
after one another.
From the C code, we will only send
out the data string after receiving the upload recipes command (v). The data string is always start with *
character follow by the number of recipes.
The format is almost identical to the download recipes data string
except it is started by ‘*’.
C code
Our
C code consists of two parts while utilizing two interrupts. The dispensing algorithm uses the timer
compare interrupt to get the exact timing when we want to dispense our
liquid. The interrupt occurs every
half a second or so based on our setting.
The dispensing algorithm allows us to dispense up to four valves
serially. The algorithm will
determine how many valves to dispense and still be able to dispense them
serially. The second part of the C
code involves parsing the data string.
USART interrupt is used to communicate the blender pro with the C
code. The parsing task (machine())
is executed all the time so that it will read any packets in the serial
buffer. We use a switch statement
to determine what to parse and store the parsing result to EEPROM on our
chip. Programming for EEPROM took
us a long time to figure out, we had a hard time string to store array of
string to EEPROM. Thanks to Greg,
who wrote helped us debug and wrote a simple string copy code that copies
EEPROM string to strings in memory, we were able to overwrite recipe names in
EEPROM.
BlenderPro
After
searching suitable programming language that allow us to implement simple
graphical user interface and also communicate through RS232, we decided to
implement our BlenderPro program on Visual C# Express 2005 beta. The compiler is free for download on the
Microsoft
page. The program allow user to
calibrate bottles, create/delete/load recipe and display them in the top left
part of the program. The program
can also send out command through the RS232 port. All the actions are based on clicking
each of the buttons. As soon as the
form is generated, we open up the serial port for connection. Calibration and Load Recipe must be done
before we can start dispensing any drink.
Download recipe is done by first sending download command (l) to the mcu
and then start reading the lines in the buffer. This causes us a lot of trouble because
it will read anything that’s in the buffer, including the data we send it out. In order to solve this problem, we make
sure that the string starting with ‘*’ will be the data we want to
download. We have also implemented
a safety scheme so that the user cannot blend if there is nothing in the
cup. The start/stop blend button is
implemented as the same one since so that one can only stop the blender after
they start it.
Motor to MCU
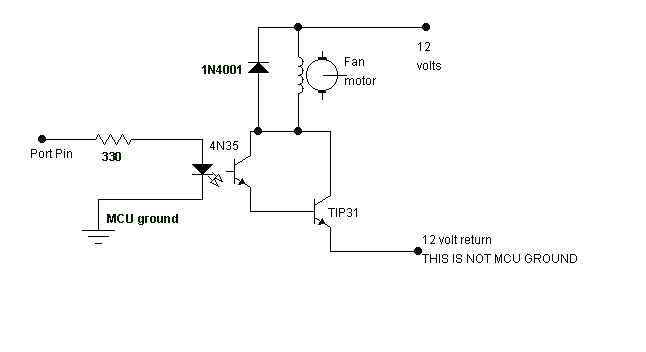
There
are a total of 5 motors utilized in the juice mixer, 4 heavy duty pull type
solenoids with built-in springs and also a heavy duty DC motor (both can be
operated using up to 24V). The
circuit we used was basically the same as the one used in lab 5 (for the DC
fan). A uniform 12V voltage source
was used for all the motors.
Although 12V is well below the optimal performance of the motors, it was
selected mainly due our transistors’ limited maximum collector current (Ic max
= 3A and the current used for each solenoid was 1.8A). If we stick with a voltage larger than
12V, the transistors connected to the solenoids will overheat really fast and
stop working. We could have used
transistors with bigger capacity.
However, since this situation surfaced in a pretty late stage of the
project development, we did not bother to look into getting better transistor. A solution for the transistor
overheating was to equip a heat sink on each one of them. On top of that, we also limit the time
the solenoids are turned on and not turning them on simultaneously.
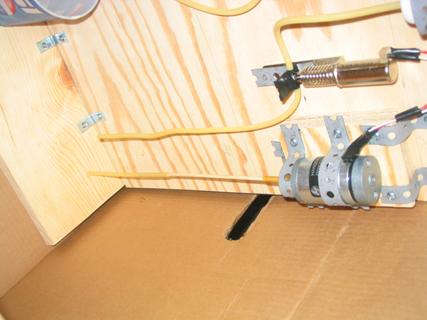
Valves
A
lot of time was spent on making the valves and adjusting them. Initially the solenoids we used for valves
were a 3-6V mini spring-return push solenoids. This approached did not work for
several reasons. First, the solenoid was too weak to shut close any tubing we
had (surgical latex tubings with inside diameters of 1/16” and 1/8”). We tried
to minimize the surface area of the solenoid shaft by attaching a dull blade at
the tip but it still did not work properly. Plus, the solenoid shaft was also too
small to push close the whole diameter of the tubing. Then, we switched to bipolar linear DC
stepper motors. This approach was
abandoned because we found that they each required an H-bridge and a pulse
width modulator to operate, hence, this would require too many components
(optoisolators and transistors), which were very limited, mainly because we
wanted to make 4 valves. Finally,
we decided to change our solenoid to the one we have. The only problem we have
with it was that the in order to pinch the valve close we have to build a
sturdy sheet of metal for the solenoid shaft to push against with. And since we
had to hand-made their quality was not identical.
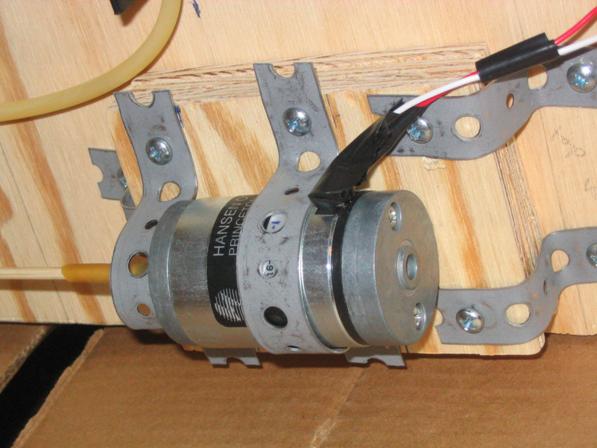
Blender
We
decided not to position our blender at the bottom of the container, but
instead, above the container. It is
mechanically easier to build this way and, since we are only mixing liquid, we
do not need to put much torque into it.
This is also way, we chose to simply use a bamboo skewer with a latex
tubing attached at the other end instead of blades. The skewer is also
connected to the shaft of our DC motor using a piece of latex tubing. There was never any problem in getting
the blender to work since the motor does not require huge current, plus, not
much modification was done and none actually affected its functionality.
With
much of the effort in making the individual valves work, the result we get is
quite satisfying. All of the valve
dispense and stops correctly and the response time is almost immediate from the
GUI to the actual machine.
Speed
Speed-wise,
the juice mixer works really well. As soon as the buttons on in the GUI is
clicked, the solenoid shaft retracts and the valve is opened. The same applies
for the blender that is operated by the DC motor.
Accuracy
Since
the timer we utilize interrupts at every half a second, our dispenser can be
quite inaccurate. In our tests, the
worst case can be 8-10 ml for each 100 ml.
We figure this is not a major concern since our mixer is not build for
exact amount and missing couple ml here and there will not really affect the
taste of the drink we make.
Safety
Since
we were dealing with liquid, our biggest concern in making the juice mixer was
to spill liquid in the lab and on our circuit. In order to avoid spilling, we tried not
to use too much water while testing and calibrating the mixer. The wooden stand
we designed for the mixer also has a space designated for the circuit and the
MCU. They can comfortably be
positioned at the back side of the system where all the other parts which are
directly related to the fluid dispensing system are located safely on the other
side. The whole mixer is put inside
a huge card box, this way, in case there are any accidental spills, the
fluid/water will be restricted in the box.
The bottles which contain the juice ingredients are also safely
protected from spilling since we taped the bottle cap whenever there is liquid
in them. The blender does not have
any safety issues, since the DC motor does not require a large current to
operate, moreover, it is also always in a sub-par operation with 12V voltage
source. Plus, we did not use any
sharp objects for the blender. Also
note that there might be liquid remain in the tubes and extra care is needed to
prevent any liquid to be in contact with the electronic part.
Usability
The
aspect of usability had been in our mind ever since we started designing the
mixer. Our aims were to be able to actually use this device in our daily life
which is outside of this lab. In order to fulfill this target we tried to make
this device operational with any, if not, most computers. This is where our idea of using C# as
our main programming language started.
Thus, any computer with a serial port that has Windows .Net framework
installed should be able to operate our juice mixer. Plus, by programming in C#, we were able
to make a user-friendly interface complete with a nice looking GUI. Overall, we
view our juice mixer to be a highly usable device. It is easy to operate,
highly automated, and it produces drinks for our daily needs.
Expectations
Although
we made several changes during our design cycle, the result we got is actually
not bad. Except from a small bug
where you have to click on download recipe twice to get the recipes loaded,
everything work as expected. Some
of the valve we design are not as strong as we hope them will be, but they
still dispense and stops the fluid correctly. If we have more time, we would like to
implement RF in our control so we can control the machine remotely.
Intellectual Properties
We
did not use any code from any of the previous projects or anyone else. The C code for microcontroller is
modified from our lab3.
Ethics
During
the course of our design project, we have followed the IEEE code of ethics
1. To accept responsibility in making engineering
decisions consistent with the safety, health and welfare of the public, and to
disclose promptly factors that might endanger the public or the environment.
Throughout our project, we
have always place the safety of the user as top priority. We make sure that no electric part will
be exposed in liquid or result in any serious injury.
2. To be honest and realistic in stating
claims or estimates based on available data.
We have achieved in what we
stated in our project proposal. The
accuracy truthfully reflects the result we got.
3. To reject bribery in all its forms.
We did not receive any favor
in building this project that would be disadvantageous for other groups.
4. To treat fairly all persons regardless of
such factors as race, religion, gender, disability, age, or national origin.
The
project we designed is suitable for any person who is capable of operate
equipments safely and responsively.
Anyone who can operate a personal computer should feel no difficulty in
operating our machine.
5. To assist colleagues and
co-workers in their professional development and to support them in following
this code of ethics.
We helped who
ever needs throughout our project
motor

valve

circuit
Blender
|
Price List |
|
|
|
|
|
|
|
Unit Price |
|
Price |
|
Source |
|
STK500 + Atmel Mega32 |
|
|
$15 |
|
Lab parts |
|
Solenoid |
$1.50/each |
|
$6 |
|
allelectronics.com |
|
DC motor |
|
|
$0 |
|
Sample |
|
Flexible metal strip |
|
|
$1.87 |
|
Home Depot |
|
Corner brace |
$1.50/4 |
|
$3 |
|
Home Depot |
|
Water bottle |
|
|
$8 |
|
ebay |
|
Heat sink |
|
|
$0 |
|
Lab parts |
|
TIP31 |
|
|
$0 |
|
Lab parts |
|
4N35 |
|
|
$0 |
|
Lab parts |
|
LN4001 |
|
|
$0 |
|
Lab parts |
|
330 Ohm resistor |
|
|
$0 |
|
Lab parts |
|
Wooden sheet |
|
|
$1 |
|
Home Depot |
|
Surgical tubing |
$5.50/10ft |
|
$5.50 |
|
Reefscuba.com |
|
Total |
|
|
$40.50 |
|
|
Danny: Did most of the coding
part of the project, including GUI and MCU control code
Lucas: Provided a workspace for
the building of the machine and did most of the construction and hardware
debugging.