Austin Lu, asl45
Albert Ren, awr8
Introduction
Have you ever imagined, "What does that cable I plug into my iPod every day actually do, and how do I take advantage of it for myself?" We did too, and that's what we aimed to do with our 476 project. The iPod is, of course, the popular digital music player developed by Apple. The heart of the project is to use the Mega32 microcontroller to transmit and receive commands from the iPod using the built-in Dock Connector, as opposed to cracking the iPod open and wiring it up. The Dock Connector is the little port at the bottom of the iPod that you would normally connect a white USB or FireWire sync cable into. Commands that are currently implemented include play, stop, fast forward and other basic commands that allow the user to enjoy music from the iPod, as well as the ability to display the current track's Title, Artist, and Album on an external LCD display.
This document is written for, primarily, the 476 graders! Just as importantly though, this document is intended for future 476 classes looking for interesting project ideas to tackle, because as far as we could tell, no one had attempted a project dealing with the iPod before. This document is also intended for those searching on the Internet for help on hacking their iPod.
High-Level Design
At first we were worried about the feasibility of the project. We had decided early on that we wanted a project with obvious user feedback. After speaking to Bruce Land about the concept of an iPod dock, we decided that it would be our final project -- what is more obvious than music starting or stopping?
A huge amount of our time involved researching the iPod communication protocol. The iPod's communication protocol through the Dock Connector is not actually publicly available from Apple. However, thanks to the reverse engineering efforts by many hobbyists, there is a lot of information about the protocol (termed the "Apple Accessory Protocol") available on the Internet.
It is possible that the protocol isn't public due to the "Made for iPod" licensing program, which lets accessory makers in the "iPod ecosystem" connect to the iPod and display certain logos on their packaging after licensing. This could present certain legal issues, as it may be considered some form of protected intellectual property. However, as the protocol has been obtained through reverse engineering methods and not through a breach of contract, we do not anticipate this to be a big factor. Additionally, this is only an educational exercise and not in any way intended to be a commercially viable product.
The structure of our project is to have the Atmel Mega32 controller talk to the iPod in both sending and receive mode through the iPod's Dock Connector. We would send commands over the serial pins on the Mega32 and receive on the appropriate iPod pins as well. We can verify that the commands worked by simply observing the iPod and checking to see that the iPod responded appropriately, e.g. with a volume change, skipped track, etc.
The only relevant standards that we use are 8-N-1 serial communication for talking to the iPod. The actual Apple Accessory Protocol is an Apple creation, so not quite a "standard" in a usual sense. Otherwise, we do not make any use of any other standards, such as IEEE or ISO standards. The iPod sends out responses for strings in ASCII format.

Design Aspects
Research
A large amount of work went into determining whether this idea was actually feasible. No one appears to have made any similar efforts in 476 final projects before, and though there is a similar idea in ECE 313, that course was designed around a standard CD player and controlled the player by shorting the buttons.
We initially found the iPod Dock Connector pin-out, which is available from pinouts.ru After that, we eventually found the Apple Accessory Protocol, which is detailed best on the iPod Linux wiki.
Important Pins on the iPod
| Pin | Use |
|---|---|
| 1 | Ground |
| 11 | Serial Ground |
| 12 | iPod RX; microcontroller transmits on this pin |
| 13 | iPod TX; microcontroller receives from this pin |
| 21 | iPod Accessory resistor: We use 500k |
It's important to note which pins are the receive and transmit pins. On the pinouts.ru page, pin 13 is "Serial RxD," which means serial receive from the iPod's point of view. Mixing it up could confuse you unnecessarily for a few hours.
Once we had a pinout and what looked like usable, if unofficial, documentation of the protocol, we started looking at actual connectivity to the iPod. There were a few efforts done by other people to create their own docks, but these were not quite what we were looking for.
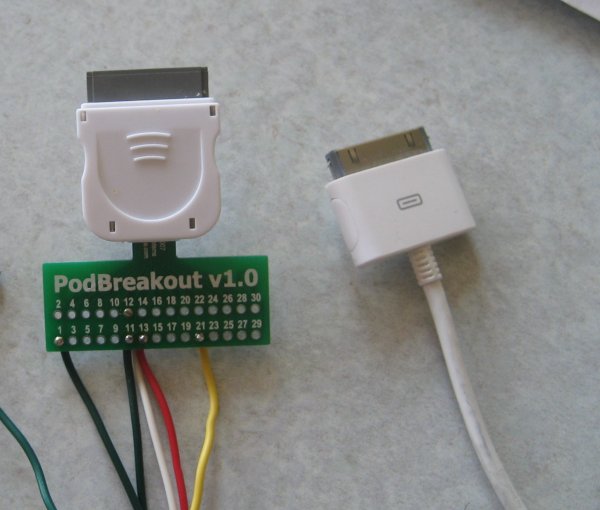
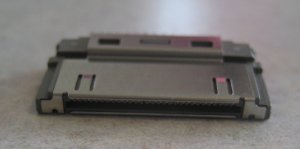
After a bit of searching, we managed to find a hobbyist's website that had the actual iPod connectors available for sale. Even better, they also had a custom PCB available for sale to break out all of the individual signals from each of the pins, which was very useful because the pins themselves are rather small.
A short while later, we ended up discovering a second source for our PCB, which cost about the same as the original source but came with the dock connector pre-soldered, which was very useful as it was probably going to be a better soldering job than we could hope to accomplish by ourselves. Additionally, unlike the other source, it would ship within the United States. Using First Class Mail, we received our component in about 2 days (shipped on Thursday from CO, received on Saturday).
Next, we had to determine what commands it is we wanted to implement. We decided that the basic control functions we're all familiar with - Play/Pause, Volume Up and Down, Skip Forward and Backward - must be implemented. We decided next that the "good to have" functions would be receiving data from the iPod and displaying it on the LCD screen, namely the current track's Title, Artist, and Album.
All of the control details can be reverse engineered using a breakout board with a pass-through connector (in other words, a female iPod connector) and a commercial accessory that implements the same feature. All you'd have to do is plug the accessory into the pass-through connector, the pass-through into the iPod, and listen in on the serial pin.
It turns out that the iPod has a set of "modes" that it categorizes the functions in. The basic set of functions all belong in Mode 2, while the "good to have" receiving functions are all Mode 4. We also use functions from Mode 0 in order to change the iPod mode. This is important, because it changes how you expect to send and receive the data packets with the iPod.
Communication with the iPod is conducted over a serial protocol with a standard 8N1 setting at 19200 baud. This means that each packet has 10 bits. The packet starts with a low start bit, 8 bits (1 byte) of information, no parity, and a high stop bit. Each packet has a very ordered structure, which is as follows:
| Section | Size of Section (in bytes) | Value |
|---|---|---|
| Header | 2 | 0xff 0x55 |
| Length of packet | 1 | Indicates the number of bytes for mode, command, and parameter |
| Mode | 1 | Mode for this command |
| Command | 2 | Command we're sending or receiving |
| Parameter | 0 to n | Optional - Some commands use this to supply more info |
| Checksum | 1 | (0x100 - [actual values of length + mode + command + parameter]) & 0xff |
This table is modified slightly for clarity from the iPodLinux page on the subject. This is the case for other tables that appear in this section as well.
Incidentally, each 8-bit chunk of data in a serial packet is transmitted in Little Endian mode. The serial protocol also idles at VCC-high when not sending.
The command codes for the functions we have selected are shown below:
Mode 0 Commands
| Command | Function |
|---|---|
| 0x01 0x02 | Switch to Mode 2 |
| 0x01 0x04 | Switch to Mode 4 |
Mode 2 Commands
| Command | Function |
|---|---|
| 0x00 0x00 | Button Release |
| 0x00 0x01 | Play |
| 0x00 0x02 | Volume Up |
| 0x00 0x04 | Volume Down |
| 0x00 0x08 | Forward |
| 0x00 0x10 | Backward |
Mode 4 Commands
| Command | Parameter (in bytes) | Function |
|---|---|---|
| 0x00 0x1e | 0 | Get Current Position in playlist |
| 0x00 0x1f | 4 | Current Position Result |
| 0x00 0x20 | 4 - current position | Get title of current song |
| 0x00 0x21 | string - unknown length | Title result |
| 0x00 0x22 | 4 - current position | Get artist of current song |
| 0x00 0x23 | string | Artist result |
| 0x00 0x24 | 4 - current position | Get album of current song |
| 0x00 0x25 | string | Artist result |
We were led to believe that Mode 2 commands needed to be sent 66 times per second until button release. However, from our experience this is not necessary. The command only needs to be sent once for the iPod to act upon it. Once the command is sent though, it is necessary to sent a button release command to indicate, well, the button's release. Otherwise, the iPod is going to assume that the button is being held and will do what it normally does in such situations. For example, pressing Play without a Button Release will turn your iPod off (a tidbit that confused us for a little bit).
The Mode 4 commands that we implemented seem basic, but as far as we could tell, very few accessories currently on the market take advantage of the mode 4 commands. As far as we know, only iPod car-kits use the mode 4 commands; these car kits scroll similar information on the dashboard.
Mode 4 commands require that the iPod be switched into Mode 4 using a Mode 0 command, when the iPod will display "OK to disconnect" and cut off interaction with the physical on-iPod controls until the dock connector is removed. With exception of volume control, the standard Mode 2 commands are still accepted, even though it is currently in Mode 4. Annoyingly, switching into Mode 4 also pauses the currently playing track.
The current position numbering is transmitted in 4 bytes, with each byte in Big Endian notation. Do not confuse this with the Little Endian transmit inside the individual bytes. The returned strings for Title, Artist, and Album are null terminated.
Program Design
The state machine operates on a single assumption: the iPod talks back only when we want it to. If the iPod were to send a message when we were not expecting it, we would ignore the iPod. Additionally, we have helper functions that wait for input from the user which set flags to alert the state machine.
The state Command is the initial state of the microcontroller. In Command, we wait for the validcommand flag to be set from the button debouncer. This flag alerts the state machine to proceed to DecodeCommand. Otherwise, Command checks to see if the releaseflag has been set and whether the mode is set to 0x02. If it is, send the state machine to the button_release state.
The next state is DecodeCommand. DecodeCommand prepares the character array t_buffer to be transmitted through the UART. In this state, the two modes are differentiated -- if the button pressed was of mode 0x02, the length of the command is typically shorter. If the command was of mode 0x04, the counter mode4flag is set to 1, which will alert the state machine that the iPod will be responding. The state proceeds to Send.
In Send, mode4flag is checked. All the mode 0x04 commands require that the iPod switch to a mode 4 state. We discovered that the iPod readily accepts both mode 0 and mode 2 commands, but will not recognize mode 0x04 commands. Thus, there is a sequence of commands to execute before sending a mode 4 command. This sequence is embodied in the mode4sequence counter. We will send commands based on what mode4sequence is.
The first command in mode4sequence is a switch to mode 4 command. Then we wait several milliseconds before transmitting a "current song" command. We check to see if the command was successful (the iPod sends back the current track if the command was received, and sends back a failure if the command was incorrect). Finally, we send the mode 0x04 command that has the parameter currentsong to determine characteristics of the song. Again, we wait for the iPod to respond. The last command in mode4sequence is switching the iPod back to mode 2. We made this decision because in mode 2, we can use volume up and down. Additionally, the iPod screen is ugly when it enters mode 4. Whenever we wait for the iPod to respond, we will be in the "Receive" state. Upon a successful response, the state will return to the Send state. If the command was of mode 0x02, the state machine will transition to Command. To transmit a command, we call on the helper function puts_int().
We should only enter the Receive state if the command is of mode 4. Depending on what mode4sequence is, the state machine may re-enter the send state (switching iPod modes do not require responses), or the state machine waits for the Receive interrupt to set the r_ready flag. Upon receiving a buffer, the buffer is dissected and the iPod response is determined. Upon a successfully sending a command, the state machine changes mode4sequence, resets the failure counter and returns to the Send state to send the next command in the sequence. Upon a failure, the state machine increments the failure counter and returns to the send state without changing the sequence. This means that the command that failed will be sent again. Once the failure counter hits the failure threshold, or if we have exceeded our timeout limit, the state machine returns to the command state.
The button_release state should occur when the user has finished sending a mode 0x02 command. The t_buffer is set to the button release command, which is of mode 0x02, and is transmitted to the iPod. The state then proceeds to Send.

Helper functions we used:
initialize() sets up the LCD display and determines the baud rate that we use. Since the iPod transmits at 19200 bits per second, we set UBRRL to 51. Additionally, an interrupt is set to trigger every millisecond, which provides the clock for the state machine.
buttons() is called every millisecond, and checks to see if a button has been pressed or not. If the previous button (lastpress) is 0, and there is a button press (press != 0), then debouncecounter begins to increment. When debouncecounter reaches 40 (40 ms have passed), the validcommand flag is set high, and the debouncecounter is reset to -460. Thus, the debouncecounter also functions as a hold timer. After 500ms have passed, the validcommand flag is set high again, and the button press is sent again.
As it turns out, when an iPod receives a mode 0x02 command, it continues performing that operation until a button release command is sent. However, the iPod does not send any acknowledgment regarding mode 2 commands, unlike mode 4 commands. Thus, we decided to err on caution and simplicity, and send the command multiple times if the button is held down noticeably. It would be an interesting question to ask if the iPod functions similarly for internal button presses (e.g. on the click wheel). Clearly, volume up/down is handled differently on the iPod due to the wheel motion.
Finally, we have a helper function called lcd_scroll(). This helper function is called every 300 ms, and is used to scroll the title, artist, and album fields on our little 16x2 LCD screen. These fields need to be scrolled if the fields are longer than 16 bits, which would not display nicely on our LCD screen. It works by copying over the relevant part of r_buffer, namely the part that includes the string fields, to another array, lcdbuffer. That array is then copied over into a "scratch" LCD buffer, displaybuffer, which includes exactly what 16 characters are supposed to be displayed on the LCD. Thus, every 300 ms, we move the LCD display buffer over by 1 character and update the LCD screen. Additionally, we also loop around to the beginning when we hit the end of our string field, so the scroll itself loops too.
puts_int() starts transmitting t_buffer through the UART. It resets all through t_index and t_ready, then calls put_char() to transmit the first character of t_buffer. Afterwards, the interrupt transmits each character at a time.
Tricky Stuff
To send and receive, we initially used Bruce Land's serial transmission code and modified the stop conditions to checksums instead of null terminators. Additionally, the transmit interrupt would not stop at the appropriate place -- we rewrote the code so it was logically the same, but now would stop at the appropriate spot.
Within the receive interrupt, we realized that a parameter within an iPod response could erroneously match the checksum. For example, when sending back the album title "Good News for People Who Like Bad News," one of our implementations stopped at the space character (' ') because its ASCII code, 0x20, matches the incomplete computed checksum. The old implementation detected this match and considered it to be the end of the transmission, while the actual checksum was quite a few bytes later. After finding several checksum collisions, we changed the end condition of the receive interrupt to look at the length of r_buffer to prevent the premature setting of r_ready flags.
How the Send and Receive states intertwined was easily the trickiest part of the code. The sources we used did not explicitly tell us every response an iPod would give us -- for example, mode switching was not well documented and we were not aware of its necessity. Originally, we were planning to ignore responses that we did not care about. After spending some time in lab, we decided that this was not the correct approach, and spent time determining all the responses.
When the iPod leaves mode 4 and enters mode 2, the iPod can ignore commands! When the user presses the physical play button on the iPod, there are no issues. In contrast, the iPod ignores the serial Play command up to three times! We believe there is a command in the sequence missing that we are not aware of and/or is not documented. We cannot see what a "proper" commercial implementation does as we do not own an accessory that actually makes use of Mode 4 commands and, as a result, cannot intercept and spy on what other implementations do. Thus, to start playing a song after entering Mode 4, the user needs to hit the play button twice on our implementation.
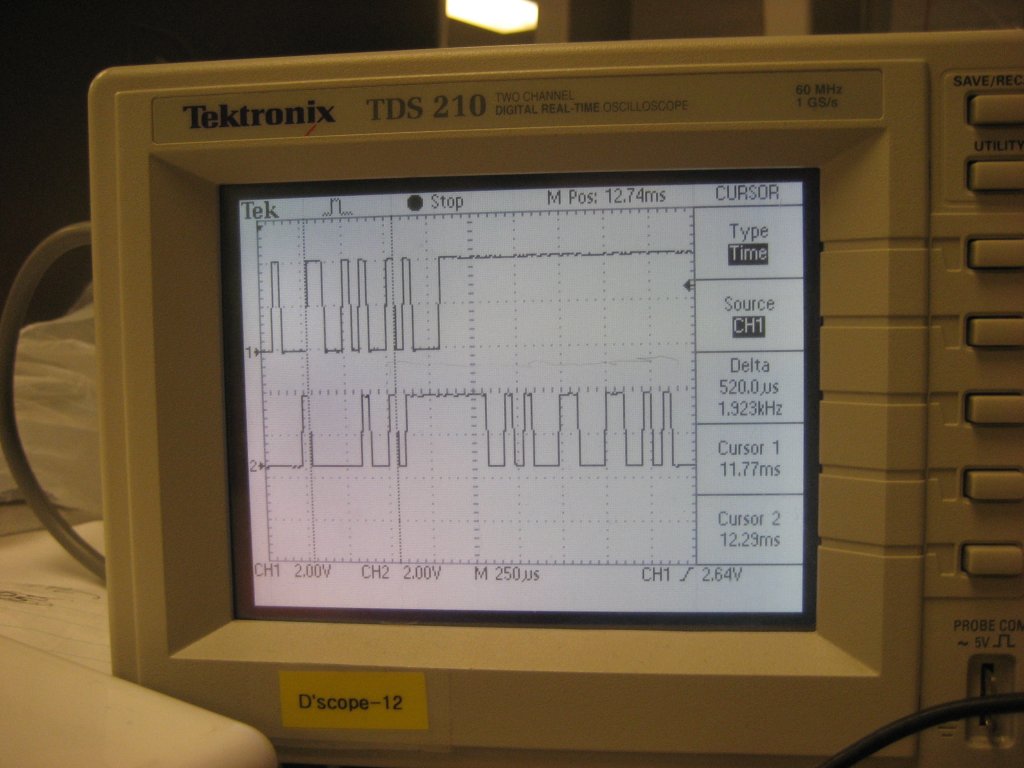
Finally, John Sicilia showed us a clever way of checking the receive buffer using the LEDs. Light up the LEDs according to the character in the buffer, delay for several seconds, turn the LEDs off for some time, and then move on to the next character in the buffer. Prior to this method, we had been looking at the waveform on the oscilloscope, which works fine but is very time consuming. When there were issues like the checksum error, we would compare the oscilloscope waveform to the output from the LEDs. A sample of this technique is shown here; be sure to include delay.h:
    for(k=0; k<11; k++)
    {
          PORTB = t_buffer[k];
          delay_ms(5000);
          PORTB = 0xFF;
          delay_ms(500);
    }
    while(1);
Hardware Design
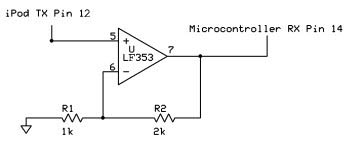
The microcontroller outputs a high and low voltage of 5V and 0V respectively. However, the iPod operates at a maximum of 3.3V for high. Thus, for the serial transmission line, we created a voltage divider, so that when the line is pulled to 5V, the iPod sees 3.3V. The high level schematic is below.
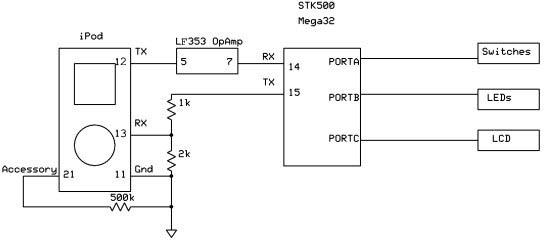
Additionally, the iPod only outputs a maximum of 3V when transmitting serially. We used an LF353 op-amp to increase the output voltage to 5V. The schematic for a non-inverting amplifier is shown below, where R2 is 1 kilo-Ohm and R1 is 2 kilo-Ohms. The Gain is 1+(R2/R1), where our values give a gain of 1.5.
Issues that we encountered
Everyone warns you about it, but somehow we got bit by it anyway. We're referring to, of course, having extra components for important things that you need. In our case, the critical piece was the PCB breakout board for the dock connector. It turns out that a pin inside the connector was no longer well connected with the pin connected to the board. This meant that our wire connection was good all the way from breadboard, to PCB, to the pin leading inside the dock connector, but the pin inside the dock connector was flaky. We had anticipated this and ordered another connector as a spare, but this took additional time and put time pressure on our schedule that we would've liked to do without.
Results
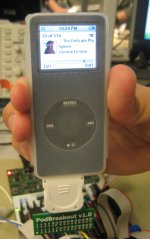
The serial commands sent to the iPod and the responses from the iPod were sent and received accurately, which we could verify by looking at the waveforms on an oscilloscope and also by the eventual display on the LCD. The LCD displays and scrolls correctly, and the iPod responds to each command appropriately and quickly, depending on how fast a person can push the button. Neither safety nor interference were much of a concern, as our design did not really pose much of an issue in these categories. Usability could possibly be improved, as the pushbuttons are currently on the STK and not in a particularly nice enclosure, for example. If this were a prototype for a commercial design, it would be easy to fix though.
Conclusions
The results of this project met our expectations. We wanted to both control and receive from an iPod with a microcontroller, and this was accomplished. Our design used the serial communication protocol 8-N-1, and for this we used Bruce Land's serial communication code as a jump-off point for our serial communication code. As mentioned before, the specifics of the iPod communication protocol came from researching the reverse engineering efforts of other hobbyists, and we communicated with a few of them if there we had specific questions about the protocol. The documentation of the protocol was fairly good but, as always with documentation and especially unofficial documentation, could have been improved and more clear. Hopefully our writeup here will clarify certain things that are confusing. We do not expect to have any patent opportunities with this project.

Future Design Aspirations
If we had more time available, we would have liked to implement an IR receiver with the microcontroller. Thus, a user could use an IR remote to send commands to the microcontroller, which would then be relayed to the iPod. We also could have implemented more mode 4 commands, with more pushbuttons being our main constraint. Additionally, future efforts could involve changing the 16x2 LCD for a more complicated and complex one that could allow displaying more information at once or even color images, such as album art or pictures. An audiophile may want to add something that uses the Line-Out component of the connector, as those pins are readily accessible as well.
Ethics
We believe that our project was consistent with the IEEE Code of Ethics. For example, we believe that our project is safe to individuals and the public at large, and we would promptly notify everyone if this ever changed. We believe that we have been honest about our project's performance and potential future efforts. We also hope that our project has made the iPod (and similar MP3 players for which control data can be obtained) an attractive option for future hobbyists and 476 students.
In the interest of full disclosure, one of us was formerly employed by Apple (then known as Apple Computer). It should be noted that none of the material referenced in this project or on this page resulted either directly or indirectly from any material obtained during employment or with any use of Apple-owned resources, such as hardware or documentation. We have made careful efforts to ensure that nothing done here would compromise any previous or (hopeful) future employment agreements and that we have respected intellectual property throughout.
No animals were harmed in the making of this project. Cornell students were merely deprived of sleep.
Appendix
- Program Code
- Schematics
- Costs
Part Name Quantity Source Cost STK500 Board 1 Lab $15 White breadboard 1 Lab $6 Power Supply for STK 1 Lab $5 LCD 1 Lab $8 LF353 OpAmp 1 Lab $0 Misc. Resistors - Lab $0 Dock Connector PCB 1 Purchased $14 Total $48
- Tasks As Performed by Each Team Member:
- Research of iPod features - Albert, Austin
- Parts Ordering - Albert
- State Machine - Austin
- Software Coding - Austin, Albert
- Hardware Design and Assembly - Austin, Albert
- Soldering - Austin, Albert
- Food Delivery - Austin
- Lab Report Writeup - Austin, Albert
References
- Dock Connector Pin-out - http://pinouts.ru/Devices/ipod_pinout.shtml
- Apple Accessory Protocol - http://ipodlinux.org/Apple_Accessory_Protocol
- Ridax - iPod boards - http://home.swipnet.se/ridax/connector.htm
- SparkFun Electronics - PodBreakout - http://www.sparkfun.com/commerce/product_info.php?products_id=8295
- Bruce Land's Serial Sample code - http://instruct1.cit.cornell.edu/courses/ee476/Serialcom/SerialInt.c
- ASCII Table - http://www.asciitable.com/
- LF353 Data Sheet - http://www.national.com/ds.cgi/LF/LF353.pdf
Special Thanks to:
- Bruce and the 476 TAs for putting up with us and being helpful when they could.
- The iPodLinux crew for maintaining the wiki with the Apple Accessory Protocol, and everyone that contributed to its discovery.
- Ridax for being helpful and answering our questions when we ran into problems.
- Even though we didn't receive any assistance from them, Apple for creating neat devices to hack like the iPod.