Introduction
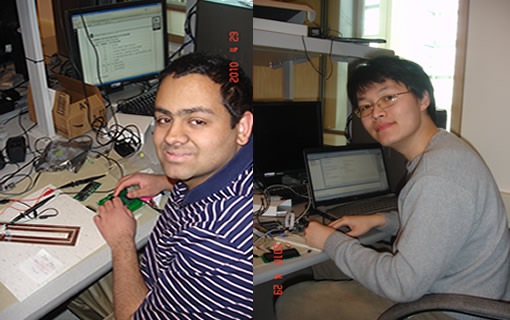
Jigar working on the antenna and Kevin programming the Microcontroller
The Elevator Pitch
We successfully implemented a prototype RFID checkout system that will enable consumers to instantly pay for their entire purchase upon arrival at the register, increasing customer satisfaction, reducing retailer costs, and ultimately lowering consumer prices.
Summary
Shopping in the present day usually involves waiting in line to get your items scanned for checkout. This can result in a great deal of wasted time for customers. Furthermore, the technology currently used in checkouts – barcodes - is from another era, developed in the 1970s, before the age of the affordable computing power. In the present world, with computers powering everyday items from children’s toys to wristwatches, we felt like we can improve on the humble shopping experience.
With the increasing prevalence and affordability of radio frequency identification (RFID) tags in everyday authentication systems, RFID holds great promise in the retail world for both customers and stores in inventory control, convenience, and cost savings. Our project utilized these RFID tags to automate the checkout process by building a system that could read the RFID signals of all the objects that were placed in proximity to an antenna platform. This eliminated the need for barcode scanning of each individual item, making checkout a significantly faster experience. Furthermore, as each item has a unique tag, even copies of the same product contrasted to the current UPC model, much better inventory control, recall ability, and monitoring of consumer behavior trends are possible, with privacy concerns considered of course.
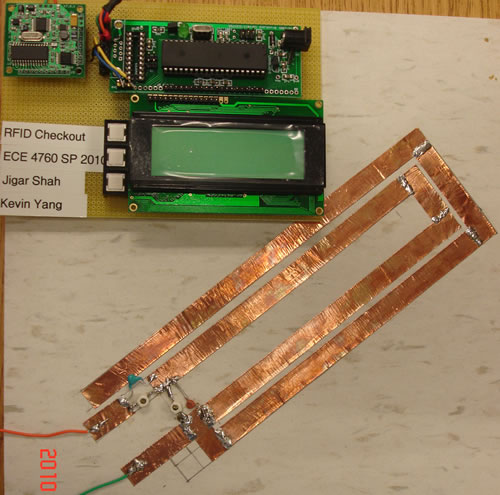
The Completed RFID Checkout System
High Level Design
Rationale and Motivation for Project
Jigar's mother has been a cashier at their local Walmart for over 15 years. One day, she was so tired from work and discussed with Jigar the possibility of technology completely taking over the job of a cashier. As we had been exploring project ideas for this course at the time, we immediately began to consider the practicality of such a proposition, and whether we could indeed implement a prototype of such a system for our final project.
We immediately considered RFID tags, already used heavily at Cornell for dorm access, not to mention in industry for employee authentication and credit card systems for wireless payment. For those applications, however, only one tag at a time was read, and multiple tags within the sensor read area would render the system useless, a key requirement of our checkout system. We discovered that a mainstream tag protocol had been developed at 13.56 MHz with anti-collision support, enabling simultaneous, error-free reading of all tags within the read field.
Last but not least, we had to consider whether such a system would be cost-prohibitive. When doing parts research, we discovered comprehensive reader chips available at less than $100 each that could be integrated into existing self-checkout systems. We came across news articles that showed research leading to tags that could cost less than 5 cents each, with cost decreasing over time.
Background Math
The particular RFID tags we will use in our project are passive RFID tags. This means that it relies on power transmitted by the reader in order to operate. In operation, passive RFID tags use the reflected carrier frequency (cos(wt)) which is modulated with a function (m(t)) in order to transmit information.
In this modulation function, the data has been hardcoded in the tag and can be transmitted to the RFID reader in a binary fashion.
Two major methodologies of modulation in our RFID tags include Amplitude-Shift Keying and Frequency-Shift Keying. In Amplitude-Shift Keying, two discrete amplitude levels are applied to the sinusoidal carrier frequency to represent 1’s and 0’s. This is illustrated below:

Image from: http://www.ele.uri.edu/Courses/ele436/labs/ASKnFSK.pdf
In Frequency-Shift Keying, two different frequencies are used to indicate binary values. This is done by switching between two different oscillators that are connected to the output. This is illustrated below.

Image from: http://www.ele.uri.edu/Courses/ele436/labs/ASKnFSK.pdf
In order to allow reads in electromagnetically noisy environments, readers are tuned to only read one particular frequency – in our case, the SkyeModule M1 reader we are using only reads radio frequencies of 13.56 MHz.
In cases where there is more than one tag in the vicinity of the reader, tag collision may occur when both tags reflect their signals back to the reader at the same time. This can confuse the reader. Thus, various methodologies for anti-collision can be used. These methodologies vary by tag type.
Logical Structure

RFID Checkout Logical Organization Structure
Our RFID checkout was organized around several central components. The prototype board containing the Atmel Mega 644 microcontroller received user input from the pushbuttons and outputted user feedback via the LCD. This in turn communicated with the Skyetek M1 Module which transmitted power onto RFID chips in the vicinity and received a signal back via the antenna. Multiple tags within the RFID field would not result in a problem, as each tag was told to 'stay quiet' after it had been successfully read. More details are described later in this report.
Hardware/Software Tradeoffs
We had a hard time choosing what frequency to buy our RFID reader at. While 13.56 Mhz was a standard for our intended application, the cost of the chips were too high for our $75 budget. We originally decided to compromise this and go with a cheaper 125 KHz reader, with much more expensive tags and poor anti-collision support in order to move forward on our project. We luckily came across a used RFID 13.56 MHz development kit - The Skyetek M1 Developer Kit - which enabled us to fulfill our potential for this project.
Another question we faced during our planning and design stage was whether to buy a reader with a pre-designed protocol that could easily interact with the microcontroller, at a much greater cost to our budget, or whether to build the reader ourselves. After consulting with the professor, we reasoned that there was no way we could implement the reader with anti-collision support/algorithms in addition to our checkout system within the short time frame of the project. We are glad we took that advice so that we were able to create a realistic prototype of our initial vision.
Upon purchase of the Skyetek M1 Developer Kit, we were dismayed to find out that the reader used a proprietary protocol. We wondered whether this was a deal-breaker, but for the cost we had gotten the kit for, we reasoned we had no choice but to move forward. Our code, as a result, is not as easily migrated to other platforms with a similar intention.
Standards
Our project used tags utilizing the ISO15693 and ISO14443 standards. IS015693 was developed in 1998 to serve as proximity cards, after which it has widely been adopted as the standard for the 13.56 MHz RFID frequency, enabling the gradual global adoption of RFID. ISO/IEC 14443 was developed in 1999 and has become the standard for contactless payment systems. For our application, ISO15693 seems like the most likely adoption candidate, given the wide variety of manufacturers, including the popular Texas Instruments Tag-It HF series tags. More details are discussed in the tag structure section.
Hardware / Program Design
Hardware Overview
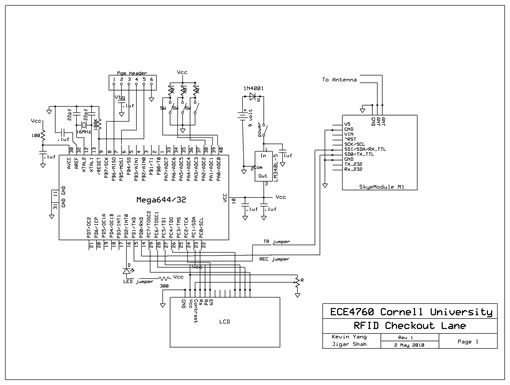
Master Hardware Circuit Schematic (Click Here for Full Size)
The hardware for our RFID checkout system was organized around the Skyetek M1 Module and the Protoboard with the Atmel Mega 644. The microcontroller board acted as the command center for our system, instructing the Skyetek M1 to turn on and remain ready for operation, taking in user input via pushbuttons, and outputting user feedback via the LCD. The schematic above best summarizes our setup. The following sections go through each of these components step by step.
Skyetek M1 Module
The SkyeModule M1 is a multi-protocol RFID read/write module. It is capable of reading most of the industry-standard 13.56 MHz RFID tags. Its input voltage should be about 5V, which means that it should be able to be powered by the Mega644 microcontroller. However, we decided to isolate the power systems of the two modules as an extra and quite probably unnecessary precaution in order to prevent possible voltage problems from destroying the SkyeModule chip.
It supports SPI, TTL, I2C, and RS-232 communication with computers, microcontrollers, and other devices and transmits the least significant bit first in its communication. In reading tags, it has anticollision capabilities, meaning that it is able to read multiple RFID tags in the vicinity of its antenna. This makes it ideal for a RFID Checkout system. It utilizes the Skyetek communication protocol, which we will discuss later on.
Antenna Design and Tuning
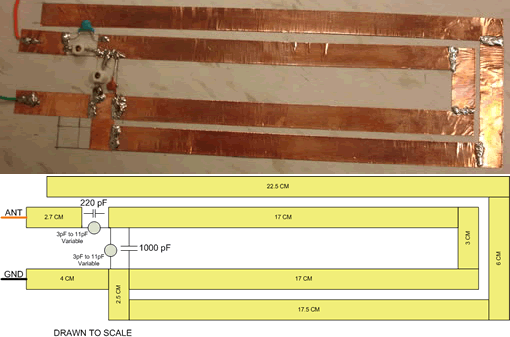
Self-Designed, Custom-Built RFID Antenna and Schematic for Checkout System
The antenna was designed using 1 cm wide copper foil tape with conductive adhesive. The top end of the antenna was connected to the external antenna pin on the Skyetek M1 J2 connector, and the bottom end to the ground pin on the same connector, completing the circuit. Much of the design was based on the Skyetek Antenna Design tutorial. Our design did not require an external power amplifier as the length was relatively short, specifically less than 10 inches as suggested by the guide. Copper foil tape was used rather than conductive copper wire due to the drastically lower impedance the greater surface area of the tape would allow. Our design initially used an 1800 pF capacitor instead of the 1000 pF capacitor, but while tuning we quickly learned how differences of less than a centimeter from an example design changed the entire resonance properties of the circuit. With the help of professor Land, we identified a 1000 pF capacitor would bring us to around the resonance we needed at 13.56 MHz. Our tests with the oscilloscope did show a peak resonance around 13 MHz, using varying frequencies with a frequency generator (below). This antenna was able to cover a much larger surface area over the stock antenna, with a reasonable range of approximately 3 inches above the surface area. In an industrial application, a power amplifier would be necessary to ensure proper performance to read an entire shopping basket.
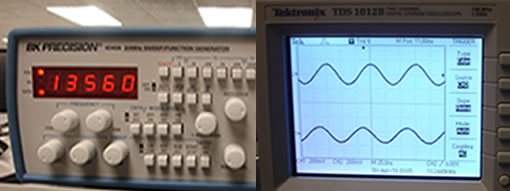
Tuning the antenna for optimal performance at 13.56 MHz
Tag Structure and Anticollision
The following tag types were supported by our reader. In summary, each tag type has a 64-bit factory-programmed permanent ID. This is the 64-bits we used for our lookup table. Each of these tags also has a user-programmable data field to store various information (i.e. inventory data, expiration, etc.), which we chose not to implement for our prototype. The data types with their programmable space and block size are as follows:
The Tag-IT HF-1 ISO15693 allows for 256 bytes of programmable data at 4 bytes per block in addition to a 64-bit factory programmed ID.
The I-Code SLI ISO15693 allows for 112 bytes of programmable data at 4 bytes per block in addition to the standard 64-bit factory programmed ID.
The my-D SRF55VxxP series ISO15693 allows for 232 bytes of programmable data at 8 bytes per block in addition to the standard 64-bit factory programmed ID.
The LRI512 ISO15693 allows for 64 bytes of programmable data at 4 bytes per block on top of the 64-bit factory programmed ID.
The Texas Instruments Tag-it HF series allows for 32 bytes of programmable data at 4 bytes per block, combined with the usual 64-bit ID.
The I-Code1 from Philips allows for 64 bytes of programmable data at 4 bytes per block, along with the 64-bit ID.
The PicoTag allows for 232 bytes of programmable data at 8 bytes per block, along with the 64-bit ID.
The ISO14443 series allows for anti-collision and is the world standard for wireless payments.
All of the tags listed above are compatible with the reader, except that the PicoTag is not compatible with the anti-collision feature.
Microcontroller Operation
The Atmel Mega 644 was at the heart of the control of our circuit. Ports D0 and D1 were responsible for the receive and transmit signals to the Skyetek M1 RFID module using uart. Ports A0, A1, and A2 received inputs from the three pushbuttons present in our circuit. Port C was used to control the LCD as in previous labs.
The protoboard was built using the board designed specifically for our class (below). The board had a slot for a Max233CPP for an RS232 connection, which we ended up not needing. Furthermore, the board featured a programmable header, a power switch, an indicative LED status light, various jumpers, and a diode to protect the circuit, in addition to specified resistors and capacitors. The diagram below shows the schematic along with our completed circuit.
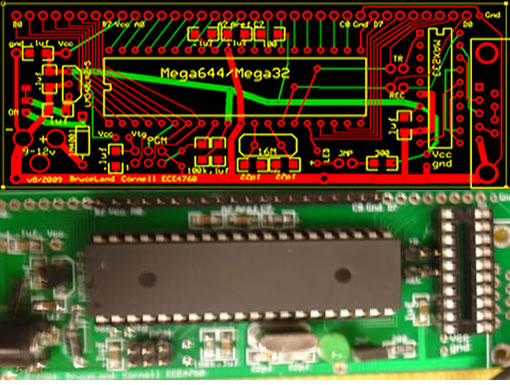
Proto Board Schematic and Completed Circuit (Schematic Credit Bruce Land)
Program Overview
Our program for the RFID Checkout system contains three major sections. In the beginning of our program, we declare multiple arrays that correspond to known RFID tags and their associated information. In our main method, we implemented a state machine that defined an intuitive user interface for a checkout lane. Finally, we also defined many methods that were used to search or particular RFIDs or recognize certain RFID as a particular product.
RFID Tag Arrays and Associated Information
A list of the RFID tag arrays and its associated information is declared at the beginning of the program. The associated information is in the same order as the RFID tag codes. This would allow the later find functions determine if a particular RFID tag was valid and what information is associated with it (i.e. price, product name). Future work in this would include an easier methodology to input the RFID information, perhaps by utilizing a USB connection and a computer program.
RFID Find Functions
The RFID find functions utilize a linear search in determining if a particular RFID is in the array. From these functions, we can determine the index of the scanned RFID in the array and be able to extract information such as price and name to display.
Skyetek Protocol
Overview
The SkyeModule M1 RFID chip that we used for this project utilizes the Skyetek communication protocol when communicating with computers, microcontrollers, and other devices. This Skyetek protocol describes how one would use a controller to configure a module to read RFID tags. Therefore, in order to interface the M1 module with the microcontroller, we needed to learn the methodology used to send commands to the chip. Furthermore, the microcontroller would need to have a limited ability to interpret commands sent in response from the Skyetek module, whether it is a signal indicating that the module is ready to read tags or a signal of a read RFID tag.
Developing the Commands
In our experimentation with the Skyetek protocol, we used the Skyetek Protocol Builder software program included with the RFID kit. From this, we were able to develop the proper commands to send to the M1 module to match our desired operation. For our particular application, we set the following options:
INV_F = 1 This option allows the reader to inventory all tags within the area.
RF_F = 1 The “Stay Quiet” command causes each tag that enters the field to stay quiet after identification (turning them off once they have been read by the reader).
LOOP_F = 1 Sets the module to continuously read for RFID tags.
These options would resulted in the following command being sent.
<CR>0B1400<CR>
From the protocol builder, we were able to surmise that the chip would either send a response to this command indicating that reading was on or not. Thus, in our program, we expected either <LF>9C<LF> (indicating the reader was not actively reading) or <LF>1C<LF> (indicating that the reader was actively reading).
Therefore, after sending our initial command to the chip, our program would interpret the response that it receives from the chip. If it receives an <LF>9C<LF> command, our initial command would be sent again so that we can ensure that the M1 module is actively reading when we turn on our RFID checkout system.
Hardware Interfacing
In order to send the commands to the chip, we used the UART interface used in previous labs. This allowed us to easily send and receive serial communication to and from the chip. Therefore, we connected the D.0 and D.1 pins on the Mega644 microcontroller to the TX_TTL and RX_TTL pins on the SkyeModule RFID chip, respectively. We decided to use a TTL connection rather than an SPI or a RS-232 connection because of its relative simplicity.
State Machine
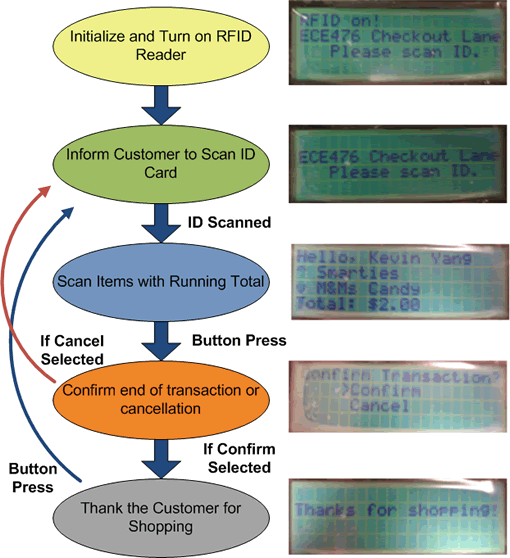
RFID Checkout Software State Machine Operation
Our state machine was designed to be straightforward and simple, allowing for the demonstration of our prototype without much overhead or frills. Upon initialization, the reader-on signal was transmitted to the Skyetek M1 Module until it was confirmed that the reader was operational and ready for the system. Following this, the customer was permitted to scan their customer identification / shopper loyalty card. Once the shopper had been identified, all items placed within the read range were scanned. As each item was scanned, their RFID tags were sent the "Stay Quiet" command as described earlier to ensure that all other tags within the field were read properly. When the user was done placing their items on the antenna platform and all items recorded to their satisfaction, the confirm button was pressed. This brought up a confirmation dialog asking the consumer whether to proceed to payment or cancel the transaction. If the transaction was cancelled, the system re-initialized to ask the next consumer to present their customer ID card. If the transaction was confirmed, a thank you message was displayed, as we have not implemented a payment system, followed by a reinitialization once the confirm button was pressed once more. This created an effective user interface for the presentation of our multiple-read RFID checkout system.
LCD Implementation
For user feedback, we used a 20x4 Solomon Goldentek LCD display (GM-C2004). We decided to use this particular display because it was fairly inexpensive and was able to give a larger amount of information to the user due to its larger size (in comparison to the 16x2 displays used in lab). Another major consideration was the fact that the datasheet indicated that it used the same LCD interface as the 16x2 display. This would allow us to use the lcd_lib.c and lcd_lib.h files that we had previously used in other labs (albeit with minor changes). This enabled us to quickly integrate it into our project, since we had decided fairly late to add a larger LCD due to our budget surplus.
However, once we received the LCD, we were surprised that we were unable to have it run on the lcd_lib code as expected. After a few hours of confusion, we realized that it was because of a poor connection between the LCD circuitry and the LCD. We thought we were making a strong enough connection by pushing pins onto the top. However, we realized that we would need to solder it in order to make a stronger connection. Once this was accomplished, we no longer had any problems with the new LCD.
Button Implementation

The buttons used for the user interface
Upon discarding our idea for using the Nintendo DS touchscreen for user interaction with our system, we decided to use a three button configuration we found in ECE 4760 lab. In this configuration, we connected each of the pins on the buttons to a 10K resistor that was connected to Vcc. We also connected the pins to ports A.0, A.1, and A.2. A ground pin was quite understandably, connected to ground. These buttons were active-low and that consideration was taken into account when writing the code.
The three buttons were designated as UP, DOWN and OK. The UP and DOWN buttons were used to select between different options in the user interface. The OK button confirms options as well as advances the checkout stages.
A form of debouncing was needed to ensure that the user could not unintentionally scroll through the different stages of the state machine, which could result in undesired purchases. The only button that required this, however, was the OK button as it was the only button that confirmed information and advanced the screens. Therefore, we only allowed the OK button to be recognized once it was released. If a user were to hold the OK button down, the checkout stages would not advance until he or she released the button.
Troubleshooting and Tradeoffs
Faced with a $75 budget limit, we were hard-pressed to find a reader chip that included the anti-collision feature we needed to implement our system as we envisioned. After failing to find anything less than $80 in the US, we stumbled upon a chip from the UK that was $30 operating at the 125 kHz frequency. We started our project using this chip, to learn that the range was rather poor, tags expensive due to the outdated frequency, and not mainstream for a realistic prototype of our system. Luckily, we bid upon a Skyetek 13.56 Mhz RFID kit sold as-is on Ebay, and succeeded with a closing price of $16.49. This led us to change our entire platform almost half-way through the project period, wasting time that otherwise could have been spent adding more features if it had not been for the budget issue from the beginning.
When switching to the new Skyetek M1 module, we could not get the chip successfully working with our microcontroller, although it worked with the PC. We followed the guidelines as described, and even went through the Atmel Mega 644 datasheet regarding TTL connections. After fixing typos in the sample code from the datasheet, we still had no luck. On a whim, we removed setting the baud rate for the TTL transmission send and receive, which magically fixed our issue and enabled us to move on with our project, losing a couple of days in this process.
We also experienced numerous issues with our protoboard, with its performance highly variable. We focused on using the SKT500 until the end, so we were not able to build a brand-new protoboard as all boards had run out, although we did try using the template from last year which ended up being even worse in performance. After soldering on a group of header pins, most of our problems seemed to go away, teaching us the importance of solid connections. This was true with our new 4-line LCD as well, as we could not get it functioning and wondered why until we bothered to solder on header pins when rendered it completely operational.
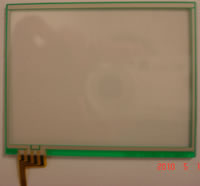
The Nintendo DS Touchscreen we decided not to implement
We considered using a touchscreen interface to allow the customer to interact with the machine to confirm or decline transactions. The particular touchscreen that we were planning to use was a Nintendo DS touchscreen because it was very inexpensive and had a straightforward interface. The Nintendo DS touchscreen is a resistive touchscreen that quickly polls the voltage values across the x and y axes. It accomplishes this by applying 5V to one side of the screen and ground to the other side of the screen. Once it detects pressure, a certain voltage level is outputted on one of the pins. This is done for both the x and y directions. Thus, with an analog-to-digital conversion, one is able to determine precisely where someone touched the screen.
However, we ultimately decided not to use this screen as we realized that it would not allow any additional functionality over buttons. Furthermore, implementation of the touch screen would be significantly harder than an implementation of buttons.
One avenue that we explored after our RFID chip was able to communicate with the microcontroller was the possible use of adding speech to the system in order to improve accessibility to those with poor vision. We explored the information on speech synthesis and compression on the ECE 4760 website. However, we eventually realized that 2-bit speech would take too much space in the microcontroller’s memory (as we would need all the numbers from 1-20, 30, 40, 50, etc. in order to fit the convention of talking about prices). Each number took approximately 140 kilobits and the many samples of sound would already take more 4000 kbits, which in addition to the code needed for our RFID reader, would necessitate the use of a second microcontroller. We also considered the use of 1-bit speech, but we ultimately decided that due to our time constraints, we would be unable to satisfactorily complete speech synthesis and promptly discarded that idea.
Results
Speed of Execution
Our RFID checkout system quickly read all the tags within the read field within a few seconds. This read time was greatly enhanced when the tags were in motion within the read field, instead of stationary. The user interface had no issue at all with keeping up with updating the items scanned or recognizing button presses from the consumer. The RFID system was initialized on startup within 1 second, as the on command was sent continuously to the reader to ensure the system was ready to go with the shortest delay possible.
Accuracy
Our RFID checkout system implemented a lookup table that only recognized valid RFID tags. As a result, we never experienced issues in accuracy. Our Skyetek M1 module did have CRC (Cycle Redundancy Code) error-checking ability, but we chose to disable this and not utilize this feature due to the short time span of our project. In an industrial world with more interference and millions of items scanned a day, implementing CRC would be crucial. Due to the unique nature of RFIDs, namely that every RFID tag is unique, in a retail setting the system would only recognize those items which had not been paid for before. For example, if someone had a candy bar within their pocket that had been paid for previously, the system would not count that read item in the running total.
Our antenna design was initially much less accurate. We discovered that even a slight difference in dimensions yielded greatly different antenna characteristics. After modifying the capacitors in our design, with the help of the professor, we had peak resonance around 13 Mhz, which was sufficient for our prototype.
Safety
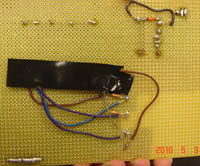
Exposed pins on the back of our main board
We took great care to ensure that our project met the highest safety standards. This included wearing safety goggles while soldering, washing hands after touching lead, and more. The board itself had a great number of metal contacts protruding from the bottom. We covered some with electrical tape, but a more permanent solution would be needed for consumer grade products. The antenna platform's metal contacts were also entirely exposed during our demo, which would have to be covered up for an industry application. Otherwise, we kept our wiring neat and wire length to a minimum to ensure that no other safety hazards were present.
Interference
With any radio frequency operated system, interference is an issue. Our system is certainly jammable at the 13.56 MHz frequency, a concern for industry application. More likely, however, is interference from other reader / checkout systems operating nearby. As a result, the read range has to be kept to a minimum to ensure that readers near other do not interfere. Also, it is crucial that customers be spaced properly in line so that items from the customer next in line are not erroneously rung up for the current customer. Such concerns could be adequately addressed by using marking tape signifying a read zone and proper employee instruction.
Usability
Our system makes it easier than ever for everyday shoppers to zoom through the checkout lane. For those with disabilities, this system allows the potential to be more independent than ever before as those individuals could pass by the reader without having to lift items, place them on a belt, or bag their items. This results in more convenience for all tiers of shoppers, as there is no wasted effort in the usual emptying of a shopping cart onto a conveyor belt only to place it back in once the UPC code is scanned.
However, the user interface for such an RFID checkout system must be properly designed using human-computer interaction (HCI) design principles. For those accustomed to old technology or methods, such advancement may be hard to adopt to and employee assistance may be needed.
Current tag costs are borderline prohibitive to implement in everyday retail outlets. In the coming years, however, we predict this hurdle will be overcome. The transition from the UPC model will take some time, but we believe our prototype is an indication of what is around the corner. Great care must be taken when changing the entire basis of the retail industry, including managing employees and transitioning them in addition to the minds of consumers.
Conclusions
We successfully implemented the final project we had imagined, outperforming our initial goals stated in our proposal. Due to our luck on Ebay, we were able to implement a multiple-read mainstream RFID checkout system at 13.56 MHz. Our system easily guided users through the checkout process, instantly scanning all items in the reader field instead of one-by-one like the present day UPC model. Our custom-made antenna performed as expected, greatly increasing the read range possible over the stock antenna and allowing for a realistic prototype. We could have implemented the touchscreen, speech synthesis, and more if we had not had to switch devices midway through the project. Given our tight $75 budget for our goal, we are very content with our accomplishments and look forward to the realization of our project in the retail world in the coming years.
Standards
Our device conformed to the 13.56 MHz standards as discussed previously. As we had bought the Skyetek M1 Module pre-built, our prototype experienced no issues in adhering to the tag standards as already discussed.
Intellectual Property Considerations
Various patents have been already filed regarding RFID readers as well as even RFID applications for the retail world. For example, we came across one patent regarding consumer behavior monitoring using RFID tags here, would would likely interfere with some potential gains from our system. Proper care must be taken when preparing such a system for industry application to ensure the technology does not infringe upon the rights of others and/or that proper royalties are paid to respective parties.
When using the Skyetek M1 module, we used the proprietary Skyetek Protocol. This protocol was specifically designed by Skyetek for the exclusive use of those using its RFID modules. As a result, our code is not universal in standard, and source code for the Syetek protocol cannot be distributed along with our code.
We did not sign any non-disclosure agreements with any parties.
Ethical Considerations
Throughout this project, we strictly adhered to the IEEE Code of Ethics.
While we did not have a strict safety protocol that we followed when working in lab, we made every effort to ensure that our project did not adversely affect the safety, health, and welfare of the public. To the best of our knowledge, we do not know of any ill effects that could be caused by the usage of RFID tags. We also avoided any real or perceived conflicts of interest.
Our conclusions and results are realistic and honest in their assessment of the project by clearly indicating what it is capable and incapable of doing. Furthermore, while we were not at any point bribed in our design of the project, we would have rejected any forms of bribery if we were presented with such a situation.
In our design, construction, and documentation of this project we improved the understanding of the RFID technology used by demonstrating the interfacing of the Mega644 to the SkyeModule chip, as we believe this particular design to be unique. In our documentation, we made our project’s possible application clear and addressed possible concerns regarding the reading of RFID tags.
Throughout this project, we improved our technical competence by developing a fuller understanding of the Mega644 microcontroller, RFID tags, and the SkyModule M1. We were able to implement a form of hardware handshaking to send and receive commands from a chip. In lab, we accepted and appreciated honest criticism of our work – this resulted in our adding or modification of features in our project. In our debugging and testing of our project, we acknowledged and made every effort to correct errors. Finally, we also strived to credit the contributions of others by including them in the acknowledgements section of this report.
Both inside and outside of lab, we treated all people fairly. We avoiding injuring others or damaging their property by ensuring that our project and its equipment were placed and moved safely around lab. We also tried to assist others in their own professional development by making suggestions and by offering aid, while ensuring that both others and ourselves adhered to the IEEE Code of Ethics so that we all can grow to become ethical engineers.
Societal Impact
To the best of our knowledge and barring exceptional circumstances, RFIDs do not present any significant health risks. The radiation from the RFID transmitter is negligible to cause any harm to human beings over the short exposure times in the RFID checkout system.
However, RFIDs have been the target of significant controversy regarding privacy issues. Privacy advocates have been concerned about the ability of RFID tags to be read without the consent of the consumer as well as the possibility of using the unique RFID tag to find out the purchaser of a particular item. Most of these concerns are due to the fact that these tags continue to be functional even after purchased. However, we do not view this as a significant problem as our project will not be used to track customer’s purchasing habits for long periods of time. Furthermore, the RF reader we will use will be of limited range – a customer cannot use this to detect another customer’s purchase without getting within close range (at which a visual inspection could yield the same information).
Finally, the impact of the adaptation of this technology in the retail world on current employees and their families must be carefully examined. While costs may be decresed over time with this technology, the question of at what human cost must come up. Furthermore, customers often prefer to have face-to-face contact with humans which they can relate to, converse with, etc, which may be lost with the infiltration of this technology into the retail world.
Legal Considerations
Every RF device used in interaction with a consumer is required to conform to FCC rules. These rules are as follows:
“This device complies with part 15 of the FCC Rules. Operation is subject to the following two conditions:
- This device may not cause harmful interference, and
- This device must accept any interference received, including interference that may cause undesired operation.
Upon FCC approval for the final device, the following warning typically appears on a device involving RF products, dependent on the particular category of approval:
FCC WARNING
This equipment has been tested and found to comply with the limits for a Class B digital device, pursuant to Part 15 of the FCC Rules. These limits are designed to provide reasonable protection against harmful interference in a residential installation. This equipment generates, uses, and can radiate radio frequency energy and, if not installed and used in accordance with the instructions, may cause harmful interference to radio communications. However, there is no guarantee that interference will not occur in a particular installation.
Division of Work
Equipment purchasing and schematic design was done jointly by Jigar Shah and Kevin Yang. Jigar Shah worked on the hardware and soldering, including the design and implementation of the antenna platform. The software for the project was developed by Kevin Yang. Both worked on the website and the final report.
Acknowledgements
We would like to thank Professor Bruce Land for providing templates and invaluable advice throughout the course of this project. We would also like to thank the many ECE 4760 TAs who have faithfully kept the lab open and answered/troubleshooted many of the problems we encountered over the course of the project. We would also like to thank Skyetek for giving us access to their support website so we could access the documentation on the Skyetek M1 Module and the Skyetek Protocol.
Appendix
Code
Libary and Header Files:
lcd_lib.c
lcd_lib.h
uart.c
uart.h
Parts List
| Component | Ordered Part | From | Part Number / Link | Unit Cost | Quantity | Total |
|---|---|---|---|---|---|---|
| LCD | 3-Button Panel | 476 Lab / Salvaged | $0.00 | 1 | $0.00 | |
| LCD | 20x4 LCD Display | Jameco | GM-C2004A | $9.95 | 1 | $9.95 |
| LCD | Single Row Header Pin | 476 Lab | WM6436-ND | $0.05 | 14 | $0.70 |
| LCD | 10K Trimpot | 476 Lab | 3386F-103-ND | $1.14 | 1 | $0.00 |
| RFID | Skyetek M1 Developer Kit (Including Reader, Power, Tags) | Ebay | DKM1 | $16.49 | 1 | $16.49 |
| Proto Board | Atmel Mega644 | 476 Lab | Mega644-20PU | $8.00 | 1 | $8.00 |
| Proto Board | Custom PC Board | 476 Lab | Prototype Board | $4.00 | 1 | $4.00 |
| Proto Board | IC Regulator | 476 Lab | LM340LAZ-5.0 | $0.98 | 1 | $0.98 |
| Proto Board | 16 MHz Crystal | 476 Lab | CTX077 | $0.75 | 1 | $0.75 |
| Proto Board | Switch SPDT surface mount | 476 Lab | AYZ0102AGRL | $0.52 | 1 | $0.52 |
| Proto Board | 2.1mm Power Plug | 476 Lab | CP-002A-ND | $0.38 | 1 | $0.38 |
| Proto Board | Power Supply | 476 Lab | DBU120020E2261 | $5.00 | 1 | $5.00 |
| Proto Board | 40-Pin DIP Socket for MCU | 476 Lab | 3M5471-ND | $0.50 | 1 | $0.50 |
| Proto Board | 20-Pin DIP Socket for Max233 | 476 Lab | 3M5465-ND | $0.50 | 1 | $0.50 |
| Proto Board | Single Row Header Pin | 476 Lab | WM6436-ND | $0.05 | 32 | $1.60 |
| Proto Board | SIP Machine Pin | 476 Lab | ED2064-ND | $0.05 | 3 | $0.15 |
| Proto Board | 0.1 uF Capacitor | 476 Lab | PCC104BCT-ND | $0.26 | 5 | $1.30 |
| Proto Board | 1 uF Capacitor | 476 Lab | 311-1181-1-ND | $0.33 | 2 | $0.66 |
| Proto Board | 22 pF Capacitor | 476 Lab | 311-1154-1-ND | $0.12 | 2 | $0.24 |
| Proto Board | 100 Ohm Resistor | 476 Lab | P100ECT-ND | $0.10 | 1 | $0.10 |
| Proto Board | 100k Ohm Resistor | 476 Lab | P100KECT-ND | $0.10 | 1 | $0.10 |
| Proto Board | 330 Ohm Resistor | 476 Lab | P330ECT-ND | $0.10 | 1 | $0.10 |
| Proto Board | 1N40001 Diode | 476 Lab | 1N4001DICT-ND | $0.30 | 1 | $0.30 |
| Main Board | Main Board | 476 Lab / Salvaged | $0.00 | 1 | $0.00 | |
| Main Board | Single Row Header Socket | 476 Lab | 929974-01-36-ND | $0.05 | 77 | $3.85 |
| Main Board | Dual Row Header Socket | 476 Lab | 929975-01-36-ND | $0.05 | 20 | $1.00 |
| Antenna | 0.5" Conductive Adhesive Copper Foil Tape - 36 Yards | Amazon | CFL-5CA | $22.72 | 0.04 | $0.99 |
| Antenna | Floor Tile | 476 Lab / Salvaged | $0.00 | 1 | $0.00 | |
| Antenna | Variable Capacitor | Digikey | 490-1965-ND | $0.43 | 2 | $0.86 |
| Antenna | 220pF Ceramic Capacitor | Digikey | 490-4284-ND | $0.19 | 1 | $0.19 |
| Antenna | 1000pF Ceramic Capacitor | 476 Lab | 1445PH-ND | $0.13 | 1 | $0.13 |
| Total | $59.34 |
References
Skyetek SkyeModule M1 Reference Guide (Proprietary)
Skyetek Protocol (Proprietary)
Skyetek M1 Troubleshooting Guide
Skyetek
EA1 Reference Guide
Skyetek Antenna Design Guide
Microchip RFID System Design Guide
Atmel Mega 644 Datasheet
Goldentek LCD Datasheet
ECE 4760 Prototype Board Guide
Related Resources
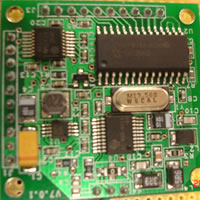
The Skyetek M1 RFID Reader - The heart of our project
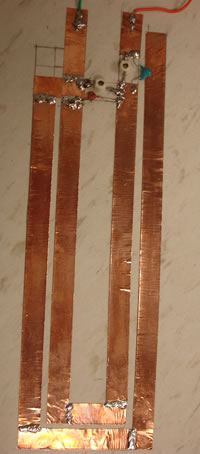
Custom-made RFID Antenna Platform to place checkout items on
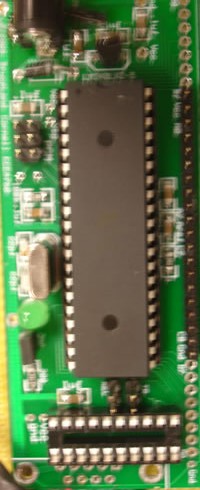
Protoboard with Atmel Mega 644 - the microcontroller in charge of the system
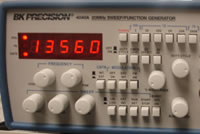
13.56 MHz - The frequency at which our RFID system operated
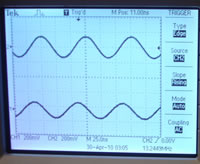
Tuning the RFID antenna for optimal performance with an oscilloscope
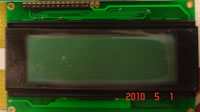
The 4-Line 20-Character LCD used to display output for our RFID checkout system

A Nintendo DS Touchscreen we thought about using as an interactive pushbutton for our system
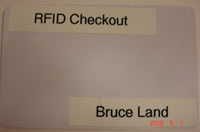
A 13.56 MHz RFID Card used as a customer loyalty/shopper identification card
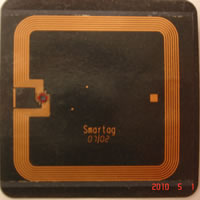
The back of a RFID tag to replace UPC codes on everyday items

The three buttons used as our final RFID checkout user interface
