After you do this, you can compile in VScode, double-click the program button you will install, then click
run in VScode to download the prodgram.
See also the Runtime Infrastructure section of the SDK docs.
Software:
Add the line:
pico_bootsel_via_double_reset
to the target_link_libraries list in every cmakelists.txt file
That's all!
Hardware:
Refer to the Pi Pico pinout diagram and identify pin 30, the RUN signal. Note that pin 28 is ground.
The button you will add shorts the RUN pin to ground when you push it. The official Pi page uses more
wires and a bigger button.
-- Straighten the leads on the switch using small pliers so that they make better contact
in the solderless board and to make the lead spacing closer to 0.2 inch (2 rows apart on board).
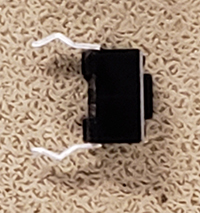

-- Connect button leads to pins 28 and 30. (click image to expand).
I find it easier to hold the button with pliers when pushing it into the solderless board.

Using the button:
-- Use power cycling programming once to insert the new loader code you just added to cmakelist.txt
-- Push the button once to reset the program to re-start.
--Push the button twice, quickly (within 0.5 second), to enter program mode, then click run in VScode.
No more power cycling or unplugging!
the elf file through the debug port. You do not have to touch the Pico, or push any buttons!
The debug probe must be connected!
You should be able to program on Windows by
- Starting a PowerShell in Windows
- Changing the current directory in the shell window to your current build diectory.
- Make sure the debugger is stopped.
VScode Menu item: Run->stop debugging - Issue this command
BUT change:
-- the name of the executable elf file
-- the netid, to your netid
-- and possibly the cpu type, if you use rp2350
The ugly paths avoid the hit-or-miss Windows environment variables.
C:\Users\netid\.pico-sdk\openocd\0.12.0+dev\openocd -s C:\Users\netid\.pico-sdk\openocd\0.12.0+dev\scripts -f interface/cmsis-dap.cfg -f C:\Users\netid\.pico-sdk\openocd\0.12.0+dev\scripts\target/rp2040.cfg -c "adapter speed 5000" -c "program your_pgm.elf verify reset exit"
The target board should get the new code, then reset and start.
You should be able to program on MAC by
- opening a console window
- Changing the current directory in the console window to your current build diectory.
- Make sure the debugger is stopped.
VScode Menu item: Run->stop debugging - Issue this command:
BUT change:
-- the name of the executable elf file
-- and possibly the cpu type, if you use rp2350
openocd -f interface/cmsis-dap.cfg -f target/rp2040.cfg -c "adapter speed 5000" -c "program your_pgm.elf verify reset exit"
The target board should get the new code, then reset and start.
You can find out more about openOCD here.