BioSignals Help
Version 1.1a
Last Updated July 20, 2000
Introduction
Welcome to BioSignals
version 1.x. The following help menu is
intended for users who are
familiar with the operation
of the BioRadio. This application is
intended to run on Matlab version 5.3.
Your copy of Matlab must have
the data acquisition and signal processing toolboxes installed.
The following help Menu is
broken down in the following manner:
·
Main Screen
·
File Menu
·
Tool Menu
·
View Menu
·
Help Menu
·
Notes
·
New for version 1.1a
·
Questions and Comments
Main Screen
After typing biosignal at
the Matlab prompt, you should see the following screen:
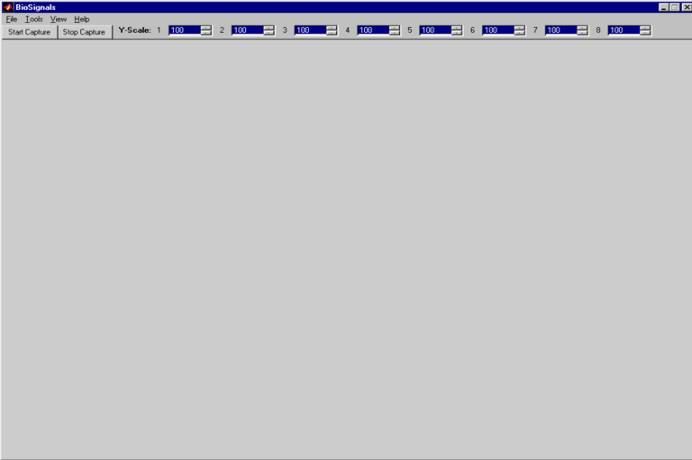
On the toolbar, there is a
Start Capture and Stop Capture button.
If the BioRadio is on and transmitting data, the start capture
button will display in the incoming
data as waveforms, and it will store data for each channel into a temporary
file. If you wish
to save your data, go to
the save command under the file menu.
The stop capture button will enable you to stop capturing data.
After clicking the start
capture button, you cannot modify any of filters or signal processing elements
or viewable channels that you
applied to the incoming
data. To the right of the stop capture
button are the Y-scale options for the channels that will be viewed when
capturing begins. The
following diagram illustrates the Y-scale option bar.
![]()
If a channel is not
activated on the BioRadio or not viewable, the corresponding y-scale options
will be dimmed. To change the
y-scale for a particular channel,
click the up and down arrows for each y-scale. Once you have chosen the y-scale
that you want,
you must click onto
the number, ensuring that the number is in blue and has a light grey square
surrounding it as seen below for
channel 1:
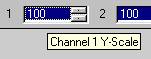
If you do not click on the
number after selecting it, the y-scale you chose will not be applied to that
channel. The y-scale value is the only
setting which can be
modified during capture.
File Menu
Open
The following is the open
menu:
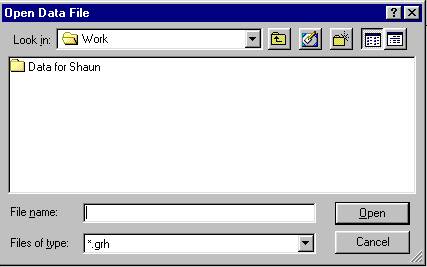
Select a previously saved
data file with .grh extension, and click open. BioSignals will graph each saved
channel on the main window.
Save
After clicking save from
the file menu, you will be prompted to type in a filename.
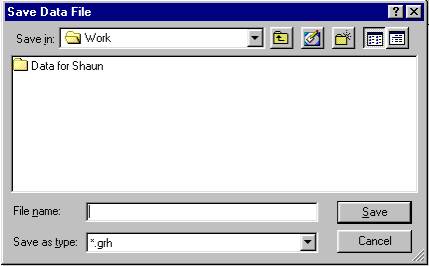
Type in a filename like
"Professor Land's Data" or "Professor Hoy's Data.grh" in
the file name
text box. Click Save. The
files will be saved as Professor Land's Data.grh or Professor Hoy's Data.grh,
respectively.
Export to Audio File
After clicking export to
audio file from the file menu, you will be prompted to type in a filename.
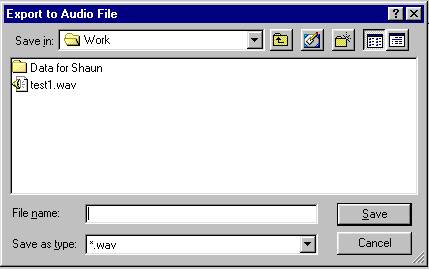
Type in a filename like
"Professor Land's Data" or "Professor Hoy's Data.wav" in
the file name
text box. Click Save. For each channel that data was being
acquired from the BioRadio,
BioSignals will save a wav
file with the above filename and a number appended to the end of
the filename. For instance,
if channels 3 and 4 were acquired, BioSignals will save
Professor Land's Data3.wav
and Professor Land's Data4.wav to the prescribed file location.
Setup
After clicking the Setup,
the following menu appears:
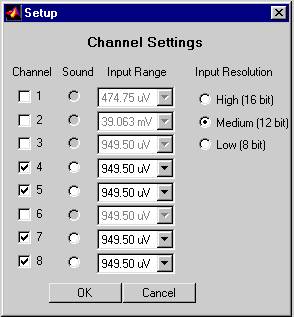
With the exception of the
sound option, all settings that you set here are
physical settings that you
manually set the BioRadio with using the BioRadio
Configuration WizardÓ. Before capturing data, you should activate
all channels
that were set with Wizard
and ensure that all the input ranges and input resolutions
are correct. Select the channel you want to hear sound
from. If you do not want to
hear sound, click the sound
radio button that is already selected.
You should notice
that the sound radio button
no longer has a dot in it, indicating no sound will be played
for that channel. Note, if none of the activated channels has
sound button activated,
no sound will play. Click
ok to save changes, or click cancel to erase changes.
(Note only one channel
can have sound at a time.)
Print
In version 1.0 of
BioSignals, the print function is not yet implemented.
Exit
Press exit to quit
BioSignals application. If the x button
at the top right of the program is
used to close the
BioSignals, the communications port will not be closed, and all files that are
open will not be closed
properly. Please be sure to press exit
from the file menu to quit BioSignals.
Tools Menu
Timer
This function is to be
implemented in the next release of BioSignals.
Signal Processing
The following the menu that opens when you click the Signal Processing option
or
hit CTRL+S.
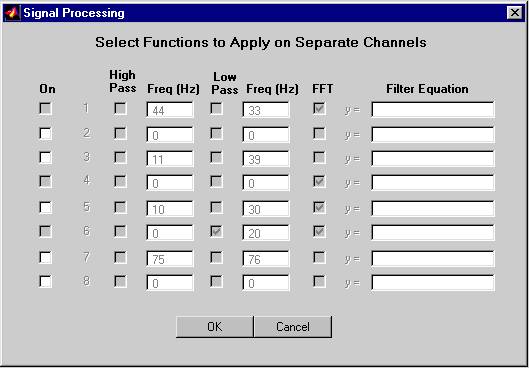
To enable Signal Processing
for a particular channel that is activated and is set to be viewable,
click the on checkbox for
that channel. Once you click the On box
for a particular channel, in this
case channel 2, the menu
will change to enable all the menu items corresponding to that channel as
seen below.
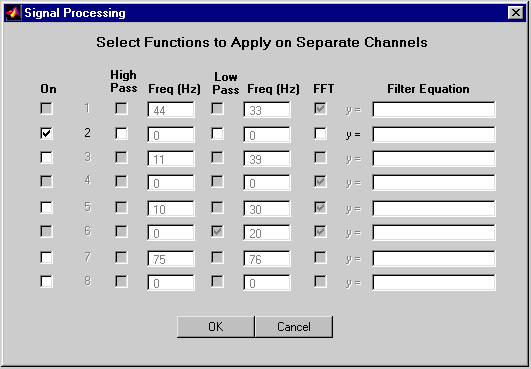
When you click High Pass or
Low Pass, the frequency box to the left of those respective
checkboxes will be
enabled. Enter in a cutoff frequency
(in Hertz) to the frequency box. In
this version of
BioSignals, if you enter a
character into the corresponding freqency box, the ascii value for that
letter will be used for
either the High or Low Pass cut off frequency.
Click the FFT
checkbox to enable FFT to
be applied to the signal. Press OK to exit and save changes, or press
Cancel to exit and not save
changes. (Note: Filter Equation is not implemented
in version 1.0 or 1.1a
of BioSignals)
View Menu
Channels
Press Channels from the
View menu or press CTRL + N to bring up the following menu:
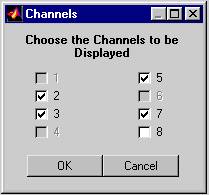
The channels that you will
be able to choose from to view while capturing data from the
BioRadio will be those that you activated using the BioRadio Configuration WizardÓ and
set in the previously described Setup menu. The channels that you select in this menu will be
viewed in the main window after pressing the start capture button in the toolbar of this program.
(Do not modify these settings while capturing is in progress!)
Help Menu
Contents
Press the Contents Menu
from the help to obtain this help screen.
You must have
wordpad installed in your
windows based machine to obtain this help screen.
Online Support
Press Online Support to obtain
web page help with the use of this program.
To use
this feature you must have
a web browser installed on your system.
About BioSignals
This screen allows the user
to determine what version of BioSignals is being run.
Notes
If the BioRadio is not on
and connected to the machine running BioSignals, the BioSignals program
will not function
properly. This means do not press
Start Capture if the BioRadio is not on.
This version of BioSignals
has minimal error checking, so be sure to enter proper values
for high or low pass
filters. If you do a band pass filter (high and low pass filters are both
enabled), then the high pass cut off should be lower than the
low pass cut off.
Otherwise, BioSignals may
behave erratically.
Finally, please be sure to
shut down BioSignals by going to clicking CTRL+Q or by clicking
exit from the File
Menu. If you click x at the top right
of the screen, the communication ports
on your computer will not
be closed properly.
New for version 1.1a
Two features are new for version
for 1.1a, print and copy commands. The
print command is
located in the file menu.
The print command will print any graphs displayed in the BioSignals
main window. The copy command is located in the new edit
menu as seen below:
 .
.
Press Ctrl + C as a
shortcut to copy all the graphs which is exportable to any standard windows
application.
Questions and
Comments
Send Email to
Shaun Chandran or Benjamin Greenblatt
shaun@chandran.cc or
bmg4@cornell.edu
Ó BioSignals by
Shaun Chandran and Benjamin Greenblatt.