Automatic Water Dispenser

Nancy Dai

An automatic water dispenser to keep your pet hydrated.

Summary

For this project, a water dispenser with two modes, timed and manual, was created. The user is able to configure different settings through the use of the keypad, which will then be displayed on the TFT. When water is to be dispensed, a signal is sent from the PIC32 to the solenoid valve to open the valve and allow water flow. The main goal behind this project was to create an automatic water dispenser that would allow pets to have a constant supply of water even when there is no one home.

Rationale

This project came about because my dog is often home alone during the day and I wanted to make sure he would not be dehydrated. As such I wanted to ensure that he would have water available, but not water that would be outside all day. As such this dispenser was created to be run on a timed mode to match my dog's drinking habits. In addition, this was extended to include a push button to allow a manual mode. This is mainly intended for a future extension in which the small push button is replaced with a larger one so that my dog can push the button when he wants water.

Configuration Options

The current available configuration options and values are listed in detail below. Note that any setting related to time must be entered in military format with 4 digits (e.g. 2:00 AM is 0200).
  • Setting: Indicates which configuration option is being changed. To change the setting, please press the # key then the setting value.
    1: Setting 2: Time 3: Water Config 4: Water Interval
    5: Start 6: End 7: Delay 8: Reset to Default Values
  • Time: Set in military time. Ranges from 0000 to 2359. Default: 0000
  • Water Config: The dispense mode. 0 for manual, 1 for timed. Default: 0
  • Water Interval: How often water is dispensed. A time ranging from 0000 to 2359. Default: 0100
  • Start: The first time water will be dispensed. Default: 0700
  • End: The time after which water will not be dispensed anymore. Default: 1900
  • Delay: How long water is dispensed for. Default: 2

Hardware and Software Tradeoffs

The current design relies completely on software to determine when the water valve should be turned off through manual time intervals. This removes the need for any sensors such as pressure, weight or water level sensors to tell the PIC32 when to turn the valve off. The hardware complexity is reduced, but at the same time the accuracy also drops. The accuracy of how much water is dispensed depends entirely on the preset delay times the software has set up.

Existing Patents, Copyrights, and Trademarks

The protothreads library created by Adam Dunkels (adam@sics.se) and modified by Bruce Land was used to handle threading and timing for the project. The Adafruit Arduino TFT Library rewritten by Syed Tahmid Mahbub for the PIC32 was used to communicate with the TFT.

Many automatic water dispensers for pets exist such as this and this. Both of these models keep the bowl full of water throughout the day though.

Hardware Design

Container

A 1/2" hole was drilled into an approximately 1 foot tall plastic container towards the bottom of the container. A male plastic adapter with barbs was inserted, then sealed with hot glue to prevent any water leaks. A PVC connector was used to connect the adapter to the solenoid valve, before connecting to a PVC extender then a PVC female adapter and finally an elbow pipe to create a faucet like structure as shown to the right.

Solenoid Valve Control Circuit

In order to control the solenoid valve without causing any damage to the PIC32 pin and to remove any voltage spikes caused by the solenoid valve, I reused the motor control circuit used in Lab 4. The circuit consisted of a 4N35 optoisolator to electrically isolate the PIC32 pin from the solenoid valve and a 2SK4017 MOSFET to control the solenoid valve. A 1N4001 diode is placed in parallel with the solenoid valve to prevent any damage to the circuit due to spikes caused by the solenoid. The base of the phototransistor was not connected to anything as the fall time did not truly matter for solenoid valve. The fully modified circuit is shown to the right.

TFT Connections

The TFT was connected to the PIC32 using the connections listed to the right. The connections are listed as going from the TFT to the PIC32. These connections were predetermined by the usage of the TFT Library rewritten by Tahmid. These pins can be adjusted to better optimize board space.

  • SCK to RB14 (Pin 25)
  • MOSI to RB11 (Pin 22)
  • CS to RB1 (Pin 5)
  • RST to RB2 (Pin 6)
  • D/C to RBO (Pin 4)
  • VIN to the 3.3V power supply line (connected from the PIC32 to the whiteboard)
  • GND to PIC32 GND

Keypad

The keypad was connected to the PIC32 using 7 pins in total. There were 4 outputs pins which where RA0 (Pin 2), RA1 (Pin 3), RA2 (Pin 9), and RA3 (Pin 10) that were connected through a 330 ohm resistor before connecting to the keypad. The 3 inputs pins were RB7 (Pin 16), RB8 (Pin 17), and RB9 (Pin 18), each of which had a 10K ohm pull down resistor. RA0 to RA3 connect to pins 1 to 4 on the keypad respectively and RB7 to RB9 connect to pins 5 to 7. The header pins on the keypad are labeled as shown to the right. These were the same connections that were used in Lab 2 on the TFT/Keypad page.

Full Circuit

Software Design

The software side was completely done in protothreads with some additional helper functions. There were 4 threads: the LCD update thread, the keypad thread, the timer thread, and the water control thread, all of which was initialized in the main function.

LCD Update Thread

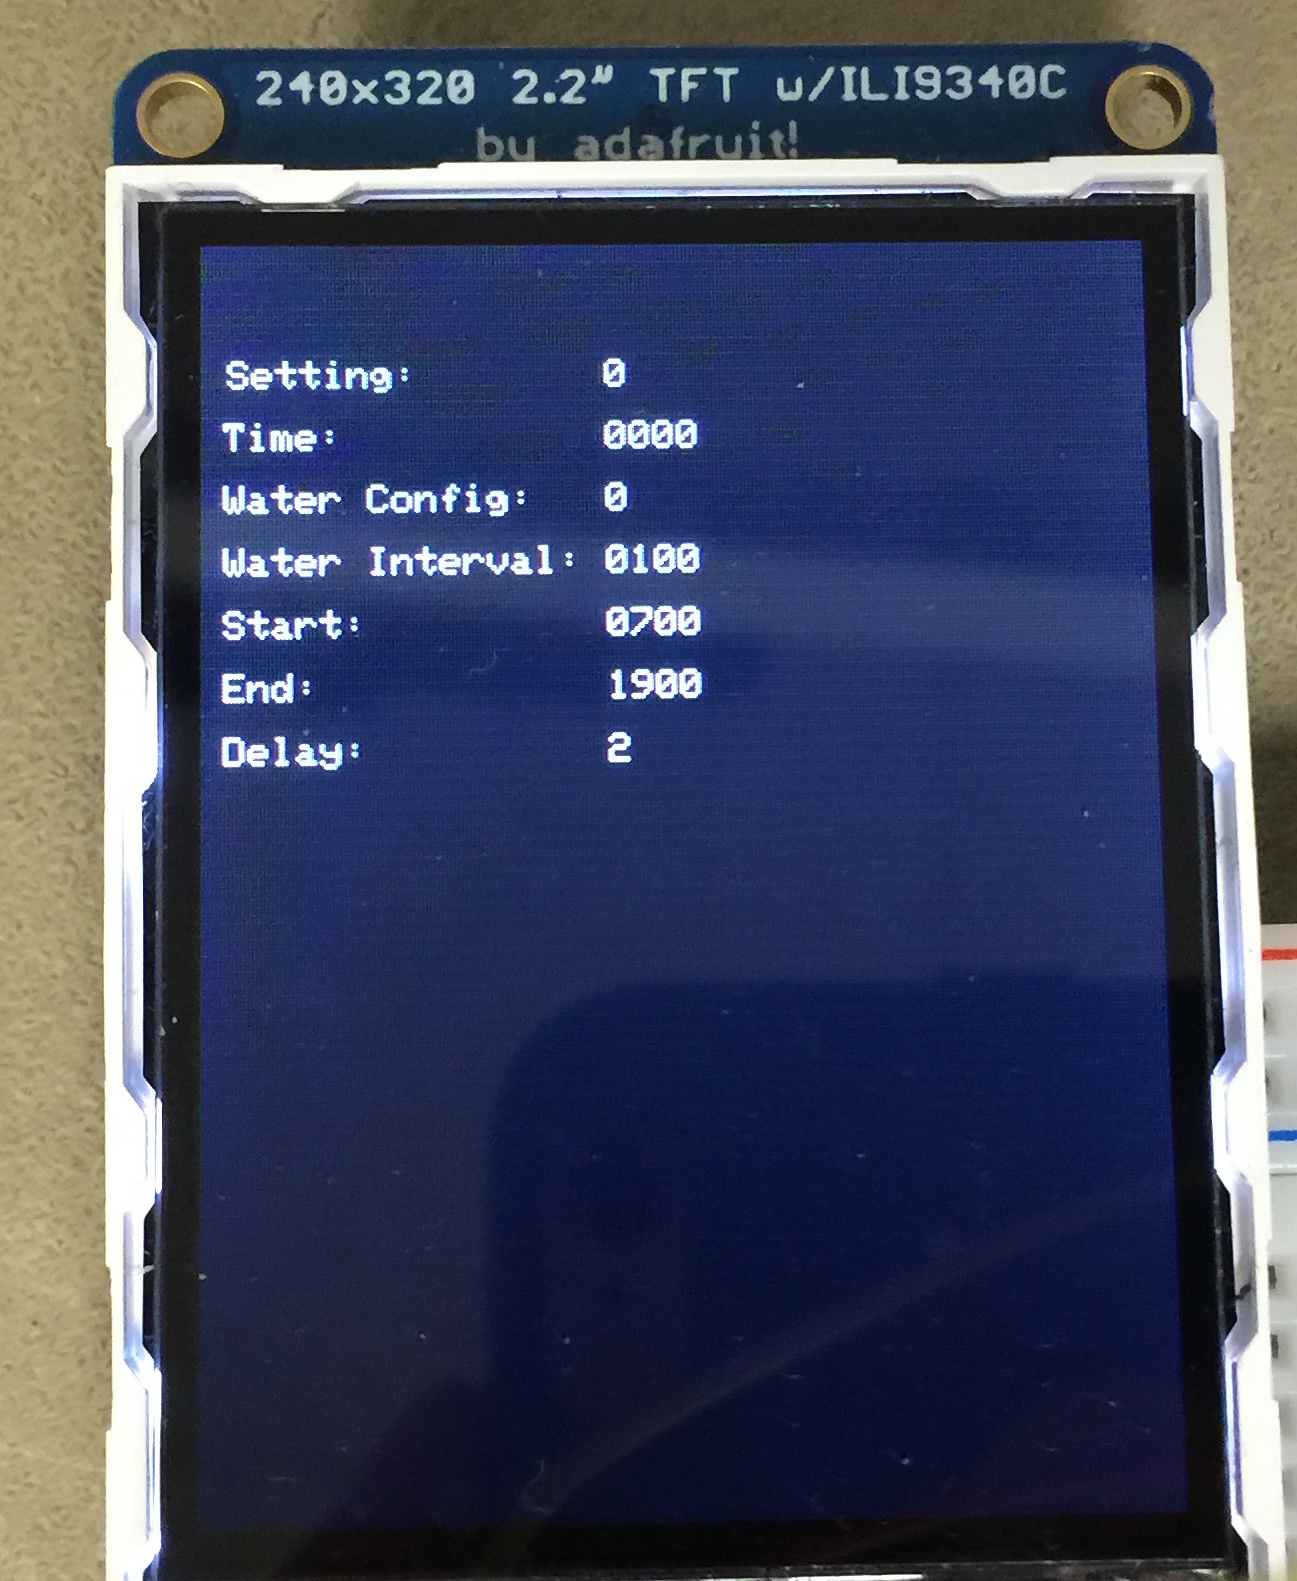
The main function of the LCD update thread was to update the LCD with the current values of all the configuration options and the time. This was done by first programming one half of the LCD to display the variable names. Afterwards, the half with the variable names would not be erased or reprogrammed. Instead the LCD will program the other half with the updated values. The LCD would update every 500 milliseconds.

Keypad Thread

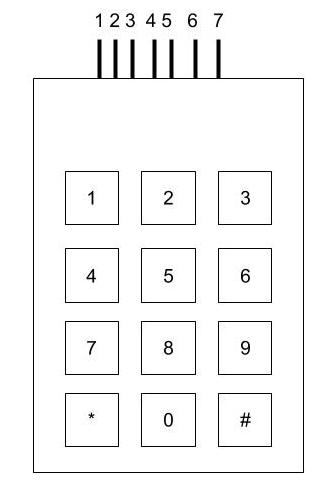
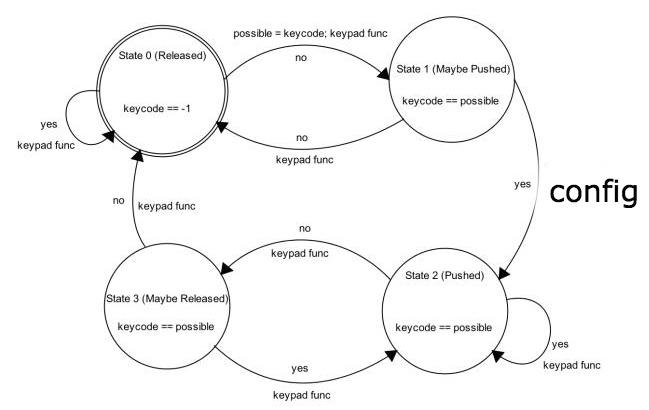
The keypad thread was exactly the same as the code used in Lab 2 for the DTMF dialer, except that the maybe state of the FSM changed what it did to the variables. The FSM used was the same FSM used in Lab 2 provided by Bruce. As in Lab 2, the keypad thread would be scheduled approximately every 30 milliseconds. First it would call a helper function to scan through the keypad to scan for a value greater than 0 to indicate that a key was possibly pressed. The value was checked against a table of values for all the keys and if it matched, the table index would be returned. Once this was done, the keypad thread would proceed through the 4 state finite state machine to handle debouncing. In the second state, the maybe pressed state, if the keycode matches the previously read keycode, then depending on the keycode, a different option will be selected. If the key pressed is the * key, the system will cancel any ongoing changes to the configuration values. If the key is a number from 0-9 and setting is 1, the thread will call the helper method config to change the settings appropriately. If the value being changed is a time, the key will be checked to see if it matches the constraints of the place and if the buffer is full. If the buffer is full, the time will be converted to the proper format and stored. Otherwise, the key will be added to the buffer and setting will remain unchanged to indicate the option is not set yet. If the key is the # key, then setting will be changed to 1 indicating that the user would like to change a configuration option. Otherwise, setting will be set to 0 indicating that it was a random key press and nothing should change. The FSM used in the keypad thread is displayed below.

Timer Thread

The timer thread would simply yield for 1 second. After which it would update the elapsed system time. Once the elapsed system time is greater than or equal to 60, the minute variable would be updated. Once the minute variable was greater than 60, the hour variable would be incremented. During each call, a check would also be performed to ensure that the hour and minute are stored in the proper format from 0000 to 2359. Minute and hour were stored separately to reduce the number of calculations that would need to be done. Additionally, all time values were also stored as minutes to simplify calculations for the water control thread.

Water Control Thread

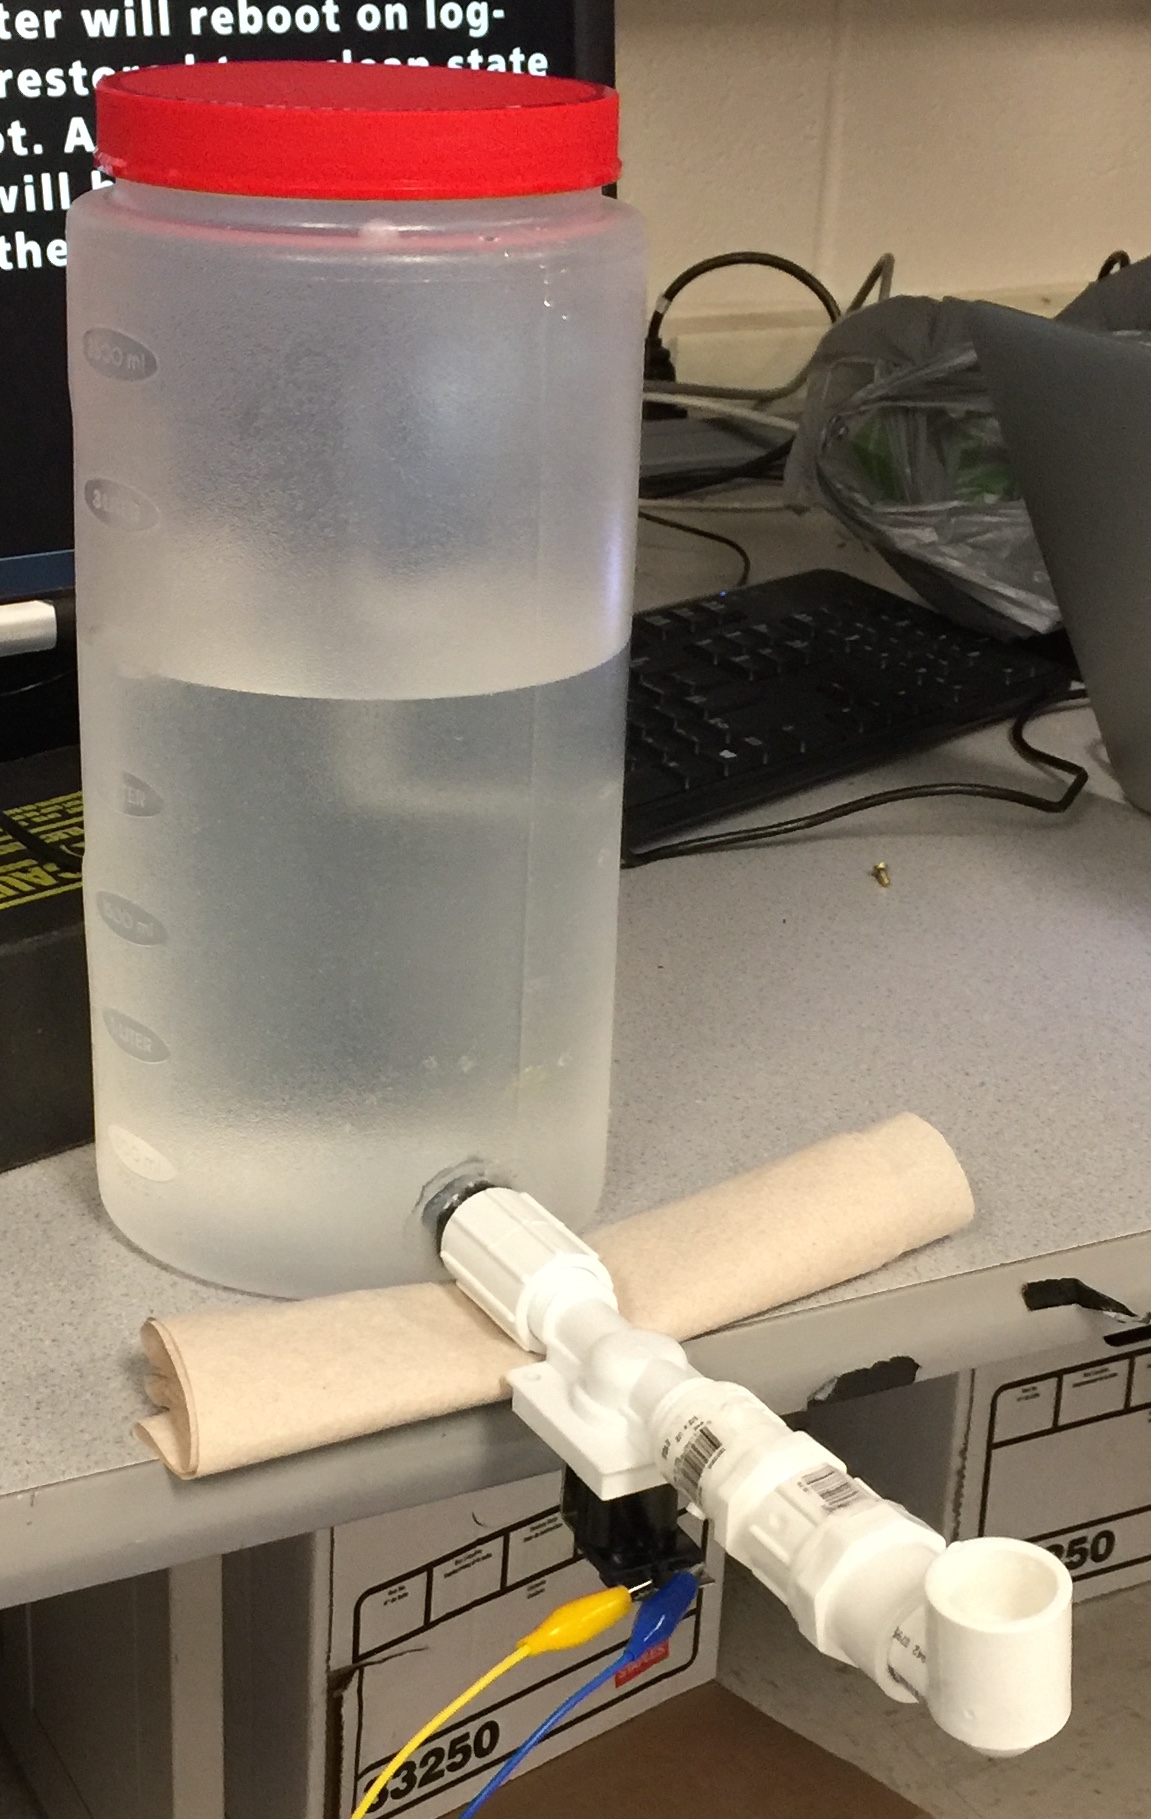
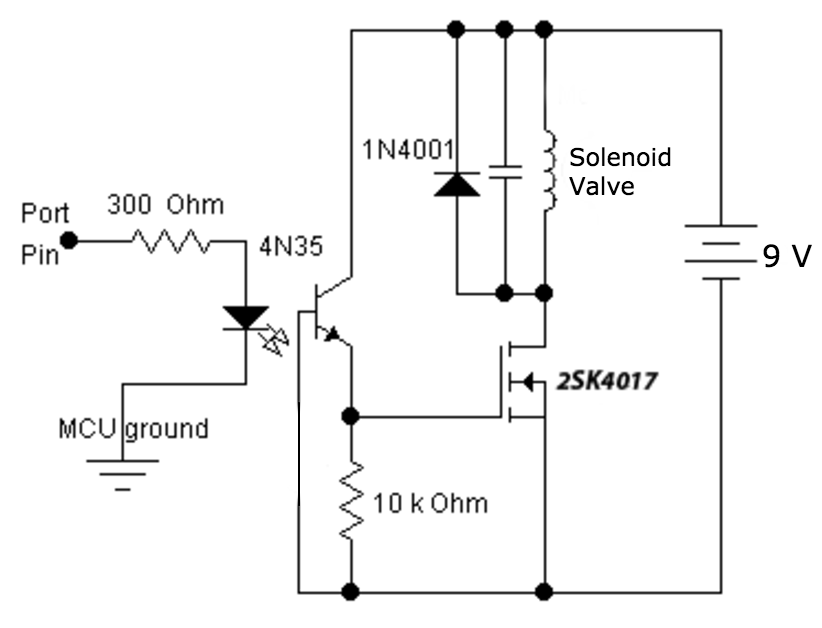
The thread would first check if the system was in manual or timed mode. If the system is in manual mode, the thread will check if the button is held down and the solenoid valve is off. If so, it will set the solenoid pin to drive the valve and wait for a period of time. This is to allow the valve to actually open before allowing the thread to close the valve. The second condition that is checked in manual mode is if the valve is open and if the button is released, If so, the pin will be cleared an the thread will yield.

If the system is in timed mode, the thread will check if the (current time - start time) % interval is equal to 0. If it is, the thread will drive the pin high, yield for startup, then yield again for the duration based on the delay value, before clearing the bit and yielding once more for the shutoff time. Afterwhich, the thread will yield for a minute as it will not be time to dispense water again. If it was not equal to 0, the thread will simply yield for a minute and then check again.

Main Function

The main function simply sets all of the appropriate pins as input or output pins and sets the default values for all the configuration options. Once this is done, the TFT and the protothreads are initialized, then the system schedules the protothreads.

Earlier Attempts

Initially, the project was supposed to be both a food and water dispenser. This required more pins than there were available on the PIC32. As such, I attempted to use a port expander to increase the number of pins I would have available. However, wwhen the keypad was connected to the port expander, it would ocasionalluy function as it was suppose to. However, other times the keypad would simply not respond. It was hard to tell what exactly was the problem becuase sometimes simply unplugging the USB from the computer then replugging it in would work. I also built the same water dispenser earlier, but I did not use the right size O-ring between the bottle and the male adapter and so it would still leak water even with a crazy glue seal. I also tried to use RTCC on the PIC32 using an external crystal. However, it would not work with or without additional capacitors. I also tried initially to build a standalone PIC32 circuit with the port expander. However I switched back to the MicroStick in order to debug why the port expander was not working and did not switch back to the standalone PIC32.

Results

Both modes will dispense water as expected. However, the time it takes for the valve to open is much longer than the specs state. This is due to the fact that I do not meet the minimum pressure requirement as my container is only about 1 foot tall. Additionally, when the solenoid valve is run at just under 9 V, according to the Adafruit Page for the valve, it should be drawing about 240 mA, however the entire circuit actually draws about 300 mA. It takes approximately 750 ns for the phototransistor to go from 0 V to 3.3V as shown below.

The amount of water flowing out of the pipe is also fairly small compared to the total poosible throughput. When the container starts out completely full at about 1 gallon, and thus it has the highest pressure at this point and the largest water flow, it takes approximately 3 to 4 minutes to fill a container up to the 1 quart mark. Additionally, it also takes about 30 seconds to a minute longer than it is suppose to in the timed mode to shut off the valve. Furthermore, once it reaches the halfway point of the container, the pressure has become so low that the water becomes more like long drips of water rather than streams of water. Additionally, even when the valve has no power and thus should be closed, it does not close fully as the minimum pressure is not reached. As such, once the water reaches a tipping point in the pipes, it will begin to drip out. Along the path from the container to the opening of the elbow, there were two places that tended to drip a bit. The first place was near the connecter between the container and the solenoid valve. The second location was near the female adapater closer to the elbow. These leaks need to be fixed to remove any chance of water damaging the circuitry if it were placed together.

Another thing to consider is that the water does not always start on the dot for the timed mode. Instead there is under a minute's worth of delay for the solenoid valve to receive power and begin dispensing water. This is due to two main reasons, the first being that I am using protothreads to do timing which will have drift. Secondly, the way my code is currently structured, the water control thread waits a whole minute before checking again. It may be better to check every 15 seconds instead in case it just so happens that the thread yields 1 second before the dispensing time.

I reinforced safety in the design because all of the circuitry is placed away from the water container. Additionally any parts that may leak were blocked with paper towels or plastic containers to catch all the water before it could do any damage. I did get rid of some of the leaks with O-rings. However, the size I got was not the right size for the pipes I had, as such there were still a few minor leaks along the way, but they were all far away enough from the solenoid valve, so no water fell on the circuit or the valve. In the future, I would have to find a way to play the circuitry in a weather proof container as I am planning on using the device outside.

I am planning on using the dispenser outside to ensure that my dog will be hydrated. In its current model, it will not work outside, as it needs to be made portable and weather proof first. However, others can also use it a a liquid dispenser within the house, which is fully possible without making it completely portable right away. The only thing may be that before it is used by anyone, the plastic water solenoid valve would have to be switched out with the brass version which does not have a minimum pressure requirement. This will remove any risk of water dripping out after the solenoid has no power.

Conclusions

Improvements

My results did not meet my expectations very well. I was hoping that the open time would be shorter and that the valve would be fully closed. Next time, I will most likely replace the plastic solenoid valve with a brass version that has no pressure requirement. This will allow me to use a container that has little to no pressure and I will not have to worry about water building up in the pipe. Additionally, I had wanted to use load cells to determine when the valve should be turned off, but instead I made it completely timer based. As such I think I will use water level sensors to determine when the valve should be set off. Thirdly, using protothreads to do the timing is not as accurate as I would like it to be, as it takes longer than it should to shut the pipe off. Next time, I will most likely get an external oscillator or crystal and build it on a PCB board instead and use RTCC to do the timing rather than protothreads.

Intellectual Property Considerations

To the best of my knowledge I did not resuse someone else's design. The code uses protothreads which is in the public domain. This project is not reverse-engineering a design and as such there are no patent or trademark issues. No non-disclosure agreement was neecessary for any part of this project. There may or may not be, but more likely not as there are many automatic water dispensers available. There may or may not be publishing opportunities available, but research would have to be done first.

Ethical Considerations

Throughout the project, I ensured that any circuitry that did not have to be near the water container was as far away as I could possibly get it. Additionally, power supply for the solenoid valve was always within the stated limits on the Adafruit website, I did not ever try to go above the 12V limit. Whenever I tested with the water, I ensured that it was always above a trashcan to prevent any water from spilling on the floor and causing someone to slip. Anytime water did spill, I used paper towels to clean it up right away. Furthermore, I have stated all my results as well as the problems I have run into during the lab and the problems with the current design. I have not accepted bribes of any form or kind. During the project, when there were things I did not understand, I would ask Bruce or one of the TAs to clarify so I could get a deeper understanding of the role a specific component plays. The resources that I used during this lab have been acknowledged in the References Appendix and code that has been provided has also been acknowledged in the existing patents, copyrights, and trademarks section.

Legal Considerations

There is no legal consideration that I am aware of, although I suppose that before the device is actually used for humans or pets, it must be made of materials that will definitely not cause any harm to the human or pet.

Appendix A

The group approves this report for inclusion on the course website.

Appendix B: Schematics

Appendix C: Budget Table

Appendix E: Code

Main