For our ECE 4760 final project, we created a maze game playable on a PIC32 series microcontroller via a Python interface on a PC. This game is complete with three different difficulty levels as well as a two player mode which allows you to race to the finish against an opponent. We also include a time trial mode which allows users to keep track of highscores in the form of how quickly they can complete a maze at a given difficulty. The Python program includes a GUI which enables the user to change game modes, view highscores, and generate new mazes from a PC.
To play our game, the user opens the Python program which launches a GUI to control the game. From the GUI, a player can select their desired difficulty as either easy, medium, or hard. They can choose to play in single or two player mode, and can toggle time trial mode on or off. Once they have selected a game mode they are satisfied with, clicking the “New Game” button will generate a maze on the PIC32’s TFT display. When the maze is generated, there is a red square in the top left of the screen with a circle inside of it; this is where the user begins the maze, and the circle is the user’s player. A green square in the bottom right corner is the target exit point of the maze. Getting to this square is how the user completes the maze and wins the game! In order to move their icon, player 1 uses the WASD keys to move up, left, down, and right respectively. In two player mode, the second player can use the arrow keys to move their icon.
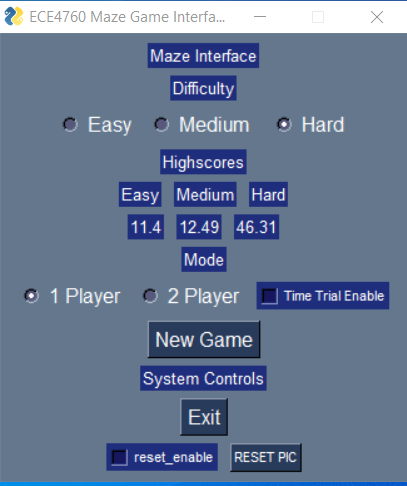
Figure 1. The Python GUI used to change the game mode.
The different varieties of gameplay allows for people to enjoy the maze game in different ways. For example, one could relax in free play mode, not worried about time trials or beating another player, and just make their way through the mazes at their own pace of enjoyment. More competitive spirited players can choose to race the clock or each other to try to beat highscores and establish a legacy as the fastest maze solver in the history of ECE 4760.
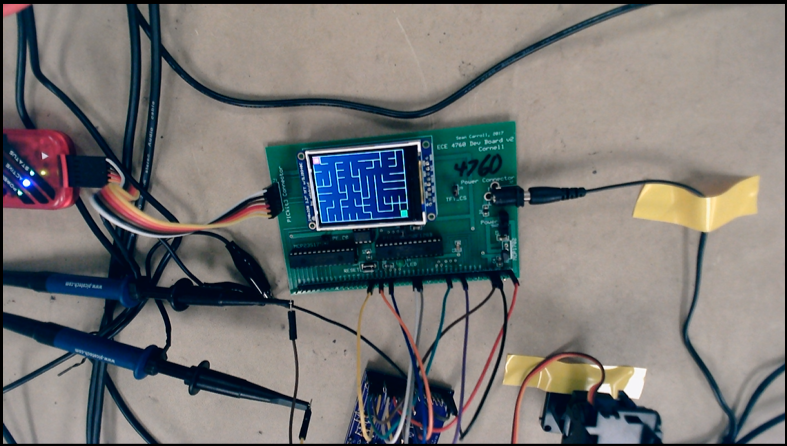
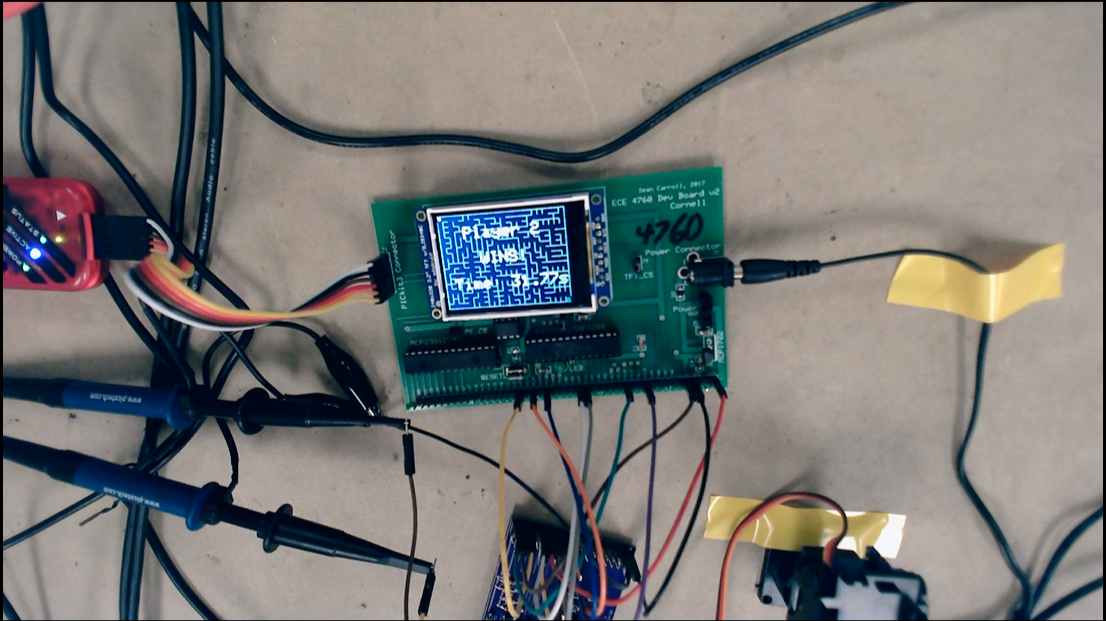
Figure 2. The TFT display with an "Easy" maze displayed.
The generation of mazes of varying difficulty was created through the use of Prim’s Algorithm. To create a maze, the algorithm can be run on a grid of nodes, where each node represents a portion of the maze. The algorithm starts on a given node, which can be selected manually or randomly from the nodes in the graph. In this implementation, the starting node is selected randomly. The next step is to add nodes that border the starting node to the frontier set. When a node is added to the frontier set, a backpointer is saved pointing to the maze node it borders. For example, when the starting node adds its bordering nodes to the frontier set, the backpointer for each of these nodes is the starting node. To grow the maze, a new node is randomly selected from the frontier set. The wall between the selected node and its backpointer node is knocked down, adding the selected node to the maze. Once the selected node is added to the maze, the bordering nodes are checked to see if they are eligible to be added to the frontier set. A node is eligible to be added if it both has all of its walls, meaning it is not already part of the maze, and is not already in the frontier set. This prevents loops from being created in the maze. The process of selecting nodes from the frontier set, knocking down a wall to add it to the maze, and adding its eligible bordering nodes to the frontier set is repeated until the frontier set is empty. The frontier set will only be empty once every node has been added to the maze, meaning the user is able to access every part of the maze. At this point, the maze generation is complete and an arbitrary exit can be added to the maze. In this implementation, the bottom right corner of the maze was selected as the exit. The generated maze is displayed by the PIC on a connected TFT display.
This game contains support for multiple different modes including single player, two player, and time trial, as well as easy, medium, and hard difficulties. To interact with the game, the user can make selections on a Python interface displayed on the computer. The user also uses this interface along with the arrow/WASD keys to move the player icon. The computer then sends this data to the PIC over a serial connection.
Figure 3. The winning screen of a Player 1 victory in Time Trial mode.
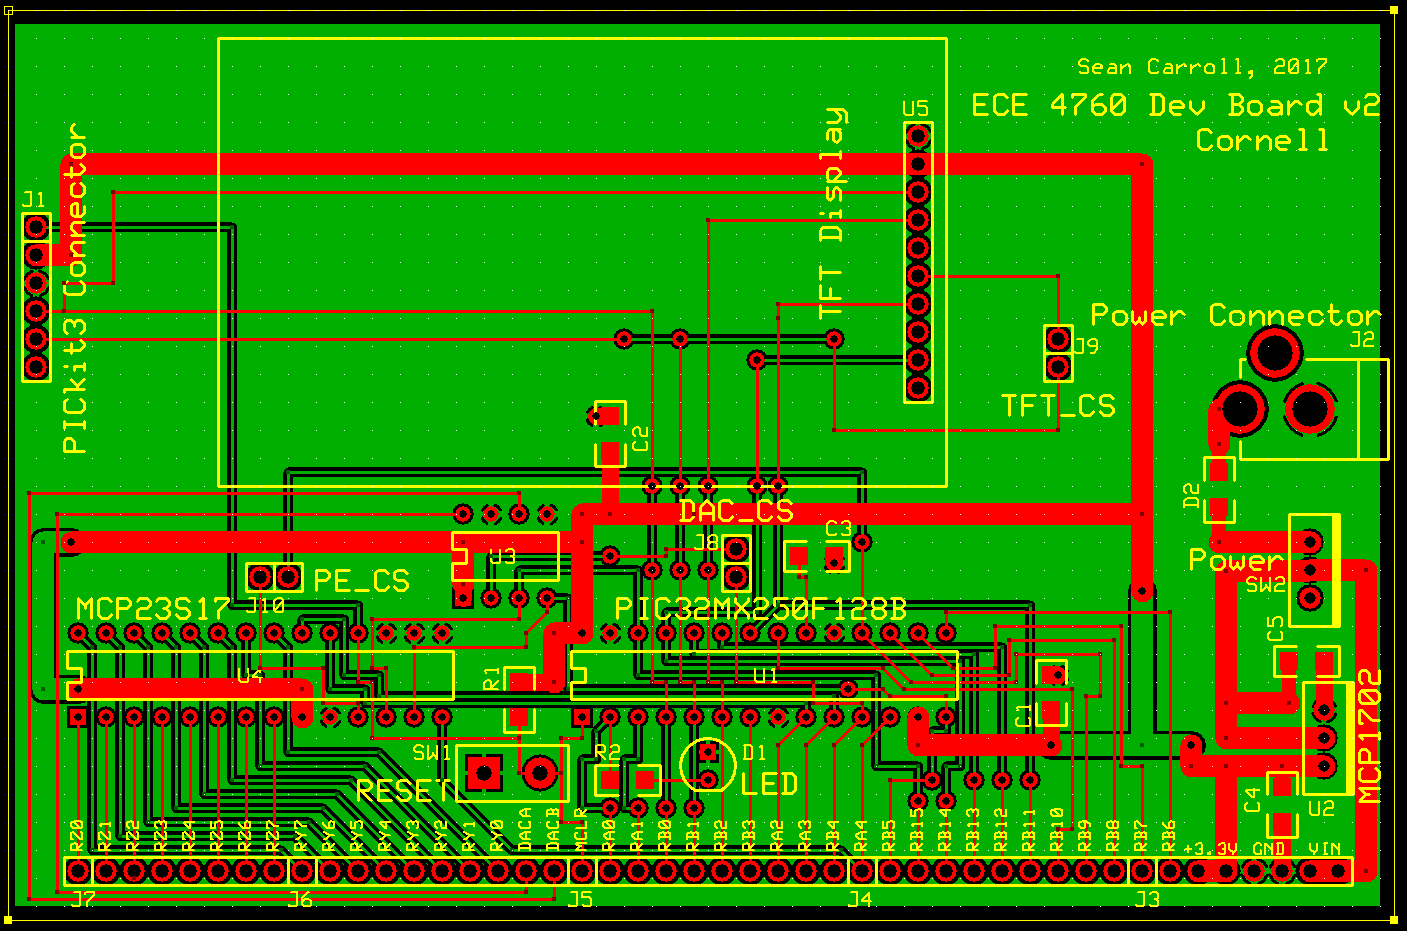
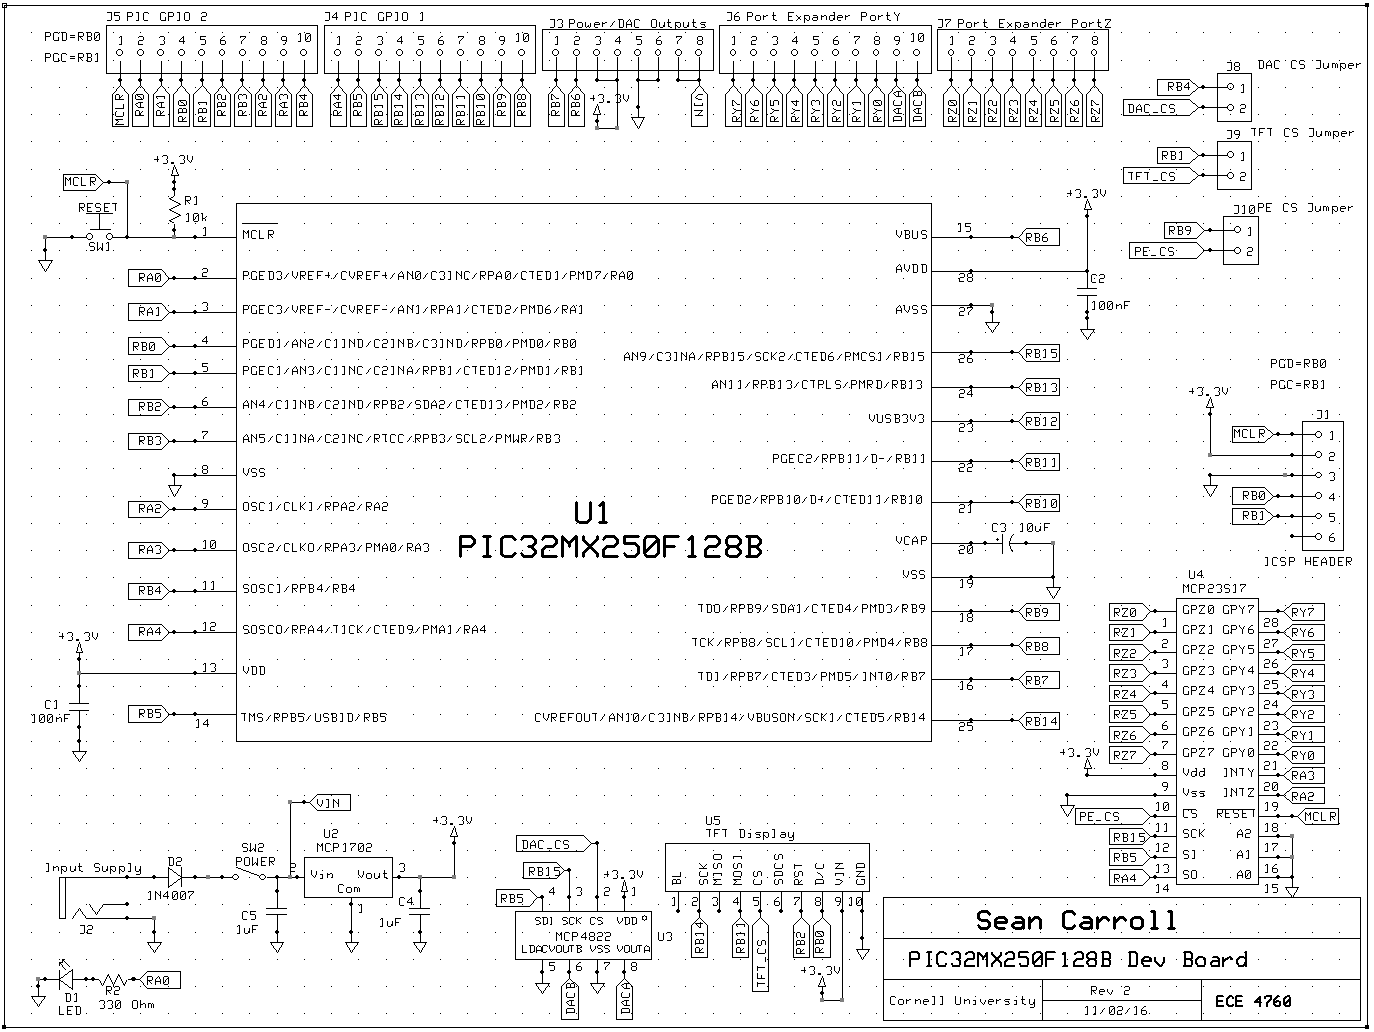
Figure 4. Layout of the Sean Carroll Big Board.
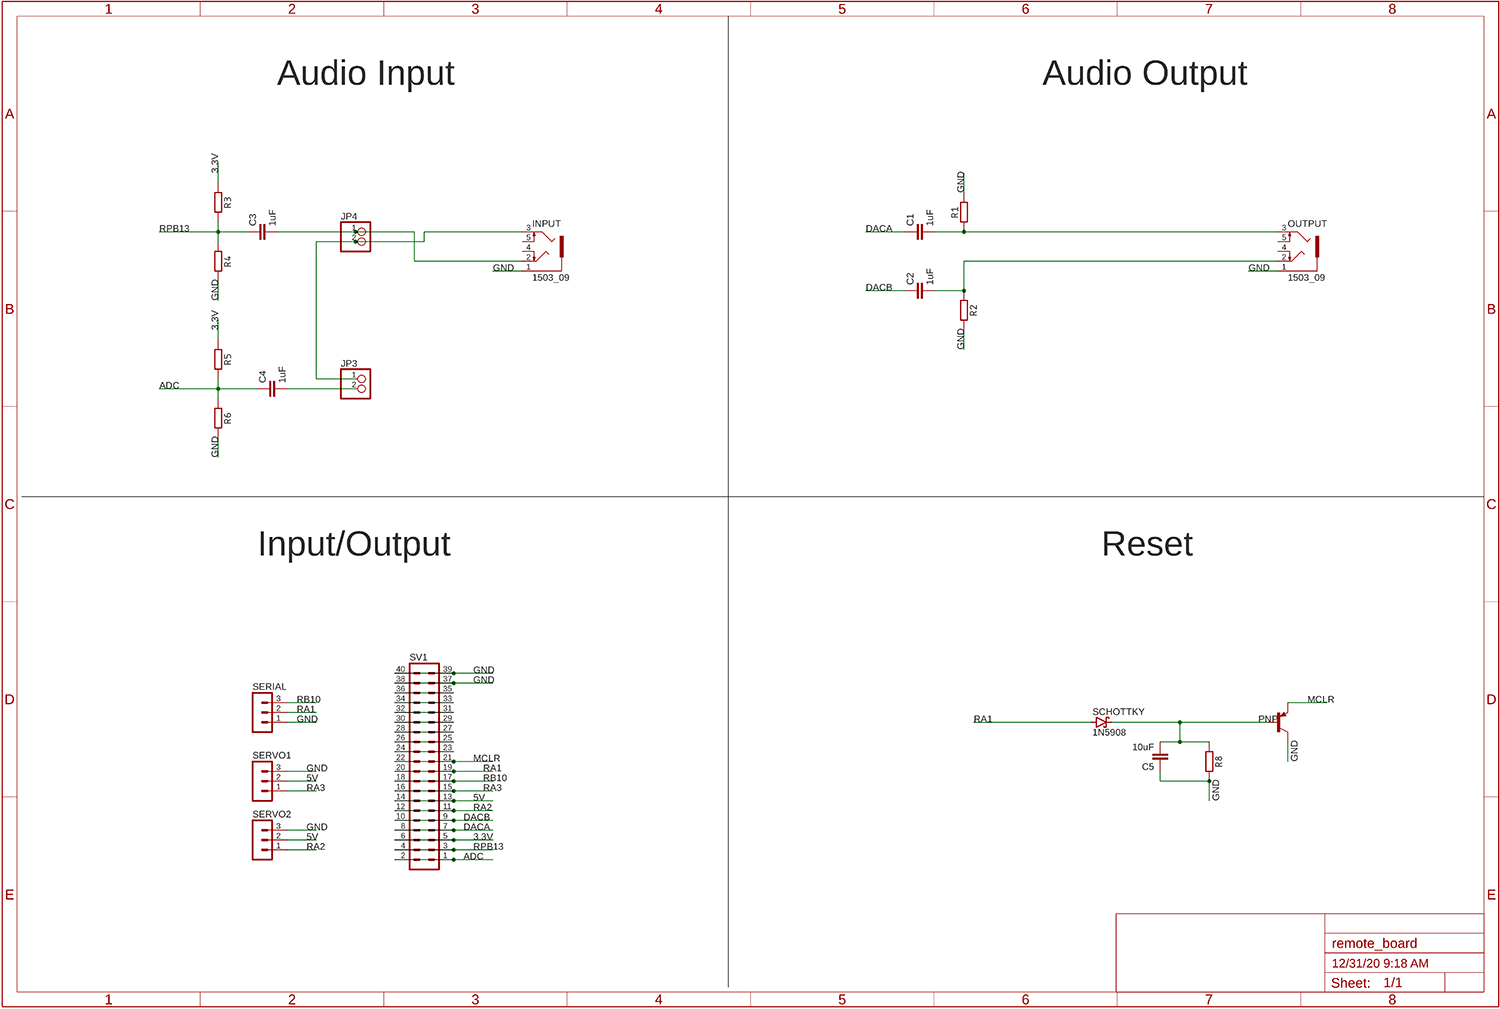
This project was created using a PIC32MX256F128B microcontroller and a serial interface to a PC. This was done using Sean Carroll’s Big Board (SECABB), a former Cornell ECE who designed the board for this course. This lab also utilizes some key hardware from the remote development board developed by V. Hunter Adams for this course. This board enables us to reset the PIC32 remotely from the Python interface, using the reset hardware shown in the figure below:
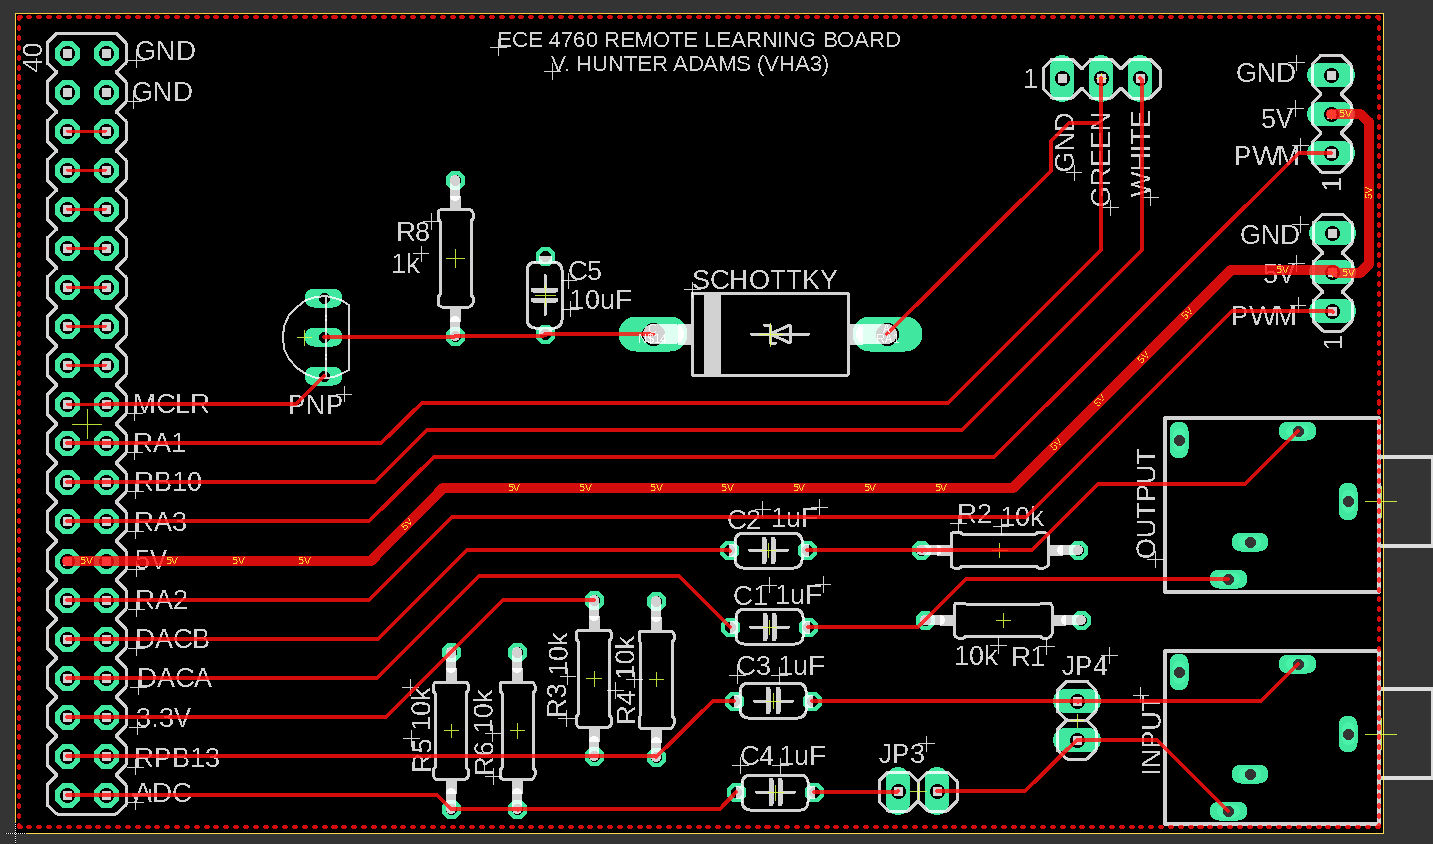
Figure 5. Layout of the Remote Learning Board.
We utilize the TFT display as well as timer2 in this project. The TFT display is the screen where the game displayed, so this is core to the functionality of our game. We include the tft_master.h and tft_gfx.h header files to configure and update the TFT in accordance with the intended behavior of our game. In main, we set up the TFT by calling tft_init_hw() and tft_begin(), and we set rotation to 1. This rotation makes it such that the origin is in the top left of the screen, the x-axis grows to the right, and the y-axis grows down.
Timer2 was utilized to implement the time trial functionality of our code. In main, we configure this timer to interrupt every 10ms, and we also reconfigure it to do the same in our New Game thread, as long as time trial mode is enabled. This allows us to increment a counter every hundredth of a second, which allows us to keep track of how long the user/users take to complete the maze. We close this timer in our endgame thread, which captures the time it takes to complete the maze accurate to one-hundredth of a second. We set the timer up with a prescaler of 16, and a timer_match value of 25,000. This results in an interrupt every 400,000 cycles. Since the main clock is 40MHz, 400,000 cycles corresponds to the 10ms period we sought.
It is also worth noting that the protothreads library utilizes timer1 behind the scenes, and therefore as a result of our use of the protothreads library, we use timer1 in this project. One interesting protothread call that we make in our code is a call to PT_GET_TIME() at the beginning of a new game. This call allows us to somewhat randomly choose a random seed to generate mazes from. Since this call is triggered by user input, we can expect the random seed generation to be adequately random, such that different mazes should generate each time a user tries to play.
The software for this project includes generating and displaying a maze, as well as handling users moving through the maze and different play modes. The process of generating a maze begins with drawing a grid to the TFT. The size of this grid is determined by the selected difficulty of the maze. The easy difficulty corresponds to a maze 12 nodes long and 9 nodes high, while medium is 16x12 and hard is 24x18. These dimensions were chosen to match the TFT display height to width ratio such that the square nodes would fill the screen. The left and right x and top and bottom y coordinates of the TFT screen edges were hardcoded to be 320x240 (the dimensions of the TFT), but could be changed to accommodate a different sized screen. The horizontal length xlen in pixels of each node is then calculated by subtracting the x coordinate of the right side of the screen by the x coordinate of the left side of the screen, then dividing by the horizontal number of nodes of the grid. This is then repeated using the y coordinates to calculate the vertical length ylen of the node. Since the grid dimensions match the height to width ratio of the TFT, the nodes are all squares. However, the grid ratio could be changed and still produce a correct maze with rectangular nodes.
Once these values are calculated, the TFT display is cleared by coloring the entire screen black. The grid is then displayed on the TFT by drawing a vertical white line every xlen pixels and a horizontal white line every ylen pixels. To create the entrance and exit, the left side of the top left grid cell and the right side of the bottom right grid cell are colored black. To make these cells more obvious, the starting cell in the top left is colored red and the exit cell on the bottom right is colored green. Since xlen and ylen are calculated using integer division, their values are rounded down to the next integer. When drawing the grid, this could result in the grid not filling the whole screen. To account for this possibility, black rectangles are drawn from the end of the drawn grid to the end of the TFT screen in both the horizontal and vertical directions.
After the grid is drawn on the TFT, the maze is generated and drawn on the TFT by removing grid lines. Before the maze is generated, the node modules are instantiated and placed in a 2D array. To eliminate the need for dynamically allocating and deallocating memory, the maximum number of supported nodes are instantiated and reused with each new maze. Since the number of nodes is limited by the memory of the PIC as well as what is visible on the TFT, the maximum number of support nodes is equal to that used in the hard difficulty, which consists of 432 total nodes. The nodes are arranged into a 24x18 2D array such that nodes can be indexed by their position in the grid. Each node object contains an int8_t value for its x and y coordinates, as well as 4 values to represent if the node has its north, south, east, and west walls. It also contains 2 values for the x and y coordinates of its backpointer node and 1 to represent if it was in the frontier set or not. Each node starts with all of its walls and a backpointer of NULL.
To create the maze, a node is randomly selected from the nodes array. A findValidNeighbors helper function is then called to find which bordering nodes are eligible to be added to the frontier set. The findValidNeighbors function takes in the current node as an argument and adds eligible bordering nodes to a neighbors array where each index represents the eligible node in a designated direction. For example, index 0 of the array is the node directly above the current node. To determine if a bordering node is eligible, the node is first checked to see if all of its wall attributes are 1, meaning the node still has all of its walls. The frontier attribute of the node is also checked to ensure the node is not already in the frontier set. If the node has all of its walls and is not in the frontier set, it is added to the neighbors array at the appropriate index. The backpointer values of the node are set to point to the current node and the frontier attribute is set to 1. For example, if the node to the right of the current node is valid, the x backpointer of the right node will be set to -1 and the y backpointer will be set to 0, meaning that the x coordinate of the point that added this point to the frontier set is 1 less than the x coordinate of this point. If a neighboring node is found to not be eligible, that index of the neighbors array is set to NULL. If the current point lies on the edge of the grid, the index corresponding to the direction beyond the grid is also set to NULL.
Once the function returns, the valid nodes in the neighbors array are added to the frontier set. A node is then randomly selected from the frontier array and is added to the maze by knocking down the wall between the selected node and the node that added it to the frontier. The helper function knockDownWall takes two nodes as an argument. One node is the selected node, and the other node is the one that added it to the frontier set, indexed from the nodes array using the backpointer coordinates of the selected node. The function compares the coordinates of the two nodes to determine which wall to knock down. For example, if the selected node is to the right of its backpointer node, the attribute representing the west wall of the selected node is set to 0 and the east wall of the backpointer node is set to 0. The x and y coordinates of the node closest to the origin are then multiplied by xlen and ylen to calculate on which pixels of the TFT the wall is drawn. The wall is then “erased” from the TFT by coloring a black line over the wall segment.
Once the maze has been generated and displayed, the protothreads library is used to control the game. The protothread_serial parses serial data sent from Python, and uses it to set the proper flag so that the handler thread for that particular event will be scheduled. If a button event occurs, the new_button flag is raised, if the user sends a string, the new_string flag is raised, etc. The python_string thread handles specific messages from the user command line, and can write a response to the Python GUI text box. This thread was used only for debugging when necessary, and was not actually used in the final version of our code.
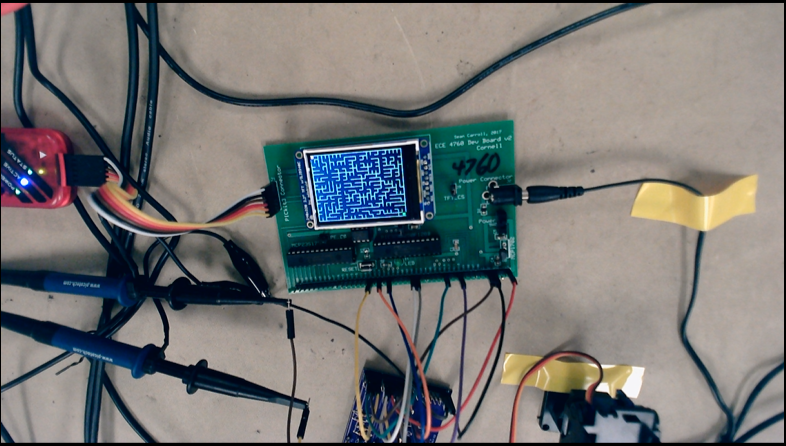
Figure 6. The TFT display with a "Hard" maze displayed.
Protothread_serial is an important link to the python/user input side of this project. This thread allows us to encode various messages from Python to key events as part of the maze game. For example, we use this thread to signal the NewGame thread, the keypush thread, and the aforementioned python_string thread. The NewGame thread is signaled by protothread_serial whenever the New Game button is pressed down on the python interface. The keypush thread is signaled every time the user presses or unpresses one of the 8 keys associated with moving player 1 or 2. It then checks if the key was pressed or released and to which user the key belonged. If a key was pressed, the move variable of the appropriate user is set to the direction of movement, otherwise the user does not move.
The NewGame thread is called at the beginning of every new game initiated by the user. Before pressing the new game button, the user would have configured their preferred game difficulty and mode, and this thread simply captures that information and uses it to generate a maze. For example, if the user selected easy mode, protothread_newgame sets the dimensions of the maze to be 12x9 by setting dimensionx to 12 and dimensiony to 9. It then sets xlen and ylen to be the appropriate length and width of a grid cell. At this point, the game is initialized by calling drawGrid(), srand(PT_GET_TIME()), which creates a random seed, generateMaze(), and drawPlayer(). If time trial is enabled, we start timer2. At this point, the game is ready to begin!
Protothread_player drives player icon movement during the game. The keypush thread is responsible for setting the user direction, which is used in this thread to update the user position. This thread yields for 10msec between iterations to ensure that user icons do not move too quickly. If two player mode is not enabled, the second user icon is not drawn or updated. This thread is also used to determine a winner/signal the endgame thread by checking if either player’s icon has entered the winning grid square. Importantly, this thread is responsible for ensuring that user icons stay on the midline between grid walls, and it does so via the canMove function. Based on the existing walls of a particular grid cell, we can determine the locations which are legal to move to. As shown in the figure below, the red lines shows where a player is allowed to move. If the player is not centered left and right on a cell, but would like to move down, we snap them to the center of the cell they are at if it is legal to move down, and then move them down. This ensures a player always stays along the red line without having to be perfectly centered when changing directions.
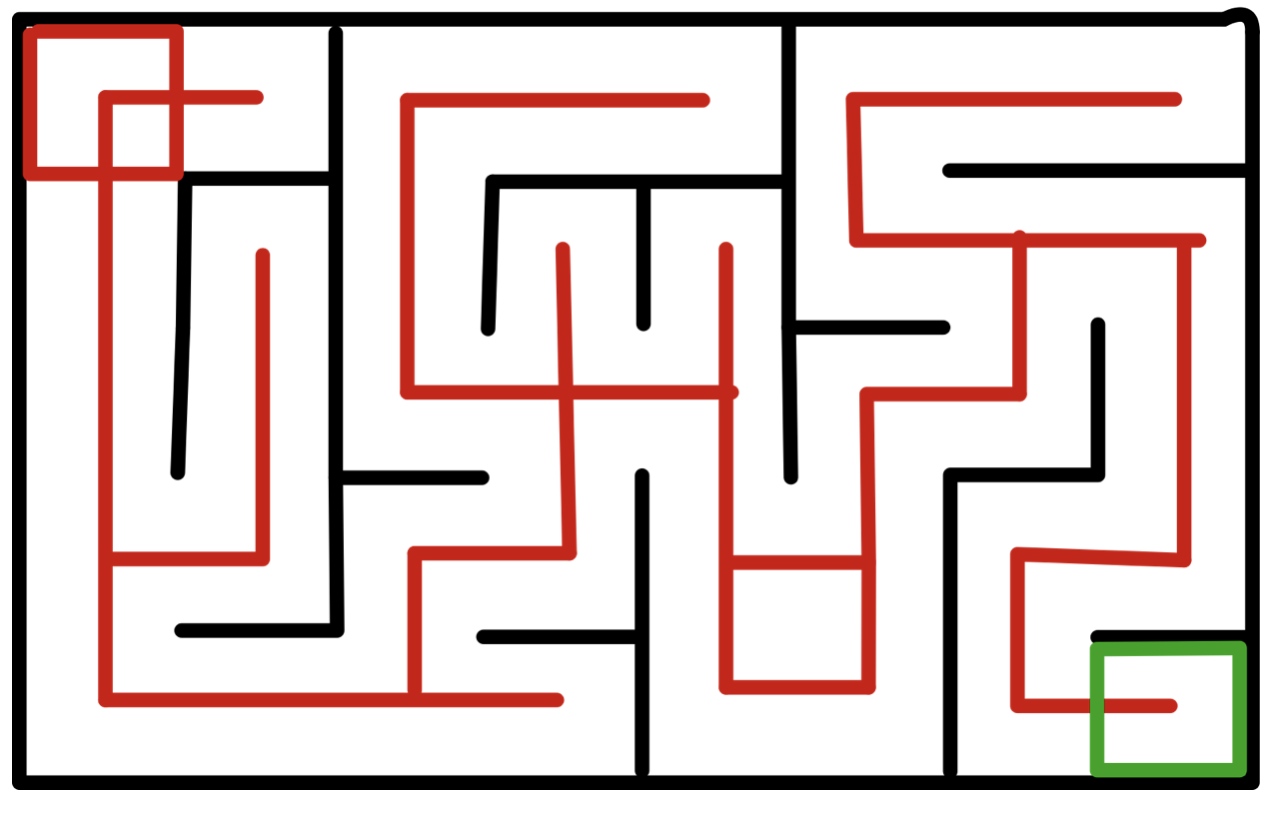
Figure 7. Visualization of the canMove function.
Protothread_endgame is signalled by the game_overFlag whenever a player enters the ending node. The game_overFlag is first cleared, then Timer2 is disabled. If the winner has not yet been displayed, the phrase “Player X Wins!” is written to the TFT, where X is either 1 or 2 depending on which player finished the maze first. If time trial mode is enabled, the message will read “Player X Wins! Time: ss.hh” where ss is the number of seconds and hh is the number of hundredths of seconds taken to complete the maze. The time and maze difficulty are also written back to the Python GUI. When the GUI receives the time and difficulty, it compares the time to the current fastest time for the given difficulty. If there is no current fastest time or this time is the new fastest time, the received time is set as the new high score and displayed on the GUI. To store the fastest times more permanently, the fastest time for each difficulty is written to a maze_highscores.txt file. This file is written to and read from by the Python program, and the data is stored until it is overwritten or the file is deleted.
In order to complete the project, we added functionality incrementally and tested each feature extensively before moving on to the next one. We began our project by generating a maze using Prim’s algorithm. The first iteration of our maze was built using Python; this allowed us to code and debug using high-level functions and let us abstract away memory management that we would eventually have to do on the microcontroller. We then printed out an ASCII representation of our maze in order to verify that the maze had a beginning, an end, and a path connecting them together. We also used this representation to make sure that our maze contained no loops.
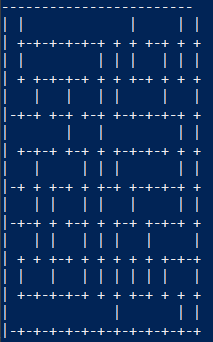
Figure 8. String representation of a generated maze used for debugging.
Once we were able to verify that our high-level algorithm was correct, we ported our code over to C. Unlike Python, C does not contain simple array-manipulating functions like len() and append(). Thus, we had to expand on many of the abstract Python functions to create the same functionality in C. One example of this was checking the length of the frontier array when deciding whether the maze generation was complete. In Python, we could just use the len() function on the frontier node list. When writing the code in C, we create an array with length equal to the number of total nodes in the maze. This is overkill, as there will never be a situation where the frontier array needs to hold every node in the maze. However, we did not want to get a segmentation fault in a corner case if the array overflowed. In order to check how long the frontier array was, we created start and end variables that tracked the index of the first and last nodes in the frontier set. We then calculated the difference between those two variables to get the length of the frontier array. Testing our C maze generation code was a little tricky, as we had not written any code to display the maze on the TFT. Thus, we used the same ASCII representation as before and printed the output to the Python GUI. With this method, we tested the maze generation code in isolation to verify its correctness.
The next feature that we added was drawing the maze on the TFT display. We began by testing the Easy difficulty, which generates a simple maze that is easy to debug. Initially we ran into a problem where if the node sizes did not divide evenly into the TFT screen’s dimensions, the nodes got cut off. We amended this issue by filling in the extra space on the TFT with black and modifying the dimensions that the maze generating function used to calculate node sizes. Effectively, this caused all the nodes to fit within the given bounds and cleaned up the display. Once the easy maze worked, we easily extended the generate maze function to handle a medium and hard-sized maze.
In our game, we also wanted the user to be able to start a new game when they completed a map. We tested this out by finishing the initial maze then generating a new maze. At first this caused the PIC to reset, so we thought we were using too much memory on the PIC. However, after examining our code we found that we did not re-initialize our start and end variables, causing an array out-of-bounds error. After fixing this mistake, we were able to generate new mazes whenever the player desired.
An important feature of our game is the ability to move the player with the WASD keys. This required us to import a keyboard module into our Python GUI to register key presses. Testing the module had several components. First, we tested that the Python to PIC serial communication worked correctly by printing the key presses to PuTTY. We then drew a big white blob on the center of our maze and attempted to make it move with key presses. Once we got this working, we tested moving the player cursor within the defined lines of the maze. Initially, the player would sometimes get separated from the middle of a node, causing it to move over and through walls. We could see this when testing, as the player would overwrite and delete portions of walls when it passed over them. We remedied this issue by moving the player to the center of a node whenever key presses were detected. This forces the player to move within the lines, and makes it easier for the user to control the player through the maze.
When we tried to get the player to move at a set frame rate to make the movement appear smooth and to control the speed at which the player moved, the player thread got called once and then was never scheduled again. This caused the player to not respond to key presses, stalling the player in its initial location. We realized that we had not enabled system-wide interrupts, meaning that PT_YIELD_TIME_msec() could not interrupt and schedule itself again after a certain number of milliseconds had passed. Once we enabled interrupts, we were able to use an update frame rate of 100fps that gave us a manageable player speed.
After getting the basic functionality of the game working, we decided to add a multiplayer mode that allowed two players to race each other to the finish. One problem we had when testing this occurred when player 2 crossed over player 1 and player 1 did not move. This would cause player 1 to disappear. We realized that we had optimized our code so that the player is not redrawn unless it was moved; however, with two players this would cause one player to delete another until the other player moved again. We fixed this bug by redrawing each player every time the player thread runs, the tradeoff being that the thread will take longer to execute.
Finally, we added a time trial mode that lets users track their highscores on different maze difficulties. We decided to display the highscores on the Python GUI, so we had to communicate the completion time serially to the lab PC. We tested that the data transferred from the PIC was formatted correctly, and then parsed and displayed it on the GUI. We got the window to update by attaching a key to the text element, then calling the update method on that key.
Our final design features a maze game with singleplayer or multiplayer mode, three difficulties, and a toggleable time trial mode Additionally, it has a high score tracker for fastest maze completion time at each difficulty when time trial mode is enabled. Below are videos of gameplay that highlight different features of our game:
Figure 9. Playthrough of an "Easy", "Medium", and "Hard" maze in Single Player mode.
The first video highlights single player gameplay with time trial mode disabled. Initially, the player attempts to solve an Easy maze, navigating with the WASD keys. We see that the player cannot move closer than half of a node width to a wall. We also see that the player cursor will slightly snap back to the middle of a node if the player tries to move towards an open section but is not exactly in the middle of the node. This is necessary to keep the player within the tracks of the maze and to prevent the player from crossing walls. Once the player reaches the green box at the end of the maze, we see the game-winning message displayed across the screen. Even though the game has ended, the player can still move around on the screen. We decided to include this feature, as it is fun to travel down other paths on the maze after you finished just to see where they end up. After we complete the easy maze, we then set the difficulty level to Medium and click New Game, which redraws the maze. Now, the player finds their way through the more difficult maze. Once the green square is reached, the same win message is displayed on the TFT. Finally, we set the maze to Hard mode and beat it to see the win screen once again.
Figure 10. Playthrough of a "Medium" maze in Two Player mode.
The second video has two-player mode enabled, and we can see two dots representing the players on the TFT. The first player is still controlled with WASD, while the second player uses the arrow keys to navigate the maze. Both players can cross over each other without deleting the other cursor, meaning our animation is robust. Each player can also move independently and fluidly, without the screen flashing or the dots jumping around. This proves that handling two players along with our threading overhead does not break the illusion of concurrency on the PIC. Each player races to the finish, and we see that once one player wins, the winning screen congratulates that player. Like in single player mode, both players can still move around, erasing parts of the winning message and exploring other maze paths. Even if the player who lost finishes the maze, the winning screen still specifies the original winner. Thus, we will not have a situation where the real winner is dethroned by a poser.
Figure 11. Playthrough of a "Medium" maze in Two Player mode with Time Trial mode enabled.
The last video enables time trial mode, which opens a timer when the New Game button is pressed. That timer runs until the first player reaches the end of the maze, then displays the completion time alongside the winning screen. In the Python GUI we see that the high score for the medium maze is updated to the player’s completion time. Now, we play a new medium maze and have a player beat the old high score. The Python GUI updates to display the new high score, and the players can keep trying to lower their completion time on each difficulty!
To animate the player, we use the protothreads_player thread. This thread yields for 10 ms at a time, so we end up with a framerate of 100 fps. This speed was chosen because it moves the player at an adequate speed across the screen. As a result, it is also not very jumpy, and results in a rather smooth playing experience for the player.
When we first began drawing mazes on the TFT, we were unsure as to whether the limitation on the largest feasible maze size would be the user visibility of the screen through remote desktop, or the memory of the PIC microcontroller. We drew grids of various sizes on the screen, with the individual grid squares getting progressively smaller until we determined we would not be able to play the game easily, or until the PIC reset from overflowing memory. When allocating a 36x27 maze, the PIC reset, so this was the breaking point for how big a maze could possibly be on the PIC. As a result, we chose the maximum size maze for the hard difficulty to be 24x18.
Our design met our expectations nicely. Every feature that we planned to implement worked as we intended, and our development process was pretty efficient. One of the most worthwhile things we did as part of this project was to implement the maze generation algorithm in Python first, and then port it over to C afterwards. This allowed us to verify the logic of the algorithm in a language like Python that is easily manipulated, which gave us confidence it would work correctly as we transitioned to the PIC32 as our target device.
Next time, we might be more aggressive in our attempts to optimize the number of nodes we are capable of displaying on the screen. In an ideal world, the user would have the PIC32 TFT screen right in front of them, and would not have to view it through a zoom screen. In that case, it may have made more sense to push the size of our hard level maze even further, as the user would be able to more easily see the maze. We could have made each node as small as possible using just a single bit for each wall, N S, E and W instead of using shorts. In doing this, the size of a node struct would decrease significantly and the space in memory it takes to store a maze would be largely reduced.
There are no patent opportunities as part of this project, nor did we have to sign an NDA. Our design did not have any safety considerations, considering it was playable via a remote desktop interface. There are no parts of this design that can hurt anyone (expect maybe the loser’s feelings).
As a part of this project, we would like to credit Christian Hill for providing a Prim’s Algorithm implementation in Python which we adapted slightly to fit our needs. You can find Christian’s code at the link in Appendix F.
According to the IEEE code of ethics, it is essential to maintain and improve our technical competence and to undertake tasks for others only if qualified by training or experience. As part of this project, we all gained valuable experience working with microcontrollers, and improved our technical abilities. We tried to avoid harassment/bullying behavior by allowing users to choose non-competitive modes of gameplay, so users don’t need to feel obligated to ‘win’ or beat an opponent. We wanted to avoid a situation where our game allowed someone to feel as though they were lesser than someone else, it’s just supposed to be fun!
The group approves this report for inclusion on the course website.
The group approves the video for inclusion on the course Youtube channel.
Schematic of Sean Carrol's Big Board
Schematic of Remote Learning Board
PIC32MX250F128B: $5
TFT LCD: $10
Big Board: $10
Jumper Cables: $1
Total: $26
We all live in the same apartment, so we were able to work on the entire project together using VS Code Live Share. We did not divide the work into sections for each of us to complete; instead, we planned and worked on each problem as a group to bounce ideas off each other and debug more easily.
Protothreads on PIC32 Reference Sheet
Sean Carroll's Development Boards Reference Sheet
Meet the team:

Jack is a junior ECE at Cornell University. His areas of interest include microcontroller programming and development, and digital ASIC design. He will be pursuing a Master's of Engineering degree in Electrical and Computer Engineering after graduating in the Fall of 2021. In his free time, Jack enjoys playing disc golf and guitar hero with his friends.
Dilan is a senior ECE major at Cornell University. His areas of interest include ASIC verification and embedded systems programming. He will be pursuing a Master's of Engineering degree in Electrical and Computer Engineering after graduating in the Spring of 2022. In his free time, Dilan likes to play the drums and hang out outdoors.

Kyle is a junior majoring in ECE with a minor in Computer Science at Cornell University. His interests include embedded systems as well as computer architecture and ASIC design. He plans on graduating in Spring 2022 and continuing with a Master's of Engineering in ECE. Kyle enjoys running in his free time.