|
Hardware Design
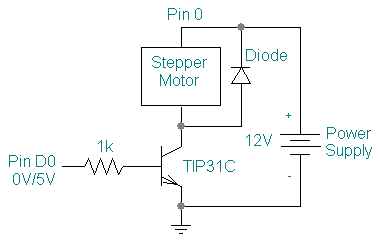
The Stepper Motors The hardware design aspects of this project mainly consisted of driving stepper motors in an accurate way. After performing basic tests on the 12V DC, 7.5 degree stepper motors we were given by Prof. Land, we discovered that the two brown leads were power, while the four remaining leads could be excited in the sequence: blue, red, orange, white, (BROW) to provide rotation to the motor. To initially drive one of the stepper motors we used four TIP31C NPN transistors, each assembled as shown in Figure 3 (one circuit for each of the four control pins). We then wrote a simple test program to step the motor for one tick, by outputing control signals on 4 pins of Port D of the 8515 MCU, exciting each of the coils individually. (Here, a "tick" is defined as one complete cycle through all four coils.) We then had the motor complete one entire rotation of the axle. We found the stepper motor took roughly 50 ticks to complete one revolution. This makes sense, as 360/7.5 = 48. This discovery also proved that our initial conjecture, that the motors had 15 degree resolution, was incorrect. We later attached a length of string to the axle of the motor, and found that one rotation equated to 2.5cm, which is roughly 1 inch.
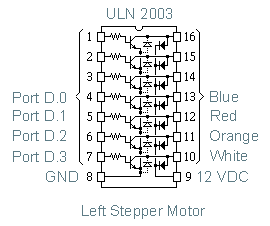
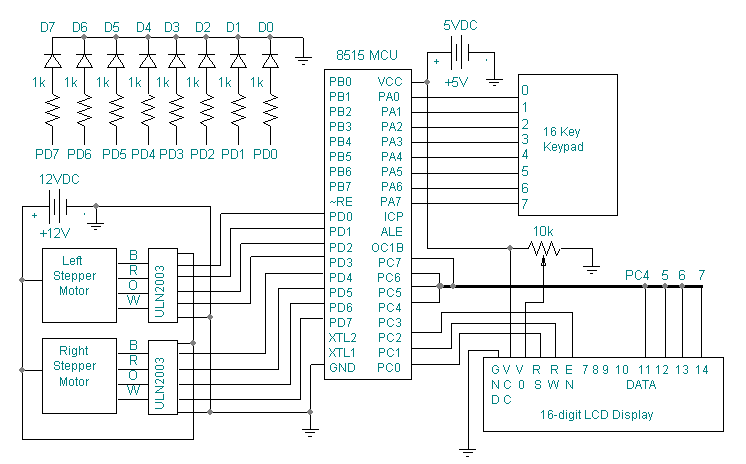
While controlling one of the motors was initially impressive, it did not completely meet our goals. We needed to power a second motor. Instead of building another TIP31C circuit, our propensity towards elegance (and laziness) caused us to choose the 16-pin ULN2003 7x Darlington Transistor DIP. With these we could simply attach our 12V DC supply to pin 9 (shown in Figure 4)1, ground from the supply and the programming board to pin 8, and have the Port D pins connect directly to pins 1 to 7. We could then drive the control wires of the two stepper motors with the 12V outputs of pins 10 to 16. We needed 8 driving transistors, however, so we chose to use 4 pins each of two different ULN2003s. After making the mounting for the dry erase marker, and attaching a sizable length of wire on each of the spools, we found that the stepper motors didn't have enough torque to move the pen around cleanly. So instead of exciting one coil at a time, we changed the logic in our test code to excite two coils at a time. The User Interface Given the time constraints of the project, we abandoned the idea of using a java/web based interface in favor of the 16-digit LCD display and 16-key keypad we had become acquainted with in previous labs. We determined that the user could scroll through menus on the LCD and enter commands with the keypad, and even control the plotter manually for calibration. We wired the LCD display to Port C of the MCU and the keypad to Port A. The LCD required an additional 10k potentiometer for contrast controls, while the keypad could be connected to the 8515's port directly. And because no project is complete without flashing LEDs, we attached a bank of LEDs to Port D, so we could see precisely what the motors should be doing, in case there is a mechanical failure and they stop working. The full schematic is shown in Figure 5 below.
1. Figure 4 extracted and modified from Control of Stepping Motors, a tutorial |