ECE 476 Final Project, Spring 2003
Cindy Jih :: Esther Jun
Introduction
High-Level Design
Program Design
Hardware Design
Results
Pictures
Conclusions
Appendix
References
Program Details
Moving the Frog
The frog moves in four directions: up, down, left, right. We use a keypad to take in user input for the frog’s direction. The keypad assignments are as follows:
- Up: 2
- Down: 5
- Left: 4
- Right: 6
- Reset: A
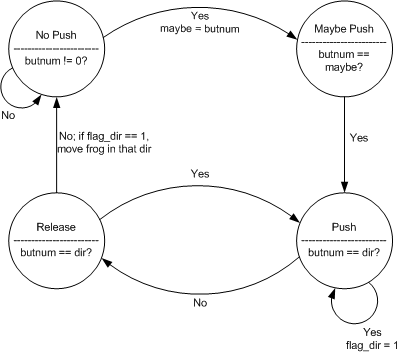
Frogger State Machine
Drawing/Displaying Cars and Logs
To draw the cars on the screen, we used Professor Land’s video_pt() and video_line() functions. We use video_line() to draw the body of the car and use video_pt() to draw the wheels. For the logs, we just use video_line() to draw a rectangle to denote our log. To move the cars and logs across the screen, we erase the current position of the car/log, increment its x-position, and redraw the car/log in its new position. To move the cars and logs at different speeds, we do the erasing and redrawing procedure at different intervals. We use a six-state state machine to draw each lane of cars/logs on the screen so that they are drawn on different frames. Drawing on different frames reduces image corruption and flicker that occurs when all the cars and logs are displayed in one frame.
Detecting Car Collisions
There are three types of collisions that can occur: a car can hit the frog from the right, from the left, or through the middle (either up or down). To detect collisions from the right, we used the upper-right pixel of the frog, and compared this point to all the points on the top row of each car. Similarly, to detect collisions from the left, we used the upper-left pixel of the frog, and compared this point to all the points on the top row of each car. For collision detection through the middle, we compared either the upper-right or the upper-left pixel of the frog with the points on the top row of each car.
Detecting Log-Hopping
For log-hopping, we used the upper-left pixel of the frog and compared this point with the points on the top row of each log. Since our frog is five pixels wide, if the upper-left pixel was less than five from the end of a log, we knew that the frog was not completely on the log, meaning that he fell off. We check this for every log and set a flag high when he is safely on a log. If the flag is low and the frog is in the region where the logs are located, then the frog is not on a log, meaning that he has died.
Resolving Image Corruption and Flicker
Our biggest obstacle during this project has been image corruption and flicker. After we had the basics of our game in place, we had difficulty adding any additional features, i.e. score, displaying text, such as “GAME OVER” or “NEXT LEVEL.” This is because if we were drawing too many images at once, there would be image corruption. So to get around this, we set flags in our functions, and executed the display in main() at different intervals.
Implementing Sound Using Timer2
Timer2 is a general purpose, single channel, 8-bit Timer/Counter module that can be used as a frequency generator. This allows us to produce sound. First, we set TCCR2 to 0x1f, meaning that we toggle OC2 on compare match, clear timer on compare match, and set the prescaler to 1024. We set OCR2 to a certain value, and whenever TCNT2 equals OCR2, it outputs a sound at a certain frequency.
Approaches That Did Not Work
Drawing on Different Lines
When we first started working on Frogger, we were executing code on different lines (e.g. lines 231, 232, etc.) instead of different frames because there was flicker due to displaying too many things in one frame. This was not a good idea because if one line took longer to execute than another, it causes the interrupt to skip lines, giving us a “fuzzy” picture.
Implementing Sound by Modifying Timer1
Once we were ready to add sound to our game, we experimented by trying to incorporate Professor Land’s video sound code into our program. This required modification of the Timer1 interrupt, by toggling the audio bit that outputted to the speakers. This change caused our game to flicker, and there would also be image corruption, which was not acceptable.
Implementing Sound by Using Two Microcontollers
After our first attempt at implementing sound failed, we tried to use another microcontroller (Mega163 with STK-200 board), which was implemented by the Russian Bloc project group last year. We spent a good deal of time trying to implement this idea, however, it was difficult to understand and incorporate it into our project. This approach seemed time-consuming and we did not think we could finish the project using this approach.