1 Matlab Graphical User Interface (GUI) |
| Abstract |
| Usage |
| Design |
| Results |
| Extended Features |
| Future Direction |
| Appendix |
| Acknowledgements |
| References |
Table of Contents:
1.1 Menu optionsThe menu options primarily focus on data input/output, changing between views of different species, color manipulation of general structures, and playing the animation of the spider. These menu options were created to allow for a broader view of the spider. Here is a list of all the menu items that are available, with a short description of each item:
The following menu options provide a friendlier interface for biologists to display by species rather than having to load from data files. Currently, the parameters for the Schizocosa Uetzi species was based on a video sequence generated by Eileen Hebets. The data for the other three species are merely placeholders for future development. For now, they contain synthesized parameters to ensure the program works properly and to display a range of morphological traits.

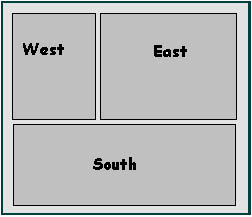
1.2 GUI LayoutThe GUI window is divided into 3 panels. The upper half of the screen contains two panels that have been labelled as 'West' and 'East', while the last panel covers the lower half of the window and is labelled as 'South' . Below is a diagram of the layout:
 The west panel consists of a static textbox which is simply the title of the panel, a listbox with 7 options, and a push button labelled as 'Select'. See diagram below for details:
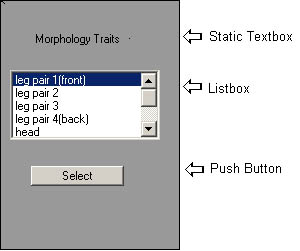 The listbox provides 7 morphological traits for the user to manipulate. However, a callback is not triggered until the user clicks on the 'Select' button. A description of each of the 7 options is provided below: There is a tight coupling between the west panel and east panel. That is, when a user triggers a callback, the GUI components in the east panel will be changed. (See 'east panel' below for details) The east panel can be formatted in two different ways, depending on the listbox option that is chosen in from the west panel. It initially contains the following GUI components:
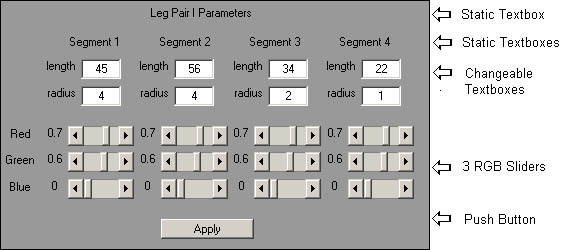
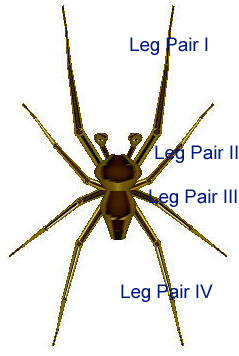
When selecting one of the leg pairs from the west panel (i.e., leg pairs I, II, III, or IV),
8 text boxes and 12 sliders appear in the east panel of the
GUI window as shown in the diagram above. The leg segments are ordered as follows:
Leg segment 1 is the segment closest to the body. Leg segment 2 is the segment next closest to
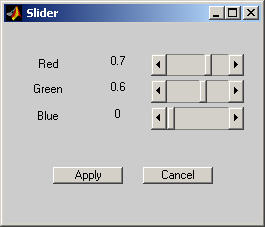
the body. Leg segment 4 is the furthest away from the body. See diagram below for details.  The rgb sliders allow individual leg segment colors to be changed. This option allows the scientist to add color to segment 1 of the foreleg, for example. A more general approach to modifying leg colors as a whole is to use the 'Edit->Color->Legs' menu option. The text boxes allow changing of the each leg segment in length and radius. These units are represented in pixels. There is an important distinction to make between the leg pairs and the rest of the body segments. Selecting one of the other body segments (i.e., head, thorax, or abdomen) will pop up 3 text boxes. See diagram below:
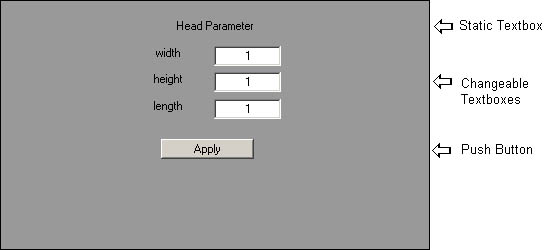 The units represented in one of these boxes relate to scale. That is, a text box will appear for height, width and length. However, in order to change the size of these body structures, a value that is proportional to the default size will need to be entered. The units were done in this way since the head, thorax and abdomen were made up of many different shapes (See Creating the Geometry section for details). Because of this, the units for each body segment was not easily changeable for the user through the GUI. However, the parameters are available in ascii text format so that the user can change the parameter settings for specific body segments easily. This requires some knowledge of the format of the files. See Appendix 1 for formatting details. Individual parameter settings may also be changed by the 'Edit->Advanced' menu option mentioned above in the 'menu options' section.
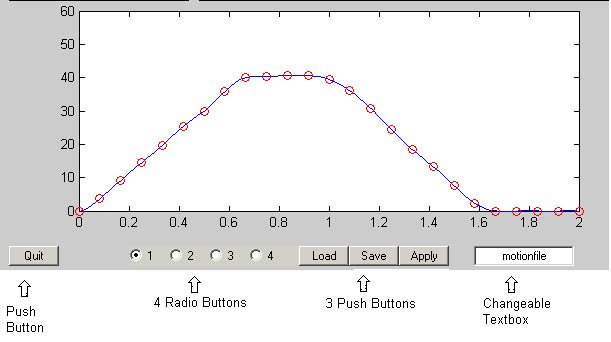 Currently, movement of the spider is limited to its right foreleg. This correlates with the need for 4 moveable joints. Therefore, the 4 radio buttons were created to allow for the user to control movement of each joint by adjusting the angles between leg segments. Angle '1' is the joint between segment 1 and the body. Angle '2' is the joint between leg segments 1 and 2. Angle '3' is the joint between leg segments 2 and 3. Lastly, angle '4' is the joint between leg segments 3 and 4. (For details on leg segment numbering, see diagram of leg segments above in the East panel section). Consequently, each radio button correlates with a plot. These plots are spline interpolations which allow the user to manipulate the angle of movement corresponding to time intervals. That is, the y-axis corresponds to the angle of rotation (relative to its resting position), while the x-axis corresponds to time intervals. Note that the joints move in only one direction. This is to prevent the user from creating unrealistic simulation of the spider. Therefore, it is important to note that the y-axis is the absolute value of an angle of rotation. This means that the movement of one joint may be in a different direction than the movement of another joint, even though all correspond to positive angle values on the plot. Since the plot is a spline interpolation, 25 data points (shown as red circles) in the graph above can be positioned through mouse clicks on the plot. Once the angles are positions correctly, click on the 'Apply' button to see the simulation in affect. In the backend (i.e., the implementation), the 25 data points actually correspond to 120 time steps. This essentially makes the animation appear smoother since finer differences in angles are being interpolated and passed into the OpenGL program for spider rendering. A description of each push button is provided below:
1.3 Data Input/Output:
All motionfiles are in a '.mat' file format. Therefore, these files are not changeable through manual human intervention. However, another Matlab program can be written to automatically generate such data files. For the spider animation, if a predetermined motion is desired, a text box is supplied at the lower right corner of the south panel, rather than as an option in one of the menus. This is to avoid confusion with loading of morphological traits. Once the file is entered, clicking on the 'load' button to its left will load the data into the GUI application.
|
||||||||||||||||||||||||||||||||||||||||||||||||||||